To pin my projects to Pinterest, hover over the picture and a Pin-it Button will magically appear.

Wednesday, November 9, 2011

Whimsical Wednesday Challenge: Happy Turkey Day!

Happy Whimsical Wednesday, my crafty friends! :o)

The Whimsical Wednesday challenge this week is Happy Turkey Day! Create any type of project that has a Thanksgiving theme. The holiday season is upon us. :o)

I chose to make a card for a loved one. Let me tell you, the journey of this project was nutty. When I sat down Monday to make it, I had a plan drawn up for a silly scene surrounding a pie-eating Create a Critter turkey. One tiny change led to another and I could only laugh at this final product. The exact opposite of my original plan! Fun turkey will be soon... this week I felt the urge to use a stamp that my sweetheart bought me a couple months ago. :o)

"Thanksgiving Blessings From My Heart To Yours"
(Using a paper backdrop that's the exact same as my card background was less than brilliant. My apologies.) As you all know by now, the baking I do for others is all about the love factor. Baking up a plate of cookies to share during the Thanksgiving prep is a special blessing for us, very much in tune with the sentimental aspect to all holidays. So my card is to celebrate those tiny blessings. Big or small, every gift, gesture, or hug comes straight from my overly sappy heart.

It's unfortunate I was photography-challenged when snapping this picture. It's quite cute in person, with little tiny details that don't really show up in this small, unclear image. This sweet baking Willow from Elisabeth Bell has a Stardust-coated bow, belt, and heart accents on her pants.. because she's sparkling with holiday cheer. The best way to bake is wearing fuzzy slippers, so I snipped up some tiny pom poms and adhered them to her orange slippers with Glossy Accents. I'd love this stamp to pieces anyway, but I especially love it because the moment my boyfriend saw it, He said, "They made that for you!" Cue more sap.

I made a pretty rosette for her to rest upon, using my favorite Martha Stewart Doily Lace punch to give it an elegant edge. I centered it with a harvest-yellow flower. The pinecone background has a bit of sparkle to it, reminiscent of a wintry frosty pinecone trail. I love shape cards of all kinds, so I used one of my favorite circles from Elegant Edges. Plus, it makes me think of a pie with a pretty edge... which is perfect for the holidays. :o) I used harvesty Copics for Willow's apron and clothing to keep in tune with Thanksgiving. Have you ever used a wrong color unknowingly, and sat there frustrated wondering why in the world nothing was blending as it should? Yep, me too. I grabbed the wrong brown and discovered it after the image was completed. There was no time for a re-do. And if you're wondering why my sentiment and cute twine bow aren't on top instead of the bottom... I am, too. I sought solace in a gingerbread cookie.

I hope you'll play along with us this week by linking up your Thanksgiving projects at the Whimsical Wednesday weekly challenge post. I am anxious to see your festive creations! You can read up on this week's prize at the challenge home, too. :o) We are one week closer to Stephanie's stamp release! I'm more excited than I could possibly express. (And you will be, too!) :o)

Be sure to frolic on over to the rest of the Design Team's projects to see their marvelous projects! Thank you for visiting me. I appreciate you all very much and wish you a beautiful day! :o)

Key Recipe Components:
 * Cricut cartridge: Elegant Edges
 * Spellbinders Nestabilities: Labels Four
 * Paper: Bo Bunny, DCWV, Papertrey Ink, SEI
 * Stamp: Willow with Cookies, by Elisabeth Bell
 * Coloring medium: Copics
 * Sentiment: Computer generated
 * Punch: Martha Stewart Doily Lace
 * Twine: Trendy Twine
 * Miscellaneous: Stickles

Photobucket

Monday, November 7, 2011

Scraptastic Monday Challenge: Thanksgiving Gift Box or Bag! (And Blog Candy Winner!)

Happy Monday, my sweet friends! I hope your weekend was crafty and beautiful. :o)

Today's post is packed with fun! Not only is it the very first challenge for Cindy's Scraptastic Designs, but after my project you'll find my blog candy winner from the blog hop AND a delicious treat! Whew! :o)

Challenge #1 is to decorate a Thanksgiving-themed gift bag or box, which must include a tag, stitching, and a button. It is NOT a requirement to use one of Cindy's images or any digital stamp to play along with us. Simply follow the theme by any means you desire. The more who join us, the merrier! :o)

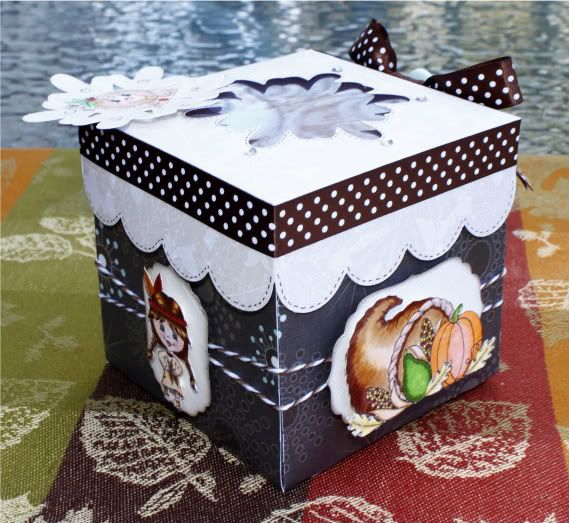
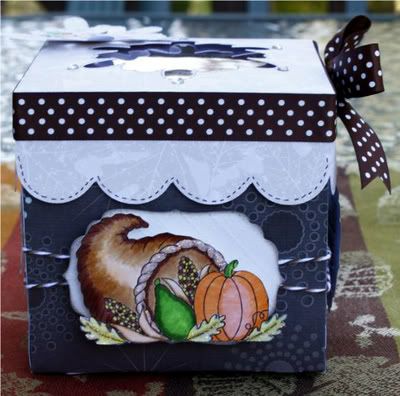
For my project, I leapt at the chance to use the Sweet Tooth Boxes cartridge again! One of my favorite gifts to give for the holidays is baked goods. There's something innately special about that, don't you think? So I made a treat box for my sweet boyfriend. :o)

A couple close-ups before I show you the rest of the box! First, Cindy's digi stamp, Thanksgiving Friend:
Another new personal favorite of mine from Cindy's designs, Horn of Plenty:
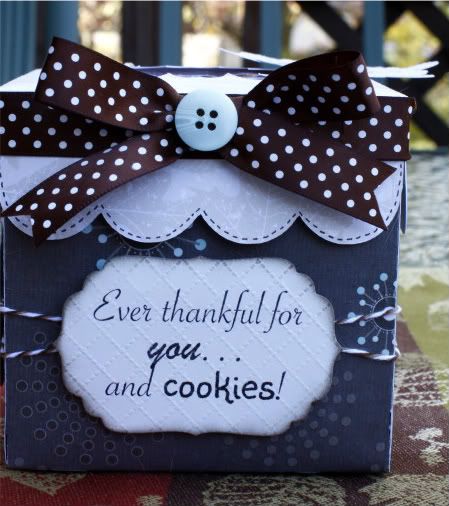
There's a teeny tiny story going on here (I'll tell you in a sec), which made this extra fun. In the spirit of Thanksgiving, this was the perfect chance to remind my sweetheart that I'm thankful for him. So I typed up a sentiment that was fitting for us and this particular project. 
He will feel honored being mentioned in the same breath as cookies! ;) I used beautiful quilted paper for all of the mats on this box for some added texture. The brown base is from Cloud 9, which I used for this because the design makes me think of chocolate or gingerbread snowflakes. (There really should be such a thing.) The box top is an ivory fall leaves design, reminiscent of a gently frosted landscape. :o) Just like Thanksgiving! The Chocolate Truffle Trendy Twine is one of my all-time favorites... in fact, I'll re-order it before I get dangerously close to running out. I love the two shades of brown with the white! :o) The Dark Chocolate swiss dots ribbon is my favorite from Papertrey Ink. (Funny how both favorites have 'chocolate' in their actual product name! A treat for the eyes.)

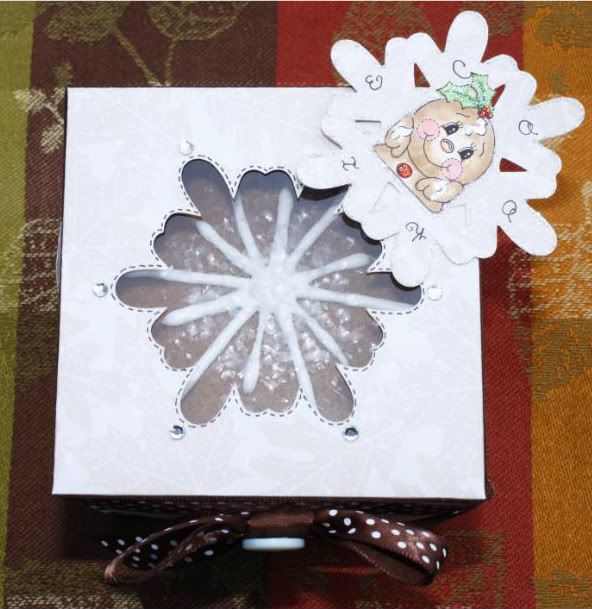
And now, the story. See this fabulous image of Cindy's? It's the gingerbread girl from the tag set Sweet Gingerbread Tags. I cut her out and nestled her within a snowflake tag. It's trimmed in Stardust, but the flash washed it out (the clouds came!):
This sweet gingerbread girl has broken INTO the treat box. She tried to cover her tracks by faux stitching around the snowflake window and scallop trim. I wrote "Cookie" on the tag surrounding her, which I love because her little arms make it look like she's pointing into the box where the treats reside. (What she left of them, anyway.) :o) Maybe the Liquid Pearls I used for the icing on her cute little body made her feel all powerful. I can't really blame her, though... a girl needs her cookies. ;)

*** Before I share a special treat, I want to announce the winner of my blog candy! ***
Thank you VERY much for participating this weekend and helping us celebrate the grand opening of Cindy's store! It was such fun! The winner of the My Craft Spot gift certificate is #11: KELL! Congratulations!!! Thank you for hopping along with us! Contact me through the email address listed on the Contact Me page and we'll set up your prize! Woohoo! :o) You have two weeks to claim your prize! (Monday, November 21st.)

A couple of weeks ago when I saw the challenge for today, I already knew I wouldn't be posting my Sweet Saturday feature the weekend prior due to blog hops. I asked Cindy if I could include the corresponding recipe for this project since it's a part of it. She is so sweet that she loved the idea! (How amazing is she?! Thank you, Cindy!) Therefore, here's a peek at the delicious treat I made to go in the box, along with the recipe. :o)
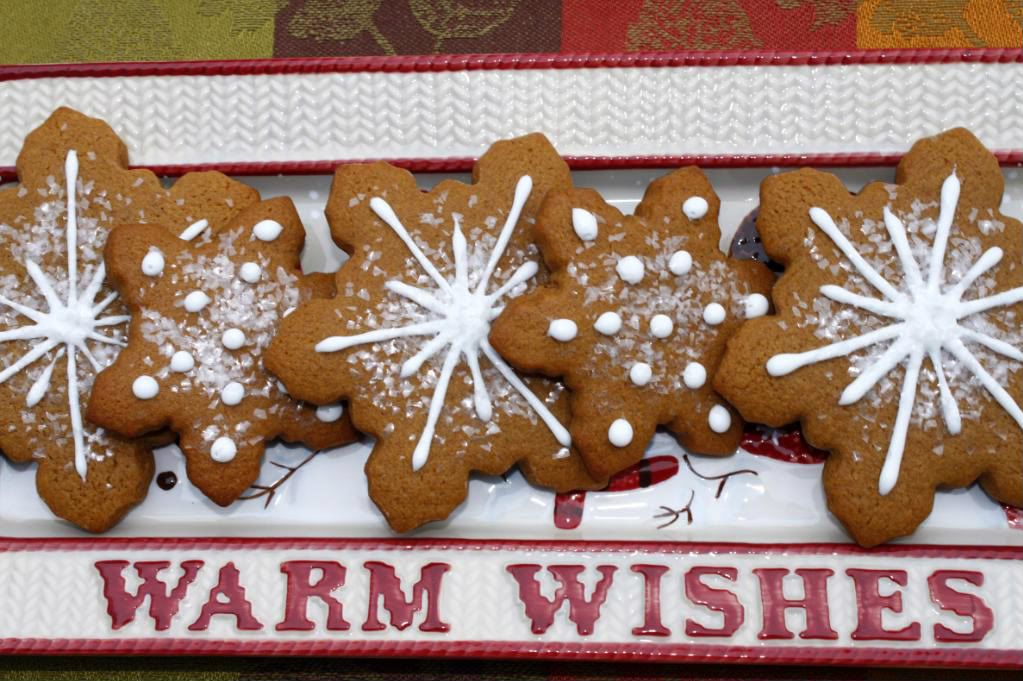
Gingerbread snowflakes! They DO exist! I love gingerbread treats and this is my very favorite recipe for gingerbread cookies. It was a favorite of my boyfriend's last year, so I was eager to make it again when November rolled around. No huge commentary on it because the focus today is Cindy's Design Team, but just know that these are delicious! Soft, chewy, thick, and bursting with seasonal spice. (Note: I will be attempting actual cookie decorating later this month! Royal icing, even. We'll see how it goes! Until then I will continue to make willy nilly designs and top it with Cake Sparkles.)

I hope you'll join us this week by linking up your Thanksgiving gift boxes or bags at the home of Scraptastic Mondays: Cindy's Scraptastic Designs. I would love to see your take on the challenge! :o) Be sure to dance on over to the rest of the Design Team's blogs to see their incredible projects. This is a wonderful team and I am honored to be a part of it. :o)

Thank you for visiting me today! Blessings and cookies for everyone! :o) (P.S. I'm still using my Sweet Saturday label, despite it being Monday. Shhh, don't tell.)
***

Gingerbread Cookies

Ingredients:
4 cups all-purpose flour
1 teaspoon salt
1½ teaspoons baking powder
½ teaspoon baking soda
1 teaspoon ground cinnamon
1½ teaspoon ground cloves
2 teaspoons ground ginger
1 teaspoon ground nutmeg
16 tablespoons unsalted butter, at room temperature
1 cup sugar
1 cup molasses
1 large egg

Directions:
In a large mixing bowl, whisk together the flour, salt, baking powder, baking soda, and spices. Set aside.

In the bowl of a stand mixer fitted with the paddle attachment, cream together the butter and sugar on medium-high speed until light and fluffy, about 2 minutes. Mix in the molasses and egg until combined. Add in the dry ingredients and mix just until incorporated. Cover the bowl and chill the dough for at least one hour in the refrigerator.

Preheat the oven to 350º F. Line baking sheets with parchment paper or silicone baking mats. Roll out the dough on a lightly floured work surface to about ¼-inch thickness. Cut into desired shapes with cookie cutters. Place the cookie shapes onto the prepared baking sheets, about 2 inches apart. Bake for 10 minutes, rotating the pans halfway through baking. Remove from the oven and let cool on the baking sheets for 10 minutes. Transfer to a wire cooling rack and let cool completely. Decorate as desired.

Source: Annie's Eats
***

Key Recipe Components (for treat box):
 * Cricut cartridge: Gypsy Wanderings (for snowflake window), Sweet Tooth Boxes
 * Spellbinders Nestabilities: Labels Four
 * Paper: Cloud 9, Papertrey Ink, stash
 * Stamps: Horn of Plenty, Sweet Gingerbread Tags, Thanksgiving Friend (all from Cindy's Scraptastic Designs
 * Coloring medium: Copics
 * Ribbon: Papertrey Ink
 * Twine: Trendy Twine
 * Button: My Mind's Eye Tres Jolie
 * Miscellaneous: iRock, Stickles

Photobucket

Saturday, November 5, 2011

PCW Thankful Hearts Blog Hop!

*** If you're looking for the Scraptastic Designs Blog Hop, please click HERE or scroll to the post below this one! ***

Welcome to Paper Crafting World's Thankful Hearts Blog Hop! If you arrived here from Mindy's blog, you are on the right track! If you just stopped by to visit, hop on over to Cooking With Cricut to start at the beginning! You won't want to miss a single one of my sweet Design Team sisters' projects! :o)

Our Thankful Hearts Blog Hop is centered around this beautiful harvest time, with an overture of Thankfulness: an attitude of gratitude. What came to my mind upon reflection of this theme is our incredible military and their families. Their sacrifices, consequences unknown, is something to remain mindful of... as painful as it can be. They battle overseas, then often return home to raging wars in the battlefield of their mind. I am so thankful for their presence, their commitment, their love for a greater purpose. With that in mind, I created an Any Hero card for a military member, delivered by the fantastic organization Operation Write Home.
Despite the announced homecoming of some of our soldiers from deployment, there are still soldiers stationed in so many areas around the world. Fighting and battling, every single day. One thing Operation Write Home does is include Any Hero cards in their shipments, which are given to a soldier who receives little or no mail from back home. Can you imagine his or her weary eyes lighting up upon receiving even the simplest card from someone who genuinely cares? That unknown face was my inspiration for this project. I wanted to deliver a reminder to let their light shine all over the world, in the midst of their war zone. One tiny spark of light defeats the darkness. I want them to know that during this time of Thanksgiving (and beyond), they are in my heart and prayers.

The multiple nested layers of Spellbinders? Those are the layers of love I packed into this simple card. All that love has made the candlelight form a golden, harvesty heart. I used Liquid Pearls for wax and carved out the patriotic eagle from a sheet of patterned paper. After saying a prayer for the unknown recipient, I thought again about how truly thankful I am for our military. I wish I could somehow pack a real hug into the envelope. Wouldn't that be fabulous?

Perfectly in theme with this event, there is a freebie at every blog along the hop, courtesy of the ever-generous Melin! How lovely is that? Seven fantastic presents for visiting us this weekend! Ready to see the free file for visiting me on this hop? :o)


Isn't he precious?! I love this sweetheart bear and am eager to color and create with him. :o) The button code is valid until the end of the weekend, so if you're visiting after Sunday night you'll want to use this direct link for access: Bear in Sweater Digital Stamp.

UPDATE: Unfortunately, the shopping cart is temporarily down due to unexpected maintenance. We are so sorry for the inconvenience! Please come back tomorrow to grab all of the wonderful freebies. :o)

Your next stop is the fantastic Christel, who has a masterpiece waiting for you! Thank you for playing along with us today! Have a blessed and beautiful rest of the weekend. :o)

Photobucket

Friday, November 4, 2011

Scraptastic Designs Blog Hop!

Welcome to the Scraptastic Designs Blog Hop! I am truly honored to take part in this event as we celebrate the store opening of Cindy's Scraptastic Designs! Not only is she a sweetheart, but she is so incredibly talented. :o)

If you just stopped by to say hi, please head on over to Cindy's blog to start at the beginning of the hop! You don't want to miss a stop as we showcase some of her adorable digi stamps. If you arrived here from Gigi (The Cricut Bug), you are on the right track! :o)

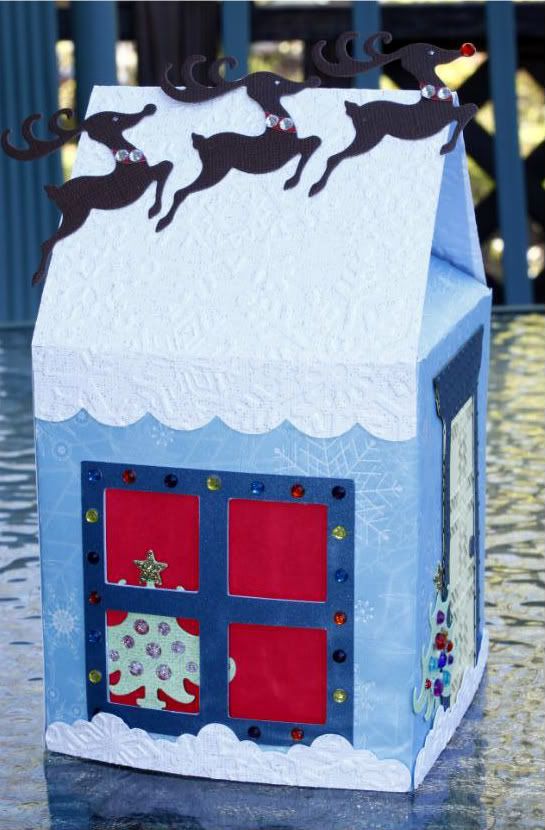
For my project, I wanted to showcase a few different stamps. I've been in the Christmas spirit (as always), so I made a festive creation. It begins with a little house, decorated for the big day. :o)
I used shimmery snowflake paper for the base to make it feel as though it's snowing. Embossed sparkly white cardstock for the roof further creates the sense of a snowy Christmas. The window is decorated in Christmas lights via small rhinestones, with the festive glow of an interior Christmas tree sparkling through this house of love. This surely helped guide Santa and his reindeer. I wonder what possibly could be inside the house after Santa's visit...

An ultra decked-out tree sits outside the house as well, brightly sparkling in Christmas cheer. The door is embossed with a plaid folder to somewhat mimic a carved wood design, while the frame is embossed with tiny dots for added texture. This entire base is the store from the Sweet Tooth Boxes cartridge, slightly altered to become a house. I cut off the bottom because Santa didn't leave cupcakes or treats as the Cricut cut is intended. Let's take a peek inside, shall we? Instead of sweets, Santa's gift is...

... a festive display for Christmas and winter memories!
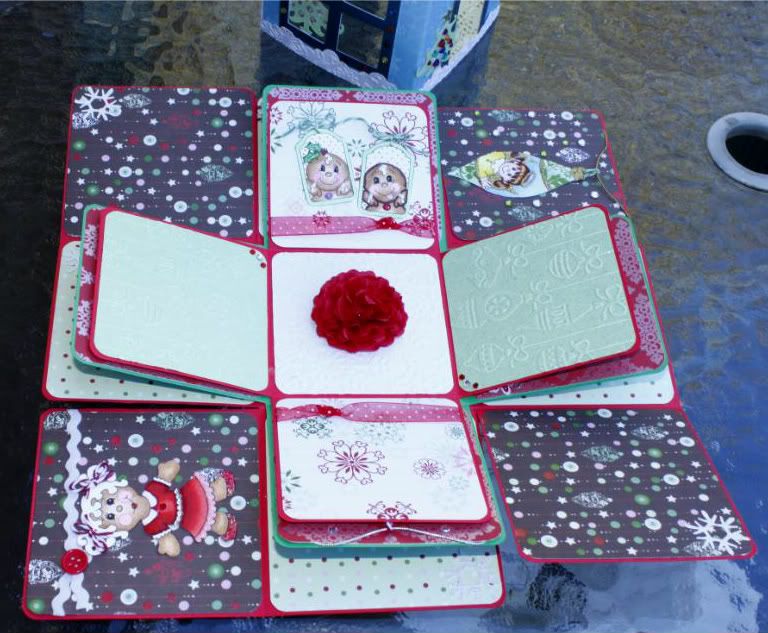
My house is actually an explosion box! How fun was this?! I used the basic explosion box tutorial from Amy at Love To Crop, adjusting the dimensions to make it a few inches larger in total. Helping to showcase holiday pictures, journaling, or memorabilia (Nutcracker ticket stub, for example) are Cindy's sweet digi stamps! I colored them with my Copics and bedazzled them in their festive best. Now, a few close-ups to properly show Cindy's beautiful images (one of which is hidden from the main picture):

Sweet Gingerbread Tags:
How cute are these tags?! I used Liquid Pearls to make it look like actual icing on their adorable little bodies. The holly, berries, and cheeks of the sweet girl are sparkly and I tied the two tags together with gorgeous Trendy Twine.

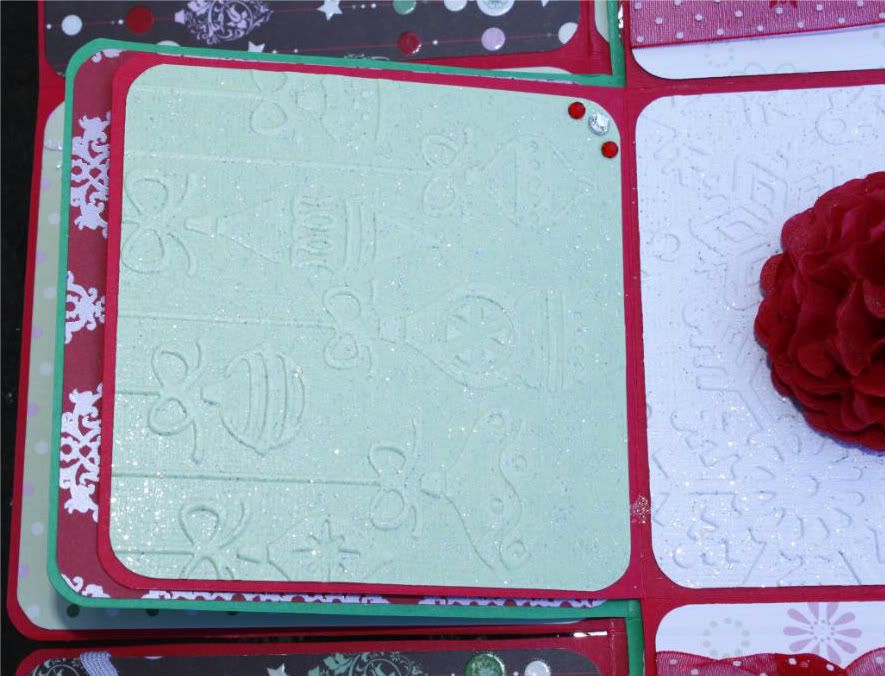
The light green photo mats are embossed with an ornament folder, which I've been so anxious to use! I have a feeling my mom (the future recipient) will leave a few mats empty for a while just to enjoy the pretty papers and embossing. The center is simply decorated with a snowflake embossed mat and a flower made from a coffee filter and Candy Apple Red Glimmer Mist. (I'm still in love with those!)

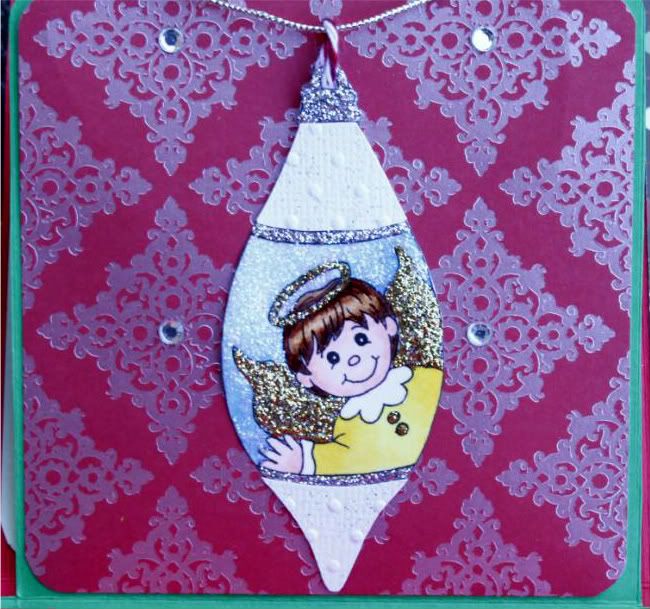
Sweet Angels Set:
I love the gorgeous shape of these! The boy is nestled on the middle layer, only seen when the mats are flipped to look at the interior treasures. To create a sparkly sky background, I colored it with blue Copics and then coated it in Stardust Stickles. I cut out pieces of sparkling white cardstock and embossed it to add some texture to the lovely ornament design. To coordinate with the silvery photo mats, I used silver Stickles for accents and hung the ornament on heavyweight silver thread. (I forgot the actual word.)

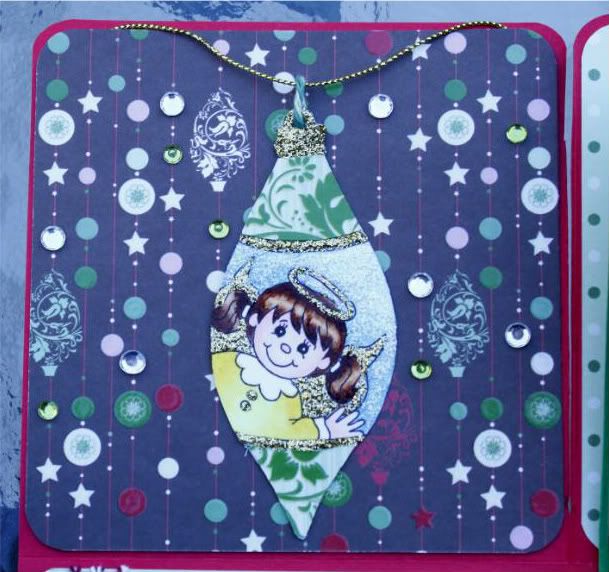
The girl angel is colored the same, though the non-Copic parts are changed to match her home. I cut out some pretty filigree paper to make the design match the Christmas paper mat. On this one, I used gold accents and gold thread... and then went crazy (again) with my iRock and added a smattering of crystal and light green rhinestones to the mat for an explosion of Christmas sparkle.

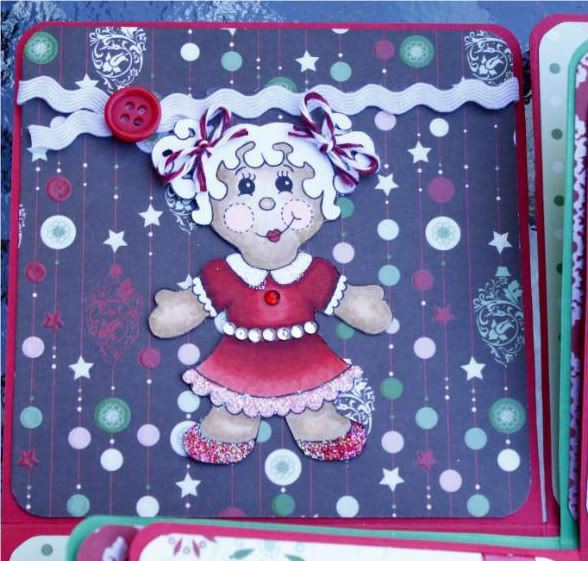
Lastly, the Gingerbread Cutie!
She's in her Christmas best! Sparkly shoes, a rhinestone belt, and Trendy Twine hair bows make her live up to her name. I try not to play favorites... but I am SO in love with this stamp! This demonstrates the beauty in Cindy's images because the stamps are so enjoyable to color and sparklify. For this square I used white ric-rac ribbon because it reminded me of icing zig zags on many gingerbread peeps.

I had so much fun making this explosion box, so a big thank you to Cindy for providing such wonderful inspiration. I'll be giving this to my mom on Thanksgiving so she can enjoy it early and fill it up as the holiday season progresses. :o)

Cindy is generously offering a grand prize to one random winner! If you stop at every blog participating in this hop and leave a comment for each designer, you will be eligible to win three digital stamps and a set of 12 Prisma Colored Pencils. :o)

I'm joining in the fun and offering some blog candy! One random winner will receive a gift certificate to My Craft Spot, one of my favorite crafty stores. :o) To be eligible, simply leave me a comment on this post. :o) I will select and announce the winner on Monday!

The first Scraptastic Monday challenge is on Monday, November 7th, at 10:00am EST. If you've never tried digis, no worries! Using one is NOT a requirement to play along with us each week! :o)

Your next stop is the marvelous Star (Star's Paper Passion)! Thank you for playing along with us as we celebrate the opening of Cindy's Scraptastic Designs! Have a blessed and sparkly weekend, my sweet friends!

Key Recipe Components:
 * Cricut cartridges: Elegant Edges, Sweet Tooth Boxes
 * Cuttlebug embossing folders: Plaid and Snow from Winter Wonderland set, Swiss Dots
 * Stamps: Gingerbread Cutie, Sweet Angels Set, Sweet Gingerbread Tags (all from Cindy's Scraptastic Designs)
 * Paper: Core'dinations, Heidi Grace, Papertrey Ink, SEI
 * Spellbinders Shapeabilities: Fanciful Holiday (reindeer and Christmas trees)
 * Twine: Trendy Twine, purchased at My Craft Spot
 * Ribbon: Hobby Lobby
 * Miscellaneous: Glimmer Mist, iRock, Liquid Pearls, Stickles

Photobucket

Wednesday, November 2, 2011

Whimsical Wednesday Challenge: Anything Goes!

Happy Wednesday, my dear crafty friends! Two cards in two days... color me sparkly! :o)

Today is a VERY special Whimsical Wednesday! New adventures are beginning and I am honored to tell you that Stephanie has asked me to stay on for another term! I am ecstatic. She is coming out with a new stamp line, so stay tuned here and at her Whimsical Designs home for the release week date! It will be coming VERY soon. :o) I am blessed to have the opportunity to showcase her stamps as a member of her Design Team... and let me tell you, you are going to love them! I am eager to begin creating with them. :o)

Additionally, Stephanie has posted a Design Team call. :o) There are some permanent Design Team positions and Guest Designer positions open. Visit Whimsical Designs for the details. :o)

And now, let's get crafty! The challenge this week is Anything Goes! Whatever strikes your fancy, we'd love to see it! :o) This card I'm about to share with you is a record, my friends. I literally had two hours to craft. TWO. That's an insanely small window for me to come up with a plan and execute it. There was fear, I tell you. I even said I couldn't do it! But then... my heart said, "JUST DO IT!" Make like Nike! You know what's funny? This is the quickest and simplest card I've ever made, yet it still portrays the message that was on my heart. Card-making is a beautiful thing!

"Love Heals"

I had to take this picture in the dark (which was funny), but hopefully most of the sparkling details still shine through. (The entire main base is sparkly.) Despite the time crunch, I had a message to share. One of the primary reasons I bought the Wall Decor and More cartridge is because of this dancer. I've longed to use her, but was a bit apprehensive. Many of you know portions of my dance status. Suddenly, I just *needed* to use this beloved dancer. But with such a short time frame, I freaked myself out wondering how I could do it justice. I mean, this is DANCE. The first thing that came to me is that love heals. From there, I knew nothing else mattered. Whatever was with it was icing on the cake. The sentiment and dancer were there, and that was enough to propel me onward.

Love is healing my body... and I hope to return to the stage or studio where a powerful performance can inexplicably bring healing love to someone in the audience, whatever it is that they need. Emotional or spiritual healing... all art forms innately possess power if you're driven by a heavenly force. And as is stated, love never fails. :o) Our sweet dancer here has released a trail of sparkling rhinestones as she gives her heart to her audience, whether it's an audience of One or a full house. Her sparkling love has burst into this red and green filigree design, accented with rhinestones, to carry out the (sparkly embossed) message that love heals. The filigree design from Storybook is actually cut in half because I made it far too large, which proceeded to somewhat make it appear as a magical Christmas butterfly. That aspect was unintentional, brought to my attention by my boyfriend when I showed him my completed card. So perfect! My explosion of love just so happened to morph a bit into a butterfly! I am tickled sparkly pink.

The lacy card design is from Elegant Edges and I embossed the sparkly Core Couture cardstock with my favorite snowflake folder. She's dancing in a winter wonderland, her body steady and secure upon the red ribbon dusted with 'snow.' But you guys know me... that's not merely flowy red ribbon. It represents the healing power of red love, flowing to us and then through us. While I love the crisp red against the pristine white regardless of theme, this is Christmassy for a purpose. My hope is that the day we celebrate the ultimate gift, I will be able to dance as a gift to and from the Lord. This is my third year saying something of that nature. Maybe this is my year. :o) See how the dancer's arabesque has extended beyond the lacy border? She's breaking through barriers. :o)

I did not intend to make this post long, so forgive me. It all went into the making of this card, so I wanted to share. :o)

I hope you'll play along with us this week and link up your Anything Goes project at the NEW challenge home of Whimsical Wednesday's: Whimsical Designs. I would love to see your creations! Our fabulous sponsor this week is my fellow Design Team member Nanne of Nanne's Creations. She is donating a marvelous variety of Webster Pages scrapping supplies to one random winner who participates. Thank you, Nanne! :o)

Be sure to dance on over to Stephanie's blog to see the rest of the Design Team's projects! Thank you for visiting me today. If you persevered through this entire post, you deserve a cupcake. :o) (Or even if you didn't... because I like to share cupcakes.)

One final thing... it's almost FRIDAY! It's nearly time to celebrate the opening of Cindy's Scraptastic Designs with our kick-off blog hop! Hope to see you there, my friends. :o)

Key Recipe Components:
 * Cricut cartridges: Elegant Edges, Gypsy Wanderings, Storybook, Wall Decor and More
 * Cuttlebug embossing folders: Swiss Dots, Winter Wonderland pack
 * Paper: Core'dinations, DCWV
 * Spellbinders Nestabilities: Labels Four
 * Sentiment: Computer generated
 * Ribbon: Hobby Lobby
 * Miscellaneous: iRock, Stickles (on sentiment embossing)

Photobucket

Tuesday, November 1, 2011

PCW Terrific Tuesday Challenge: Harvest Time!

Happy Tuesday once again, my sweet friends! I hope your November is off to a beautiful start. :o)

It's my first Terrific Tuesday Challenge as a Paper Crafting World designer! I am honored. The theme this week is Harvest Time, with the option of creating any type of project. For even further inspiration, Melin has provided three optional sketches if you so choose to use them. :o)

The creative process can be interesting. I will be honest and say this began in a frazzled panic. This is one of my favorite themes, yet I was drawing blanks and everything felt wrong and forced. I tried to simplify (don't laugh... I AM trying to explore that side of me!), which ended up making things harder. I stepped back, cast aside what I was doing, and started fresh. I thought about what harvest means to me and from there, I finally had a card path that was clearer than mud. Victory!

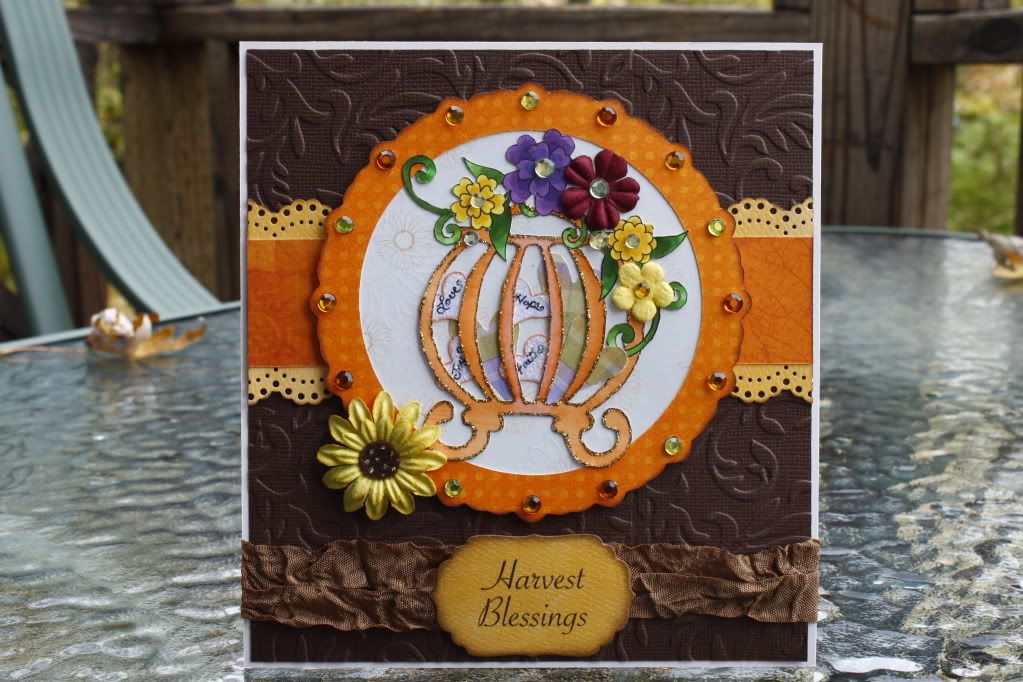
"Harvest Blessings"

When I think of harvest, the most poignant meaning is a harvest of spiritual blessings. What stands out is not the blessing of fruits, vegetables, and grains... but rather sowing seeds of love, faith, hope, and joy to reap a harvest of blessings for others and for myself. To spend time planting tiny seeds whenever possible, whether the recipient realizes it or not... being a blessing above all else to be a representation of heaven. Every moment is an opportunity to sow the most important seeds of all... and in due time, all will be gathering a harvest of blessings. :o) Truly glorious.

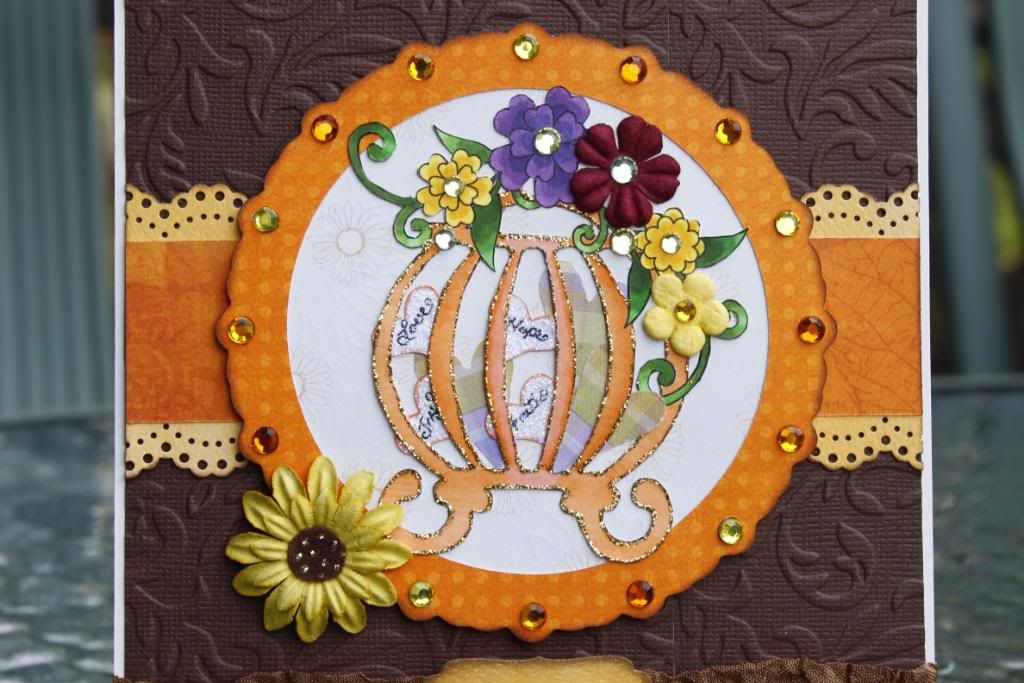
My attempt to craftily capture this is focused upon this wonderful PCW birdcage and flowers digital stamp that I colored with Copics and trimmed in gold sparkles. Given the season, when I saw this I immediately thought pumpkin... so I colored it shades of orange and filled it with the heart-shaped seeds of love, faith, hope, and joy. I coated the seeds with Stardust to make them sparkle with the Lord's radiance. Extra love abounds when on this beautiful path, evidenced by the pretty plaid hearts that are ready to burst forth from the cage. The tiny seeds, properly nourished, have blossomed to overflowing, portrayed by the cascading flowers. I colored a few of them with Copics and also added a couple of Primas. Naturally all are anchored with a sparkle. The focal element is surrounded in a circle of sparkles because love is sparkly, after all. I used rhinestones of deep amber and a golden orange, then used one of my yellow Copics to color a few clear stones to get a third harvesty color in the mix. (Which was oddly entertaining.)

My card needed a sunflower, but without any on my carts I had to improvise. I layered two sizes of Prima daisies, cut out a circle of brown felt for the fuzzy center, and dotted it with gold Stickles. I used my favorite Martha Stewart border punch and some gorgeous Prairie Bird Boutique crinkle ribbon, so I was having all sorts of fun once I relaxed about the whole project. I love how embossing looks on chocolate browns, so that was actually the first thing I did to set the stage for a happy harvest of blessings. :o)

Be sure to skip on over to the PCW challenge post to check out the fabulous creations by the rest of the Design Team! I hope you'll link up with us this week, too! I'd love to see what you create for this beautiful harvest time. :o) Thank you for dancing on by to see me! Have a sparkly day. :o)

Key Recipe Components:
 * Cricut cartridges: Elegant Edges
 * Cuttlebug embossing folder: Victoria
 * Paper: Bo Bunny, stash
 * Spellbinders Nestabilities: Labels Four
 * Stamp: Paper Crafting World~ Birdcage and Flowers
 * Copics: YR01, YR12 ('pumpkin' birdcage); YG11, YG13, YG17 (vines); Y13, Y15, V, 12, V15, V17 (flowers)
 * Ribbon: Prairie Bird Boutique
 * Flowers: Prima
 * Border Punch: Martha Stewart Doily Lace
 * Miscellaneous: Brenda Walton rhinestones, Stickles
Photobucket

Scraptastic News and Reminder!

Happy Tuesday, my dear friends! :o)

I am ecstatic because the lovely Cindy of Cindy's Scraptastic Designs has officially opened her store! Her images are so sweet and adorable... it is truly a pleasure every time I use them. In fact, I'm working with some right now as I prepare my project for the celebration blog hop this weekend! :o) That's right, I said 'some'... I was too excited to only use one! :o)


Cindy is generously offering a blog hop grand prize of three Scraptastic Designs digital stamps, along with a set of 12 Prisma Colored Pencils. Fabulous. :o) I hope you'll come hop with us!

Also, her weekly challenge (Scraptastic Mondays) officially begins on November 7th at 10am EST... less than a week away! So much excitement. :o)

Have a gorgeous day, my crafty friends. :o) I'll be back later today with an actual CARD! (It's been far too long!) Keep sparkling. :o)

Photobucket
Related Posts Plugin for WordPress, Blogger...
Blogging tips