To pin my projects to Pinterest, hover over the picture and a Pin-it Button will magically appear.
Showing posts with label Wall Decor and More. Show all posts

Saturday, January 26, 2013

Monkey Valentine's Card: More love for I Feel the Love

Happy Saturday, my dear friends! I hope everyone is enjoying a beautiful weekend! :o) Thank you for your sweet anniversary wishes toward my parents... 50 years ago today they were married in the midst of a snow storm! Even then, no storm could stop their love. :o) I'm happy to say they adore the swan card I made them. :o)

An uncharacteristically short post from me today! I've had to switch gears back to children's goodies to add to my contribution toward this month's I Feel the Love Project. We have been creating Valentines for the six or seven children who survived the Sandy Hook Elementary tragedy last month, thanks to their heroic teacher Vicki Soto... January's collection is in her honor. It has been incredible making them surprises the past few weeks!

Kiddos love monkeys, so I made a colorful little Valentine scene.
The Create a Critter monkey is offering his sparkling heart in one hand.. and his treasured banana in the other! Surely the child will know just how much it means for a monkey to share his banana. ;) I sprinkled a trail of bananas behind the sparklified Memory Box Spring Border. The Wall Decor and More tree is embossed with the Swiss Dots folder and swirling with love via heart rhinestones. I hope it engulfs the sweet kid who receives it. The background paper is from the Doodlebug Lovebirds collection, where every adorable bird is tweeting their love for everyone impacted by that event.

Love abounds inside as well, along with an extra surprise monkey. :o)
The Whimsical Designs sentiment is from the With Love set, layered upon a Spellbinders Lattice Rectangle base. I hope this card encourages a smile to the little one who needs all the extra love possible. :o)

We are also creating cards for Vicki's grieving family, which I will spend this weekend doing. There are still a few days left to participate, so I hope you'll consider joining us. :o)

Challenges entered:
 *Cupcake Craft Challenge~ Make a Scene
 *DL.Art~ Thankful Thursday: Use Red or Pink
 *Paper Playtime~ Use Brown

Thank you for swinging on by! I wish a beautiful day of love and light. :o)

Sunday, May 27, 2012

Altered Recipe Box

Happy Sunday, my dear friends! I hope everyone is having a beautiful weekend. :o)

Yesterday I decided to ignore my throbbing, achy finger to try and make a project that's been on my cupcakey heart. By the time I was done designing and coloring, it hurt like mad to even take pictures! Oops. No crafting the rest of the holiday weekend for me...

This was such a fun project. One of the challenges I love participating in required the use of my favorite Elisabeth Bell stamp that I own, so I had no choice but to color my beloved Cinnamon Sugar again! Woohoo! Although my ten-year-old recipe box from the store was pretty, I wanted to alter it into a crafty creation. :o)
I turned it into a house! Here's a slightly better look at the front, despite cutting off the cute chimney with the heart stick-pin:
Side view:
The roof and chimney structures were made with 300gsm heavyweight cardstock. I used Elegant Edges to create scallop borders for my chocolate-shingled roof. The white portion directly beneath is a confectionery delight, with pom pom ribbon serving as dollops of freshly whipped cream and two sizes of pearls as white nonpareils. Beneath the recipe box opening, I created a pretty summery scene, starring our sweet Cinnamon Sugar. :o) The patterned papers are from the My Mind's Eye Blush collection. (Naturally the doorknob is a chocolate heart.) The fence is from Wall Decor and More, which I lightly inked with Walnut Stain so it would stand out a bit. I adhered Wild Orchid Crafts roses to the fence, trimmed in Star Dust.

Our lovely baker is colored up in rosy pinks and aquas, with matching rhinestones on her apron and garnet rhinestones as the cherries atop her cupcakes. The heart puffing out of the chimney reflects that she bakes with love, but there is also another indicator. As you walk up to the door, there's a tower of love offering up a sweet cupcake, secured with a pink satin ribbon. :o) The hearts are a coordinating light pink filigree design, also from Blush. I cut the grass with scissors for some fringey texture.

The side has a circular window from Sweet Tooth Boxes, which I backed with SEI heart paper... perfectly appropriate since every recipe within is used to shower my friends and family with sappy love. Instead of roses, I used cheery yellow Wild Orchid Crafts sweetheart blossoms as bursts of sunshine. I hadn't altered an item in a very long time, so it was a wonderful change of pace and such fun. I hope you like it, too! :o)

Challenges entered:
 * A Gem of a Challenge~ Photo Inspiration
 * Cooking With Cricut~ Pink and Satin
 * D.L. Art~ Anything Goes
 * Docerela Creations~ Scrap What You Love (baking!)
 * Elphine House Australia~ Alter It (with your favorite Elisabeth Bell stamp)

Thank you for dancing on by! I wish you all a sparkly day of hugs and blessings. :o)

Sunday, May 20, 2012

Choo-Choo! I Feel the Love

Happy Sunday, my sweet friends! I hope everyone is having a beautiful day. :o)

This week's Cooking with Cricut challenge links up with the inspiring Madison of Funky Cards in support of May's I Feel the Love Project. You know the importance of this cause in my life. Every month Madison highlights a particular person, family, or organization in need of our love and prayers. We then have the opportunity to be a blessing, delivering a ray of sunshine amidst their current storm. We all know how incredible it feels to receive a handmade card from a bloggie friend or loved one.. imagine the unexpected joy during the darkest of days as they receive an outpouring of love from complete strangers. This project is vital. It truly is.

A couple of weeks ago I first posted this story when sharing the card I made for Brandon's mom, which is posted HERE. As a recap, Brandon is a 4-year-old who was seriously injured in a car accident. As a result, he is considered tetraplegic, which means he can move one limb from time to time. He remains trach and ventilator dependent. Due to the neurological damage suffered, there is little likelihood that he will ever be weaned from the ventilator. However, I believe in miracles and pray for his healing every day.

Brandon's mother, his 2-year-old sister Ashley, and still-hospitalized aunt were all seriously injured in the accident. His mom's sweetheart (Ashley's father) did not survive. :( This is why I couldn't only make Brandon a card this month. The whole family is fighting so many battles and so many facets of sadness. This weekend I made the second one of this batch, which is for sweet Brandon.

"Choo-Choo! We love you!"
Little boys like trains filled with sweet animal friends from Create a Critter, right? The puppy is on an Action Wobble, so he wiggles with the slightest touch! Hopefully it will make Brandon smile. :o) (Thank you Pam for the wobbles! I've been anxious to use them!) I cannot resist giving my favorite puppy a Peachy Keen face... and I sparklified the little bell on his collar with gold Stickles. His train car is filled with hearts, as he's delivering an endless supply of healing love to Brandon. The monkey must have thought the yellow top was a banana, seeing as he's swinging all willy nilly from it. He is popped up with foam tape for dimension and to clear the chunky buttons I used for the wheels. :o)

Since this train is guided by and powered by my and God's love, I used heart-shaped rhinestones as puffs of steam. To make the track, I used the film strip border found on Wall Decor and More. I welded two of them together on my Gypsy, rotating one to make the curvy track I desired. I wanted more of it showing, but I goofed up a bit. I was having too much fun packing love and joy into it, I suppose! ;)

The grass is embossed with the Swiss Dots folder for texture, while the non-sentiment clouds are embossed with D'vine Swirls. I wanted to include a pattern in the card, so I used this lovely Bo Bonny basics cardstock for a dotted sky. The sentiment is computer generated, using my favorite kid font: Sunshiney. It's so whimsical and has the cutest name. The card base is yellow for an extra burst of sunbeams. I hope this card brings a smile to his face and heart. Now I just need to make one for Ashley.. I'm thinking of using another Action Wobble. They might like having a set of wiggly cards. :o)

Brandon and Ashley:
Challenges entered:
 * Cooking with Cricut~ Card Outreach
 * Krafty Girls~ Face Off! (Use a face)

There is still time to make a card for this precious boy, so I hope you will join us. :o) Thank you for swinging on by! I wish you a day sparkling with sunbeams and blessings. :o)

Key Recipe Components:
 * Cricut cartridges: Create a Critter, Wall Decor and More
 * Cuttlebug embossing folders: D'vine Swirls, Swiss Dots
 * Peachy Keen Stamps: Medium Critter Faces
 * Paper: Bo Bunny, Core'dinations, Papertrey Ink
 * Buttons: Michael's dollar bin
 * Small heart punch: stash
 * Heart rhinestones: Recollections

Thursday, May 17, 2012

Dance :)

Happy Thursday, my sweet friends! I hope you're all having a beautiful week! :o)

Today I'm sharing a card I made for a very special friend... one who believes in my hopes and dreams as if they were her own. In fact, they *are* part of her dreams. That's how special our friendship is and I am blessed every day by simply having her in my life. :o)

She loves dance too, but this card is more a reflection of my heart. I firmly believe one of the best gifts you can give someone is a part of yourself. Today, I'm giving her another peek into my heart that's still dancing while my body heals up. :o) And when the day arrives that I can return to the dance studio, her tears of joy will mirror my own.
One reason I love challenge blogs is how they can inspire you to bring to life an image from your heart. This week one of my favorites requires lacing, while another has an option of dance. You can imagine my joy! I could hardly wait to tangibly create the design that instantly formed in my mind upon seeing the themes.

The beautiful dancer silhouette (from Wall Decor and More) is adorned in a costume I made with two types of ribbon. The tutu has two layers of sheer glitter ribbon beneath two ruffled layers of lace. The glitter peeking through is gorgeous in person, but did not pick up well in the photograph. I am disheartened that I forgot a side view picture.. the skirt's dimension is stunning. So poofy and beautiful, just like exquisite romantic-length tutus with endless layers of tulle. The bodice is black with a V-shaped inlay of the sheer glitter ribbon, trimmed with mini rhinestones. Perhaps the most difficult part of this card was figuring out how to somewhat make that V the appropriate angle for a semi-side view. ;) I added one sweet sparkle to her bun and formed a small flourish of rhinestones extending from her hand. Her passion for dance and life is exploding from within as she arabesques with an indescribable joy. :o)

The lacing along the side represents the beautiful lacing often found on dance costumes. I used satin ribbon with a pretty decorative trim, 'securing' it with 8 black pearls. Unseen unless you enlarge the picture is how the coordinating Art Philosophy corner flourish is sporadically beaded with three sizes of black pearls. The tiny flourish that our lovely ballerina is dancing upon has three.. it needed to be a little extra special. ;)

The lacing panel is set apart with my favorite Martha Stewart Doily Lace edge punch. The gorgeous patterned papers are from the Glitz: French Kiss collection. The detail is remarkable in person. The woven texture designs are so realistic and absolutely perfect for this card. The dance world is filled with textural elements and in this scene, the soft flower pattern whisks her away into a glorious dance with nature. My Nutcracker-loving self couldn't help but continuously think of the Waltz of the Flowers throughout the design process. :o) The Dance is from Gypsy Font and I sewed around the main background with my sewing machine.

Challenges entered:
 * Fantabulous Cricut~ Prom-enade (Tux/Dress or Prom/Dance theme)
 * Frosted Designs~ Lacing

Thank you for pirouetting on by! I hope your day is filled with sunshine and blessings. :o)

Key Recipe Components:
 * Cricut cartridges: Art Philosophy, Gypsy Font, Wall Decor and More
 * Paper: Core'dinations, Glitz
 * Ribbon: From Michael's and JoAnn's
 * Edge Punch: Martha Stewart Doily Lace
 * Rhinestones: Recollections


Tuesday, March 13, 2012

Fluttering By to Say Hi... more love for Trinitie :)

Happy Tuesday, my dear friends! I hope you're having a sunshiny day where you are, too. :o)

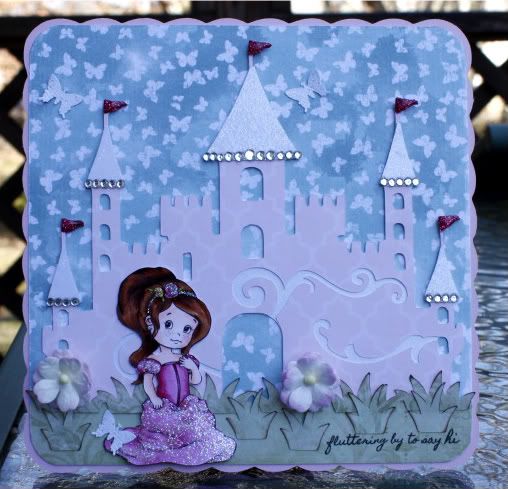
Last week I posted a little garden card for Trinitie, who is this month's recipient of the I Feel the Love Project, hosted by the sweet Madison of Funky Cards. As stated in that post, I already had an additional card in mind for beautiful Trinitie who was recently diagnosed with a brain tumor. I had planned on Create a Critter fun, but instead decided to make her a sparkling castle surrounded by butterflies. :o)

"Fluttering by to say hi" (sorry for the dark picture)
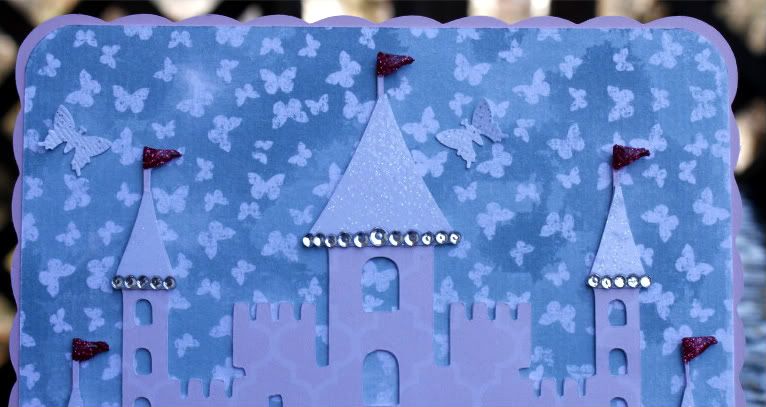
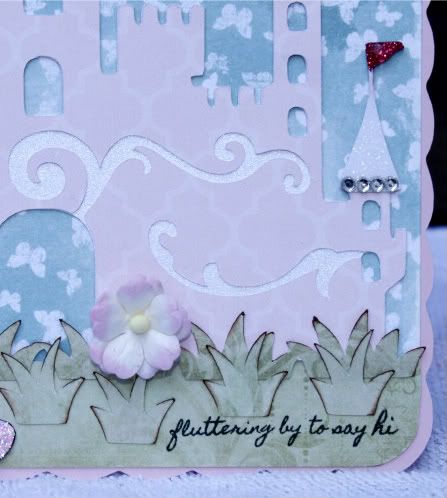
The goal of this card was to give Trinitie a whimsical and happy little scene to immerse herself in. The castle is from Wall Decor and More, which I adore because of those whimsical flourishes that make me think of a heavenly breeze whistling around the castle. The castle paper is from the Echo Park Runway collection, which I chose based on the subtle design.. it is somewhat reminiscent of a fancy stone pattern. (At least in my mind! Hehe.) The tops are cut from the super sparkly DCWV glitter stack, which are trimmed with rhinestones. (I nearly wore out my iRock on this one.) Hopefully you can see the paper a little better here if you enlarge it:
The flags are covered in bright pink glitter and a coat of Glossy Accents, which looks nice with the sprinkles of glitter in the paper. Why so much sparkle atop the castle? Because everything is better with sprinkles on top, be it cupcakes or castles. :o)

I couldn't give Trinitie a sparkly castle without a sparkly princess, so without any type of Disney cartridge I turned to my Copics. The digi stamp is from The Paper Shelter, titled Spring Princess. I colored her in rosy pinks and coated the fluttery sleeves and skirt with Star Dust to be like a shimmery overlay. Her flower headpiece is also Star Dusted and I put a layer of atyou Spica glitter on her eyelids for sparkly eyeshadow. I probably would have given her a necklace if I wasn't already frustrated with the troubles from those 29 rhinestones on the castle. ;) You don't want to know how ridiculously long those took me to get "just right."

The exquisite Magnolia background paper is one of my all-time favorites, titled Mini Butterfly Dreams. I bought it last week (in four colors!) and was wondering if I'd ever be able to get myself to use it... what will I do when it's gone?! But I had a feeling Trinitie would love a sky of butterflies, so I used it as the backdrop. :o) I pray she smiles as much as I do when I see them. I punched out a few white sparkling butterflies with Core Couture cardstock and sprinkled them throughout for a touch of dimension. One landed on the Princess' dress, which I can clearly imagine happening with lovely Trinitie. She has such a radiant heart.

Lastly, I used pretty green patterned paper from the Kaisercraft~ English Rose collection for her landscaping so she could be nestled in nature. I added two Sweetheart Blossoms from Wild Orchid Crafts because Trinitie is such a sweetheart. :o) The sentiment is from the Whimsical Fun~ Volume 1 stamp set from Whimsical Designs. The pink base isn't merely an Elegant Edges scallop base... it's to reflect my favorite sunset. Wispy blue skies with puffy pink clouds, which I call cotton candy sunsets. :o) It seemed ideal for a card of this nature. I hope she loves it.
And the lovely Trinitie, who has inspired me so much in the last couple of weeks.
Challenges entered:
 * A Gem of a Challenge~ Perfect Pastels
 * Flutterby Wednesday~ Spring Time
 * Paper Sundaes~ Feminine Flair
 * Sentimental Sundays~ Go Green or Recycle
 * Sweet Stamps~ Think Spring
 * The Paper Shelter~ Anything Goes

Thank you for fluttering on by today! There is still plenty of time to make a card for Trinitie. The information can be found HERE. She needs tons of love right now. I hope you all have a blessed and sunshiny day. :o)

Key Recipe Components:
 * Cricut cartrdiges: Create a Critter (grass), Elegant Edges, Wall Decor and More
 * Paper: DCWV, Echo Park, Kaisercraft, Magnolia, Papertrey Ink
 * Sentiment: Whimsical Designs~ Whimsical Fun, Volume 1
 * Image stamp: The Paper Shelter~ Spring Princess
 * Copics: E25, E29, E33 (hair); E00, E000 (skin); R81, R83, R85 (dress and larger flower); Y15, Y11 (smaller flower); BG11 (headband); atyou Spica glitter in clear for eyeshadow
 * Flowers: Wild Orchid Crafts (Sweetheart Blossoms)
 * Butterfly punch: Fiskars
 * Miscellaneous: Glitter (Martha Stewart), Glossy Accents, iRock, Stickles

Photobucket

Sunday, January 8, 2012

So Super Sweet Friendship Card

Happy Sunday, my crafty friends! I hope your weekend has been wonderful. :o)

I wanted to play along in a couple of my favorite challenges, so I made a friendship card for someone who needs an extra dose of love. (Forgive the darker first image. I was having issues! The close-up shows the actual shades better.)

"So Super Sweet"
Love and sweetness are sparkly... so I covered the steam in microbeads. (You may need to enlarge it to really see them.)
The pretty little butterflies are on a sparkly path, sprinkling the hot cocoa with love. I mixed in a few rhinestone hearts along the saucer and top of the cup as a reminder that my heart is with her and that she is amazing. My sweetheart told me to order some new paper as a gift and it arrived in the mail Friday! I wasted no time putting this pad to use. I truly love this First Edition~ Isabelle paper... it makes me swoon. (And it's sparkly.) Brown and pink is one of my favorite color combinations and I thought these patterns would work well for a feminine hot chocolate card. My cut is technically a teacup... but really, hot cocoa belongs everywhere.

For some additional textural elements, I embossed the brown layer, lined the butterfly bodies with pearls, and added a puffy bow of crinkle ribbon and Chocolate Truffle Trendy Twine. I used the same paper for the teacup and sentiment tag because I just couldn't put it down. The marvelous "So Super Sweet" sentiment is a Whimsical Designs stamp, from Stephanie's Whimsical Fun~ Volume 1 set. I can't even tell you how much fun I've been having with her stamps. They are a joy to use. :o) Hopefully this little card will make my friend's heart smile extra brightly. :o)

Challenges entered:
 * Cooking with Cricut~ Something new! (All three patterned papers)
 * Fantabulous Cricut~ Warming Up with Hot Cocoa (Use a cup, chocolate, or the color brown)

Thank you for visiting me today and for being such fantastic bloggy pals! :o)

Key Recipe Components:
 * Cricut cartridges: Elegant Edges, Wall Decor and More
 * Cuttlebug embossing folder: Swiss Dots
 * Spellbinders Nestabilities: Labels Four
 * Stamp: Whimsical Designs~ Whimsical Fun, Volume 1
 * Paper: Core'dinations, First Edition Paper~ Isabelle
 * Butterfly Punch: Martha Stewart Small Monarch
 * Crinkle Ribbon: Prairie Bird Boutique
 * Twine: Trendy Twine
 * Button: My Mind's Eye Tres Jolie
 * Miscellaneous: iRock; Recollections heart rhinestones, microbeads, and pearls

Photobucket

Wednesday, December 28, 2011

Happy New Year: Whimsical Wednesday Challenge!

Happy Wednesday, my sweet friends! I hope everyone had a blessed and sparkly Christmas. :o)

This week's Whimsical Wednesday challenge is: Happy New Year! There are two wonderful options: either create a card/project to celebrate the new year OR upload your favorite card/project from this year. :o)

I embraced the option to share my favorite project so I wouldn't have to miss even a moment of precious family holiday time. As much as I love creating, I wanted to be with my loved ones as much as possible. Although this is a fairly recent project, it is my absolute favorite from my 7 or 8 months of Cricut creations and blogging. It makes my heart happy.

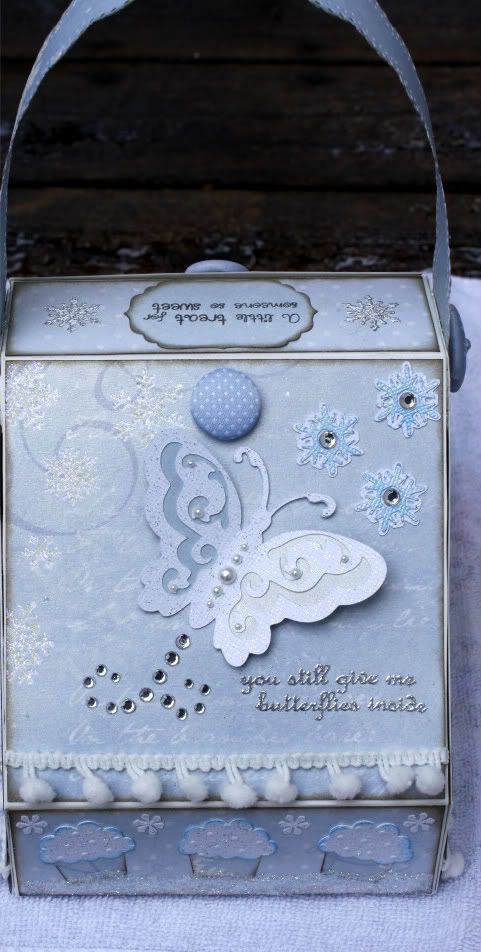
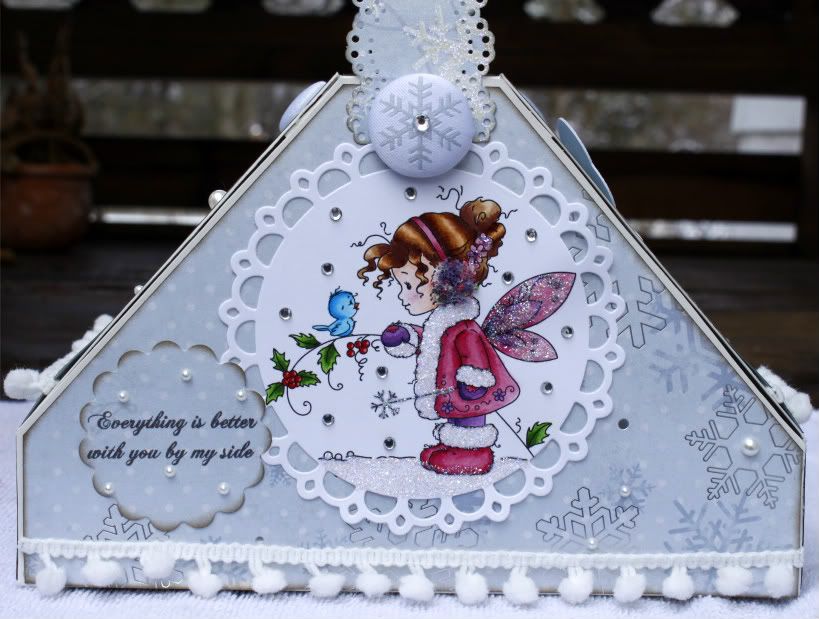
My winter picnic basket, created for me and my sweetheart to enjoy a lovely indoor picnic while snowflakes flutter outside:
I won't rehash most of the oodles of sappy notes and project details I shared in my original post, but if you want to re-read it (or didn't see it the first time) you can find it all by clicking HERE. For this recap, I'll simply share the highlights. :o)

"You still give me butterflies inside"
The pearl-accented Wall Decor and More butterfly is carrying the silver-embossed message, stamped from Stephanie's With Love stamp set.

"Everything is better with you by my side" 
One of my very favorite digi stamps, the Wee Stamps Winter Fairy... sharing her sparkly heart with her sweet friend. Another Whimsical Designs~ With Love sentiment makes this perfect. 

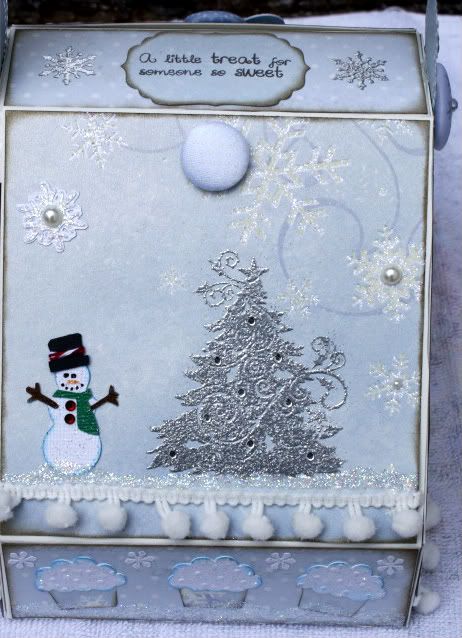
"A little treat for someone so sweet"
A touch of snowman-whimsy mixing with the elegant silver-embossed/rhinestone Christmas tree atop the fun snowy pom poms... and of course the dancing cupcakes below. Every winter picnic basket needs cupcakes dancing in the snow! And that sweet sentiment from Stephanie's Whimsical Fun~ Volume 1 is ideal for the yoke of the basket.
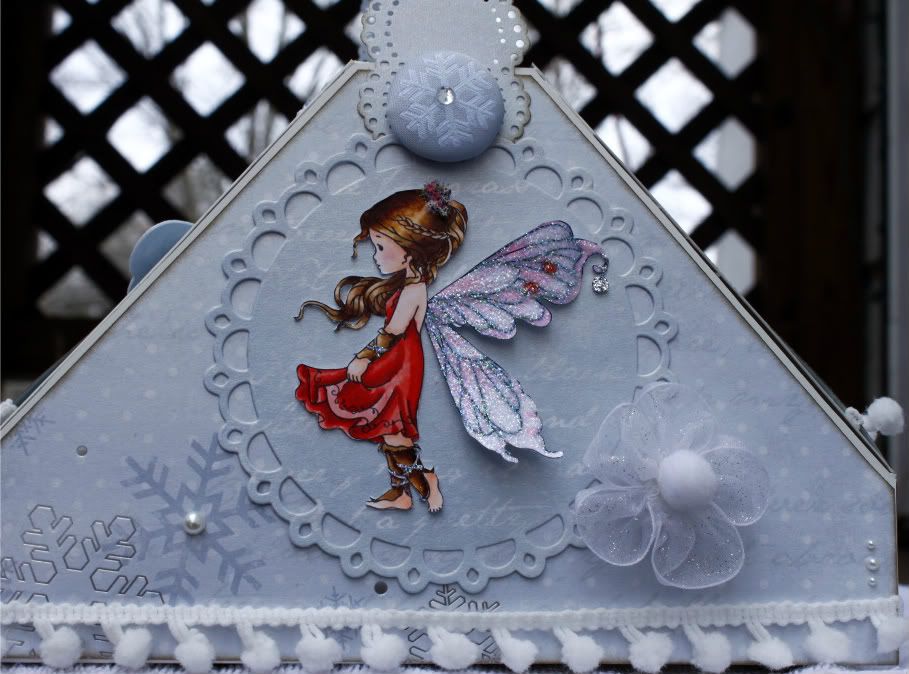
Lastly, another Wee Stamps image. She is technically the Silver Fairy, but to me she is always the Angel of Love. And you can never go wrong with a snowball-centered glitter bow made of ribbon. This project was such fun.. I'm thinking I should make another one soon. :o)

Picnic basket template I (mostly) followed: Created by Silvie Z Tutorial

I hope you'll join us this week by linking up your New Years card/project or your favorite 2011 creation to the Whimsical Wednesday challenge post! You can also read up on this week's prize on that post. I truly look forward to seeing what you share for this marvelous challenge. :o)

Be sure to hop on over to the other Whimsical Designers' blogs to see their fantastic projects. Thank you for stopping by today! I wish you all a beautiful day. :o)


** After two days of debating between this and my carousel, I'm adding this to another fabulous "Favorites" challenge! Oh how I've missed participating at CWC.
 * Cooking With Cricut~ Year in Review


Key Recipe Components:
 * Cricut cartridges: Create a Cricut, Gypsy Wanderings, Wall Decor and More
 * Cuttlebug embossing folder: Swiss Dots
 * Spellbinders Nestabilities: Labels Four, Picot Edge Circles
 * Sentiment stamps: Whimsical Designs Stamps (Whimsical Fun- Volume 1; With Love)
 * Digi image stamps: Wee Stamps (Silver Fairy; Winter Fairy); Colored with Copics
 * Christmas tree and the yoke snowflake stamps: Recollections
 * Paper: The Paper Company (Winter Whites Collection)
 * Fabric Buttons: The Paper Company (Winter Whites Collection)
 * Ribbon: American Crafts
 * Handle Border Punch: Martha Stewart Doily Lace
 * Miscellaneous: Flower Soft, iRock, Pearls (Recollections), Stickles
Photobucket

Wednesday, December 21, 2011

Home for the Holidays: Whimsical Wednesday Challenge!

Happy Wednesday, my sweet friends! Thank you for your loving support over the weekend... my family and I appreciate it. You are all amazing. :o) Hugs!

This week's Whimsical Wednesday challenge is Home for the Holidays! Create any winter, Christmas, or New Years themed home decor item to play along with us this week. With the big celebration this weekend, there's still some time to make that perfect accent or centerpiece with your own crafty hands. :o) Or as is the case with mine, one with a couple of Christmassy elements, but meant to stay put beyond that glorious day.

Made for my sweet, amazing mom... snowy flowers that will never wither. :o) (And a cute stocking tag, too!)
"Warm Winter Wishes"
This turned out to be a favorite project of mine! I happened upon a paper flower arrangement during a google search a couple weeks ago and instantly fell in love. I needed to make my own version and decided on a wintry wonderland bouquet with a couple pops of gorgeous festive red. All of the paper is Core Couture, so it is indeed sparkling like winter's beauty.

I sketched out some ideas, flipped through my little Cricut cart booklets to select a few different flowers... and five million pop-dotted layers later, my snowy bouquet was complete:
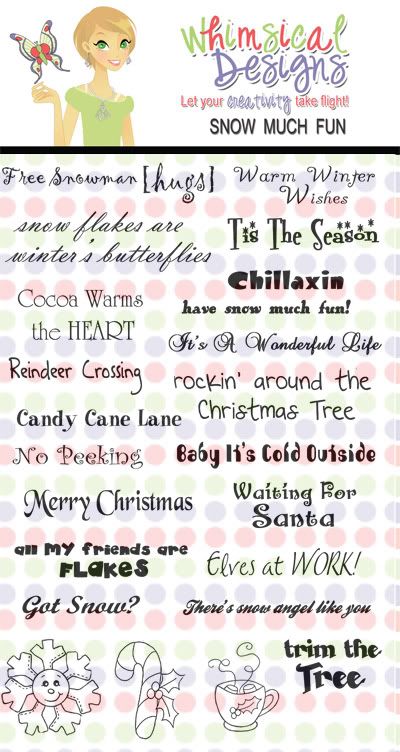
The Christmas ornament (and tag) hanging by a pearly snowflake contains the beautiful Whimsical Designs sentiment, which is from the Snow Much Fun set. I embossed it in silver to match the icy silver flecks in the flowers and also embossed some snowflakes from an Inkadinkado Christmas set. I love that I always have the ideal sentiment on hand with these magnificent stamp sets! :o) They make me happy, just like these enormous flowers. Oh these flowers... I practically cleared out my stash of pop dots. They range in sizes for a more realistic appearance. The smallest is 11 layers and the largest is 19 layers, with each layer being 1/4-inch smaller than the previous. To complete the arrangement I added a few different leaves, a couple of my favorite Cindy Loo flourishes, and added some pearls that my mom adores. (And of course a smattering of snowflakes.) The flower stems are made with rolled up white paper. Straws would have been much easier, but mine are all striped or neon... which just didn't quite coordinate. ;)

One side of the Cindy Loo basket contains another ornament, given to me by my sweet friend Jayne. I'm unsure what cart it is from, but I absolutely love it and think it's perfect for this project.
I backed the opening with a swirled golden paper, then covered it in Star Dust to make it sparkle with the Lord's light. Both of the ornaments are topped with silver Stickles and hung in silver. (And a winter butterfly wanted to be a part of this gift.) I made the basket from Cindy Loo and filled it with river rocks to prevent a tumbling accident. I admit it was a bit time consuming assembling the flowers with so many layers, but it was well worth it. Plus, this project was completely enjoyable and fun. I'll be giving it to my mom on Christmas Eve, along with a massive hug.

Since this project isn't exactly wrapping-friendly, I made a coordinating tag. I used the same papers, plus some sparkly Snow-Tex, microbeads, and ribbon. Why so snowy? Because this stocking has been dancing in the snow! :o) (Although technically the rain and fog came, so they are photographed separately. So unfortunate!)
If you view it larger, you'll see the pretty microbeads on the two bottom white sections. I wanted the stocking 'snowy' in a few different forms, so I used the microbeads on the bottom (lightly pressed into Glossy Accents), embossed the top section with a snowflake folder, and added some Glistening Snow-Tex along the trim. My mom loves ribbon and buttons (don't we all?), so I finished it off with some Prairie Bird Boutique crinkle ribbon, a shiny button from a goodie box I won from my sweet friend Pam, and a Peppermint Stick Trendy Twine bow. :o)

I hope you'll join us this week by linking up your winter, Christmas, or New Years home decor project to the Whimsical Wednesday challenge post! I am excited to see your creations. :o) Our very own Whimsical Designer Nanne is this week's generous sponsor, donating a prize pack of marvelous Webster Pages scrapping supplies. Thank you, Nanne! :o)

Be sure to flutter on over to the rest of the Whimsical Designers' blogs to see their beautiful creations. Thank you for visiting me today! I hope everyone has a sparkly, joyous, whimsical Christmas. :o)

Challenges entered:
 * Die Cuttin Divas~ Holiday Decor
 * Fantabulous Cricut~ Trimming with a Tag
 * My Craft Spot~ Tag... You're It!
 * My Sheri Crafts~ Let it Snow

Key Recipe Components:
 * Cricut cartridges: Cindy Loo, Create a Critter, Florals Embellished, Wall Decor and More
 * Cuttlebug embossing folder: Snowy one from Winter Wonderland set
 * Stamps: Sentiment~ Whimsical Designs~ Snow Much Fun; Snowflakes~ Inkadinkado
 * Paper: Core'dinations, K and Company
 * Ribbon: Prairie Bird Boutique
 * Twine: Trendy Twine (Peppermint Stick, purchased at My Craft Spot)
 * Microbeads: Recollections
 * Punches: Butterfly~ Martha Stewart Small Monarch; Snowflake~ Marvy
 * Miscellaneous: Glossy Accents, Pearls (Recollections), Snow-Tex, Stickles

Photobucket

Saturday, December 3, 2011

Whimsical Designs Stamp Release Blog Hop!

Happy Saturday, my sparkly friends! :o)

Welcome to the Whimsical Designs Stamp Release Blog Hop! You should have arrived here from the fabulous Cindy at Cindy's Scraptastic Designs. If you just happened to stop by or you got lost along the way, start at the beginning at Stephanie's blog. :o)

Since we are celebrating Stephanie's stamp release, I wanted to make something extra special to showcase a few of them. Her fantastic stamps played a huge role in how this project played out. The inspiration for my project idea itself came from my relationship. My sweetheart and I do our favorite things year round. We go to Christmas stores in the summer, make s'mores over candlelight in the winter... and now, we can have a little indoor picnic while snow piles up outside because I made us a sweet winter picnic basket!
Oh my, was this ever a fun adventure! It had some bumps along the way since it was my first time trying this, but this basket is already loved by many. To properly show you all sides, I need to share a few additional pictures. Click for larger views, if you'd like! Just pretend you don't see my mistakes. ;) Ready to be whisked into a sappy winter wonderland?

"You still give me butterflies inside"
One of my favorite sentiments in Stephanie's release, from her With Love set. I heat-embossed it in silver and surrounded it by a whimsical butterfly of sparkly white, icy blue, and a smattering of pearls. The papers and fabric buttons throughout this project are all from The Paper Company Winter Whites collection. They are heavyweight, double-sided, and possess a gorgeous sheen. I added a few snowflakes, a rhinestone path, and trimmed the panel with white pom-pom ribbon to resemble snow. We love snow. :o)

"Everything is better with you by my side"
This could not be more true. Everything is better with my sweetheart by my side... I knew this sentiment, also from the With Love set, was going to make an appearance. I used my Copics to color the adorable Wee Stamps Winter Fairy. Not only because it's precious, but also because the sweet birdie and little girl make me think of us. :o) I used Flower Soft in Fuchsia (yes, I clearly love that stuff) for her earmuff, as it perfectly coordinates with her rosy pink and purple outfit. I covered her wings, snowflake wand, and the snowy ground in Stardust Stickles. I thought it needed a smidgen more sparkle, so I grabbed my iRock and added crystal snowflakes in the sky. As is the case on all sides, I centered some of the snowflakes with pearls or rhinestones. Also, this is one of the better shots of the handle. I used my Martha Stewart Doily Lace punch on both sides to make it a little fancy.

"A little treat for someone so sweet"
How sweet is that sentiment?! It is from Stephanie's Whimsical Fun- Volume 1 set. I heat-embossed a couple snowflakes on either side of it to decorate the yoke of the basket. For the panel, I heat-embossed a Recollections Christmas tree stamp in silver to make it an icy outdoor tree, and then of course added a few rhinestones. I made a snowman to frolic beside the elegant focal point because there's always room for a little whimsy. :o) I gave him garnet rhinestone buttons, a sparkly green scarf, and Peppermint Stick Trendy Twine to make him spiffy. I added a layer of Stardust for the ground above the poms... just because.

You may have noticed the sweet little cupcakes on the two shorter sides. This is a picnic basket after all, ready to be filled with treats of all kinds. I cut out and embossed some cupcakes, topping them with sparkly white 'snowy' frosting. I nestled them in a layer of Stardust. I made the ones on the outsides slightly angled because they're happy dancing. They love this winter picnic idea! ;)

Lastly... a simple scene surrounding my angel of love.
Another Wee Stamps image, this is the Silver Fairy, colored in red because she's bursting with love. Although she's technically a fairy, I always think of her as an angel. I made the flowers in her hair a textural bouquet of Flower Soft (I know, I know... I can't stop! Three times in two days of projects!). I sparklified her wings and placed her atop a coordinated Winter Whites paper. See the white scroll across the Spellbinders Picot Edge Circle and the silver scroll across the base? For this picnic basket, I like to think of those as our memories being journaled. :o) To complete this side, I made a flower out of sheer glitter ribbon and centered it with a snowball. Ha! That tickled me pink for some reason.

Regrettably I do not have interior pictures... but it will soon be stuffed with treats for my sweetheart and I to share. One of those treats just might make an appearance on my blog very soon! The two nearly-square panels are the lids and the big fabric buttons serve as the openers. Ideally you could use something like the recommended Tim Holtz hitch fasteners if you have them. The template for this basket can be found here: Created By Silvie Z Picnic Basket Template. I (mostly) followed the instructions found in a Magnolia Ink magazine from this past summer. :o)

And now, are you ready to see Stephanie's fantastic stamp sets?! I am so excited to share these with you! I absolutely love them. :o)

With Love:
Snow Much Fun:
Whimsical Fun-Volume 1:
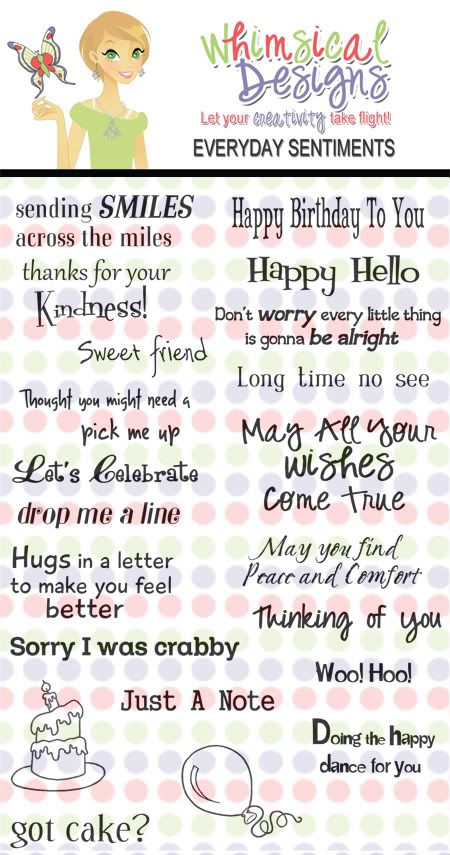
Everyday Sentiments:

Aren't they wonderful?! :o) I love the varied fonts, sizes, and the inclusion of sweet little images.

And now, because I'm all wrapped up in this festive atmosphere, I am offering up some BLOG CANDY! One random winner (via random.org) will receive the With Love set of Stephanie's new stamps! I am ecstatic to share these incredible stamps with you! It was difficult to decide which set, but my sappy side won out. ;) To be eligible to win, simply leave me a comment on this post! I do not require that you become a follower, but of course would love it if you do! The more, the sparklier! I will select and announce the winner on Wednesday, December 7th! :o)

There is also a GRAND PRIZE for this hop! :o)

One random winner will receive one Whimsical Designs stamp set of your choice, along with a fabulous prize pack that includes two Stampin' Up ink pads (Black and Chocolate Chip), one Stampin' Up medium sized acrylic stamp block, and one pack of Stampin' Up White Card Stock. In order to be eligible for the grand prize, you must be a follower of the Whimsical Designs blog and leave a comment on all of the Whimsical Designers' blog hop projects. You have until Sunday night at midnight to leave your comments. :o)

For extra chances to win the grand prize:
1. Advertise the Whimsical Designs Stamp Release Blog Hop on Facebook and then go to the Whimsical Designs blog to leave a comment that you did.
2. Blog about the Whimsical Designs Stamp Release Blog Hop and leave a comment at the Whimsical Designs blog saying that you did.
You must include the links to the posts in your comments.

Thank you for playing along with us! Your next stop is the marvelous Star at Star's Paper Passion. Happy whimsical hopping! :o)

**APRIL 13th EDIT**
Linking up in a Favorite Project challenge:
Getting Cricky with K Andrew

Key Recipe Components:
 * Cricut cartridges: Create a Cricut, Gypsy Wanderings, Wall Decor and More
 * Cuttlebug embossing folder: Swiss Dots
 * Spellbinders Nestabilities: Labels Four, Picot Edge Circles
 * Sentiment stamps: Whimsical Designs Stamps (Whimsical Fun- Volume 1; With Love)
 * Digi image stamps: Wee Stamps (Silver Fairy; Winter Fairy); Colored with Copics
 * Christmas tree and the yoke snowflake stamps: Recollections
 * Paper: The Paper Company (Winter Whites Collection)
 * Fabric Buttons: The Paper Company (Winter Whites Collection)
 * Ribbon: American Crafts
 * Handle Border Punch: Martha Stewart Doily Lace
 * Miscellaneous: Flower Soft, iRock, Pearls (Recollections), Stickles


Photobucket

Wednesday, November 2, 2011

Whimsical Wednesday Challenge: Anything Goes!

Happy Wednesday, my dear crafty friends! Two cards in two days... color me sparkly! :o)

Today is a VERY special Whimsical Wednesday! New adventures are beginning and I am honored to tell you that Stephanie has asked me to stay on for another term! I am ecstatic. She is coming out with a new stamp line, so stay tuned here and at her Whimsical Designs home for the release week date! It will be coming VERY soon. :o) I am blessed to have the opportunity to showcase her stamps as a member of her Design Team... and let me tell you, you are going to love them! I am eager to begin creating with them. :o)

Additionally, Stephanie has posted a Design Team call. :o) There are some permanent Design Team positions and Guest Designer positions open. Visit Whimsical Designs for the details. :o)

And now, let's get crafty! The challenge this week is Anything Goes! Whatever strikes your fancy, we'd love to see it! :o) This card I'm about to share with you is a record, my friends. I literally had two hours to craft. TWO. That's an insanely small window for me to come up with a plan and execute it. There was fear, I tell you. I even said I couldn't do it! But then... my heart said, "JUST DO IT!" Make like Nike! You know what's funny? This is the quickest and simplest card I've ever made, yet it still portrays the message that was on my heart. Card-making is a beautiful thing!

"Love Heals"

I had to take this picture in the dark (which was funny), but hopefully most of the sparkling details still shine through. (The entire main base is sparkly.) Despite the time crunch, I had a message to share. One of the primary reasons I bought the Wall Decor and More cartridge is because of this dancer. I've longed to use her, but was a bit apprehensive. Many of you know portions of my dance status. Suddenly, I just *needed* to use this beloved dancer. But with such a short time frame, I freaked myself out wondering how I could do it justice. I mean, this is DANCE. The first thing that came to me is that love heals. From there, I knew nothing else mattered. Whatever was with it was icing on the cake. The sentiment and dancer were there, and that was enough to propel me onward.

Love is healing my body... and I hope to return to the stage or studio where a powerful performance can inexplicably bring healing love to someone in the audience, whatever it is that they need. Emotional or spiritual healing... all art forms innately possess power if you're driven by a heavenly force. And as is stated, love never fails. :o) Our sweet dancer here has released a trail of sparkling rhinestones as she gives her heart to her audience, whether it's an audience of One or a full house. Her sparkling love has burst into this red and green filigree design, accented with rhinestones, to carry out the (sparkly embossed) message that love heals. The filigree design from Storybook is actually cut in half because I made it far too large, which proceeded to somewhat make it appear as a magical Christmas butterfly. That aspect was unintentional, brought to my attention by my boyfriend when I showed him my completed card. So perfect! My explosion of love just so happened to morph a bit into a butterfly! I am tickled sparkly pink.

The lacy card design is from Elegant Edges and I embossed the sparkly Core Couture cardstock with my favorite snowflake folder. She's dancing in a winter wonderland, her body steady and secure upon the red ribbon dusted with 'snow.' But you guys know me... that's not merely flowy red ribbon. It represents the healing power of red love, flowing to us and then through us. While I love the crisp red against the pristine white regardless of theme, this is Christmassy for a purpose. My hope is that the day we celebrate the ultimate gift, I will be able to dance as a gift to and from the Lord. This is my third year saying something of that nature. Maybe this is my year. :o) See how the dancer's arabesque has extended beyond the lacy border? She's breaking through barriers. :o)

I did not intend to make this post long, so forgive me. It all went into the making of this card, so I wanted to share. :o)

I hope you'll play along with us this week and link up your Anything Goes project at the NEW challenge home of Whimsical Wednesday's: Whimsical Designs. I would love to see your creations! Our fabulous sponsor this week is my fellow Design Team member Nanne of Nanne's Creations. She is donating a marvelous variety of Webster Pages scrapping supplies to one random winner who participates. Thank you, Nanne! :o)

Be sure to dance on over to Stephanie's blog to see the rest of the Design Team's projects! Thank you for visiting me today. If you persevered through this entire post, you deserve a cupcake. :o) (Or even if you didn't... because I like to share cupcakes.)

One final thing... it's almost FRIDAY! It's nearly time to celebrate the opening of Cindy's Scraptastic Designs with our kick-off blog hop! Hope to see you there, my friends. :o)

Key Recipe Components:
 * Cricut cartridges: Elegant Edges, Gypsy Wanderings, Storybook, Wall Decor and More
 * Cuttlebug embossing folders: Swiss Dots, Winter Wonderland pack
 * Paper: Core'dinations, DCWV
 * Spellbinders Nestabilities: Labels Four
 * Sentiment: Computer generated
 * Ribbon: Hobby Lobby
 * Miscellaneous: iRock, Stickles (on sentiment embossing)

Photobucket

Wednesday, October 19, 2011

Whimsical Wednesday Challenge: Autumn and Halloween Have Crept Into Our Homes!

Hello, my sweet friends! I hope your day is off to a wonderful start. :o)

It's another Whimsical Wednesday! The challenge this week is all about seasonal home decor, whether celebrating Autumn or Halloween. I'd love to see your projects, so I hope you'll join us! :o)

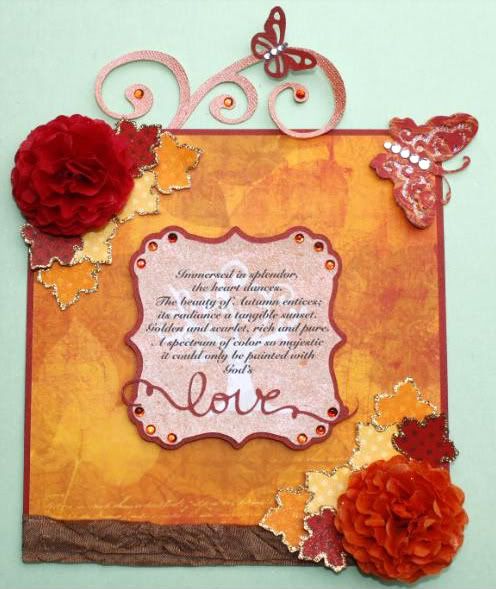
I chose to write a passage and create a wall hanging showcasing it. With the proper backing added, it can also be set upon an armoire or table, whichever the recipient desires. :o) (No need to squint... I'll type the text below the images!) If you understandably skip through my jibber-jabber, don't miss the end of this post because there's a second project! :o)
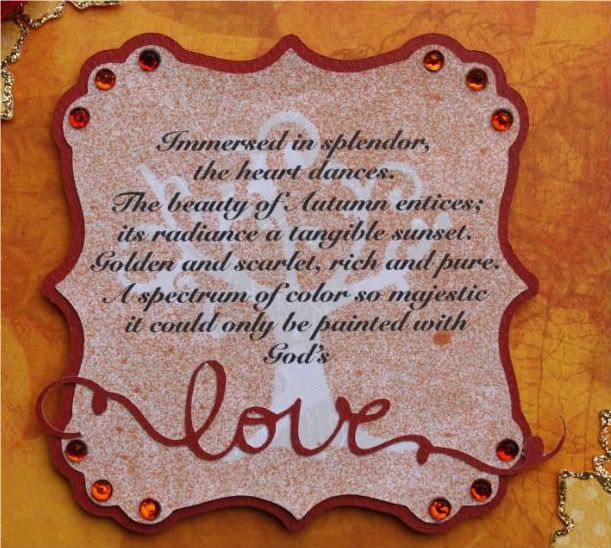
Text:
Immersed in splendor,
the heart dances.
The beauty of Autumn entices;
its radiance a tangible sunset.
Golden and scarlet, rich and pure.
A spectrum of color so majestic
it could only be painted with God's love.

I wrote the itty bitty passage after enjoying and reflecting upon beautiful fall foliage near my home. Something so exquisite can only come from a divine touch, which I tried to capture in the writing. With that as my base, I wanted to keep the surrounding design simple, yet beautiful... I wanted to enhance the showcased writing as opposed to detracting from it. (You guys know I can go a little nutty with adding stuff to my creations!) The background script in the paper makes me think of Autumn memories being written on your heart as they occur. This simple design had room for a few special elements, though.

First is the passage itself. I used my new Wall Decor and More cartridge, which I am in love with. When I saw the scrolly 'love' penned so gorgeously, I knew that would be my ending. It's such a simple touch, but I love the impact of that fabulous word standing out. :o) I still felt it needed something to really embrace Autumn and the Lord's work, so I cut out the swirly tree from the same cart to use as a mask. After carefully adhering it atop the passage using ridiculously teeny tiny pieces of double-sided tape, I went crazy with Tiger Lily Glimmer Mist. Oh the relief upon removing it without tearing the writing! :o) Pure at its core, then bursting with seasonal regal tones. It's super shimmery, too.

Secondly, I made the flowers I've been longing to try! My lovely and talented friend Sherrie at Sherrie Scraps with Passion created a tutorial last month, teaching us how to make gorgeous flowers out of coffee filters and Glimmer Mist. (Thank you, Sherrie!) They are fun, easy, and beautiful. I somehow managed to get pictures that eliminated nearly all of the pretty sparkle... rest assured, these could not possibly get any sparklier. Glimmer Mist is amazing and I am SO excited to finally have some. The colors I used for my flowers are Candy Apple Red and Tiger Lily. Sherrie's pictures accurately portray these beauties, unlike yours truly's. (I think I need to take a day to practice photographing projects. Seriously.)
Tutorial: Coffee Filter Flowers

As far as the rest of the design, I wanted the focus to remain on nature's beauty. I trimmed the polka-dot leaves in gold, reflecting the sparkling warmth of nature. I partially (but securely) adhered them, leaving them nearly pop-dotted for a dimensional element. The flourish represents an Autumn breeze, beginning from behind and swirling up and over the top.. carrying and guiding the butterfly. Now closer to the message, the larger butterfly has developed its intricate beauty, sparkling from within with the light of the Lord. :o) The flourish is also sprayed with Tiger Lily Glimmer Mist. (I couldn't put it down!) Lastly, I added some pretty crinkle ribbon in earthy brown from Prairie Bird Boutique. I hope this fun little project makes your heart all warm and fuzzy, like it does mine. I think I need to make one for myself! :o)

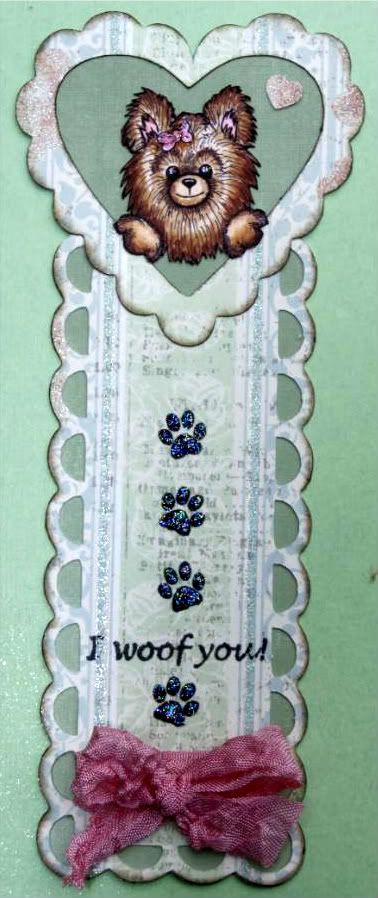
I'm super excited because we are also showcasing Mr. Cricut Crazy stamps, created by the amazing Tanner! He is one sweet and talented crafter and I am so honored to be using one of his stamps. He is a delight! I made a bookmark for my mom, using my Copics to color a fabulous digi stamp created by my friend and Design Team sister Cindy of Cindy's Little Creations.

I'm happy to say my mom loves it! I welded two borders from Elegant Edges for the bookmark and used paper that is naturally vintagey/distressed to replicate the look of a worn out, well-read book. As an added bonus, it even has areas of faint writing and sparkly elements. :o) I lined up the heart with the bookmark so the paper seamlessly flows, despite the multiple parts. She loves animals, so combining puppy elements from Tanner and Cindy was ideal! I stamped (and sparklified) paw prints because they're always traipsing across her books (and newspapers) as she's trying to read. See how the sentiment is in between two of them? It's like when you're in the middle of something, then all of a sudden you simply *need* to tell your sweetheart, parent, friend, etc. that you love them... and then you carry on with your activity. :o) The focal element is that sweet puppy Cindy designed, nestling in the ruffled heart, practically bursting out of it just like furry friends make our hearts overflow with joy. :o) She was fun to color. I added two specks of Stardust to her eyes to make them twinkly and used Cotton Candy Stickles for her sweet bow. Even though it'll be smooshed, I couldn't resist adding some crinkle ribbon. At least it's supposed to be crinkled, right?

I hope you'll play along with us this week and link up your wonderful creations to the Whimsical Wednesday Weekly Challenge post! Our two fabulous sponsors this week have provided prizes for two lucky winners who participate:

1. Prairie Bird Boutique~ One random winner will receive their choice of one beautiful bundle of shabby crinkle ribbon. Thank you, Patsy!
2. Mr. Cricut Crazy~ One random winner will receive their choice of one stamp set. Thank you, Tanner!

Be sure to flutter on over to the rest of the Design Team's blogs to see their marvelous projects. :o) I'm so happy you stopped by today. :o) Love and blessings to all!

Key Recipe Components (home decor item):
 * Cricut Cartridges: Cindy Loo, Elegant Edges, Gypsy Wanderings, Wall Decor and More
 * Sentiment: Written by me
 * Paper: Bo Bunny, Papertrey Ink
 * Ribbon: Prairie Bird Boutique
 * Small Butterfly: Martha Stewart Small Monarch punch
 * Miscellaneous: Glimmer Mist, iRock, Stickles

Key Recipe Components (bookmark):
 * Cricut Cartridge: Elegant Edges, Gypsy Wanderings
 * Paper: DCWV
 * Stamps: Puppy~ Sweet Heart Puppy from Cindy's Little Creations; Sentiment~ Mr. Cricut Crazy; Paw prints: My Pink Stamper (Even More Punny-licious)
 * Copics: E25, E31, E50 (fur); R10, RV20 (ears, bow)
 * Ribbon: Prairie Bird Boutique
 * Miscellaneous: Stickles

Photobucket
Related Posts Plugin for WordPress, Blogger...
Blogging tips