To pin my projects to Pinterest, hover over the picture and a Pin-it Button will magically appear.

Thursday, January 31, 2013

Varied-Flap Folded Mini Booklet

Hello, my sweet friends! Thank you for your lovely words and encouragement all week as I've worked on my last contributions for this month's I Feel the Love Project. I'm ecstatic that I finished this last project on time.. and I'll celebrate by seeing what you've been up to the past two days while I was holed up in my crafty area. :o) Then I'll write a little note for the Sotos to accompany this gift.

I had it on my heart to make a little something for each of Vicki Soto's immediately family members. She is the heroic first grade teacher who sacrificed her life to save six or seven of her students in the Sandy Hook Elementary tragedy... we've been creating in her honor this month.

At 27 years old, she was the oldest of four kids. One of her younger sisters said the pain was unimaginable. Since Madison gave us the opportunity to reach out to Vicki's family and her surviving students, I wanted my final project to be a little keepsake.

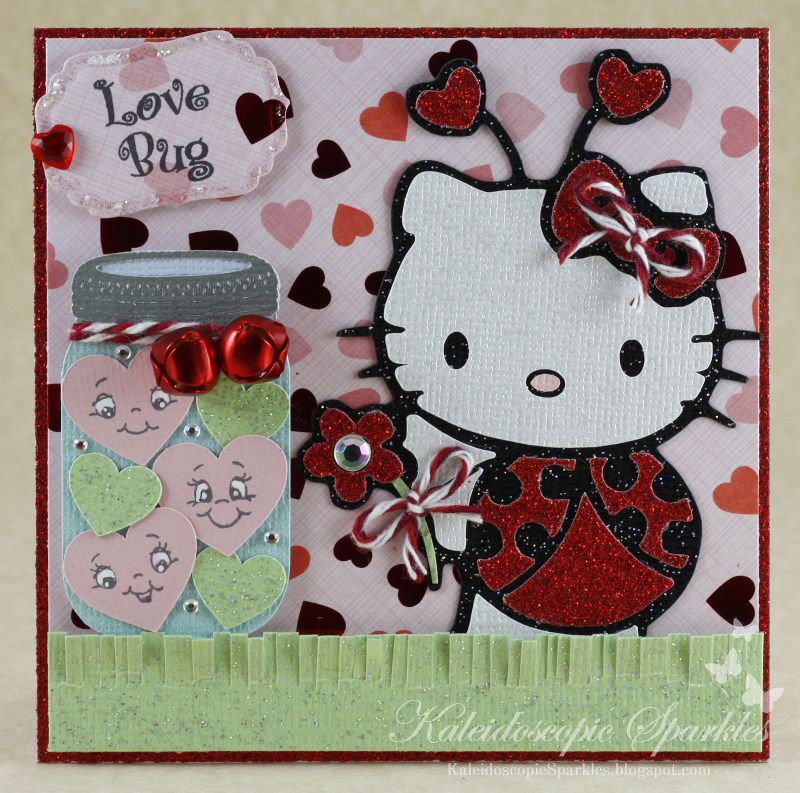
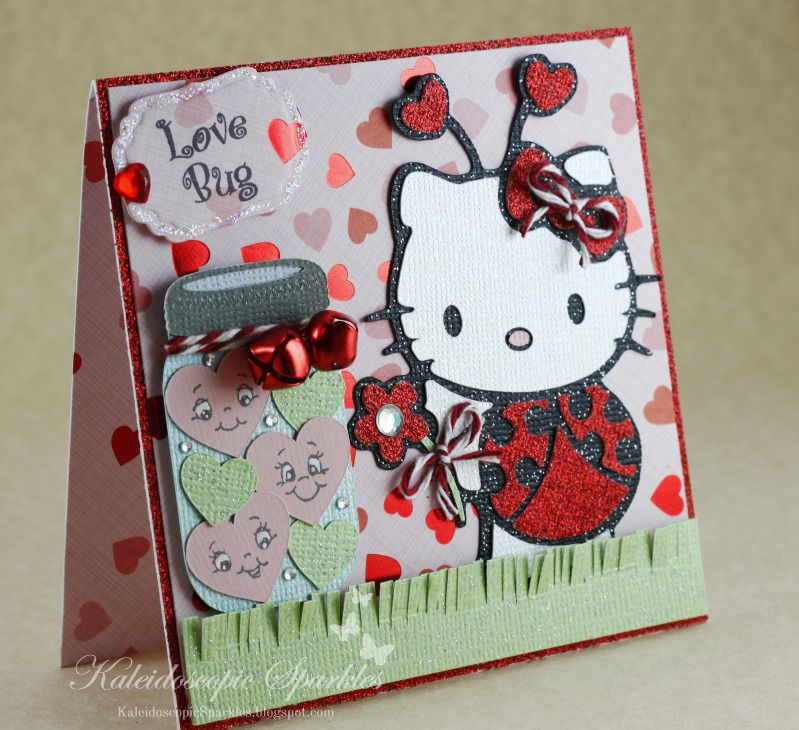
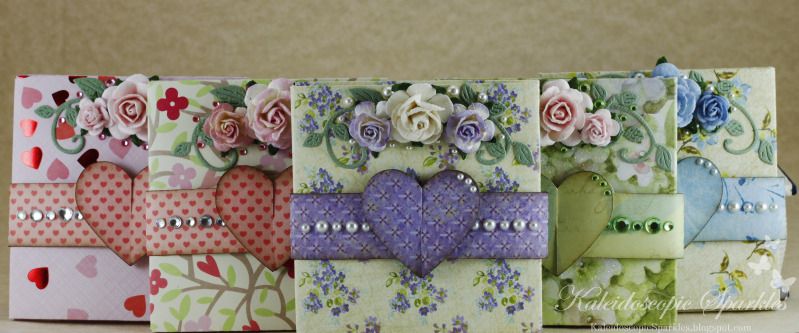
Five different little minis to store favorite pictures or memories of their beloved sister and daughter... one each for her parents (Carlos and Donna), two sisters (Jillian and Carlee), and her brother (Carlos):
I used my Cameo and a Samantha Walker cut file to create these folded goodies. They can be cards or little booklets... I'm using them as teeny mini-albums. I've spoken at length about this collection over the last few weeks. All that's left to say as I wrap up my work for it is that I love this family with all of my heart. I pray they see and feel the love I've poured into these little gifts... creations that Vicki inspired. I hope they know how much they are thought of and that God loves them dearly. And I hope they use these, keeping a few treasured memories tucked safely inside.

A few more pictures... they probably need to be enlarged to see the little sparkles and pearls sprinkled throughout the flower clusters. I used Wild Orchid Crafts flowers and my Cheery Lynn Designs Mini Fanciful Flourish for the arrangements. The flowers were Shimmer Spritzed for a sparkly finish.

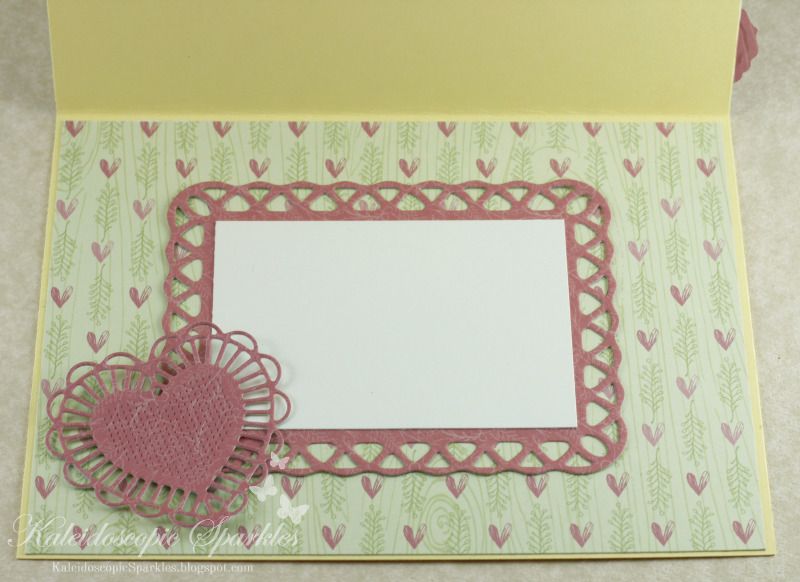
I bet you want to see a peek inside, don't you? An abundance of love, in varying patterns... eager to hold extra special moments from Vicki's life:
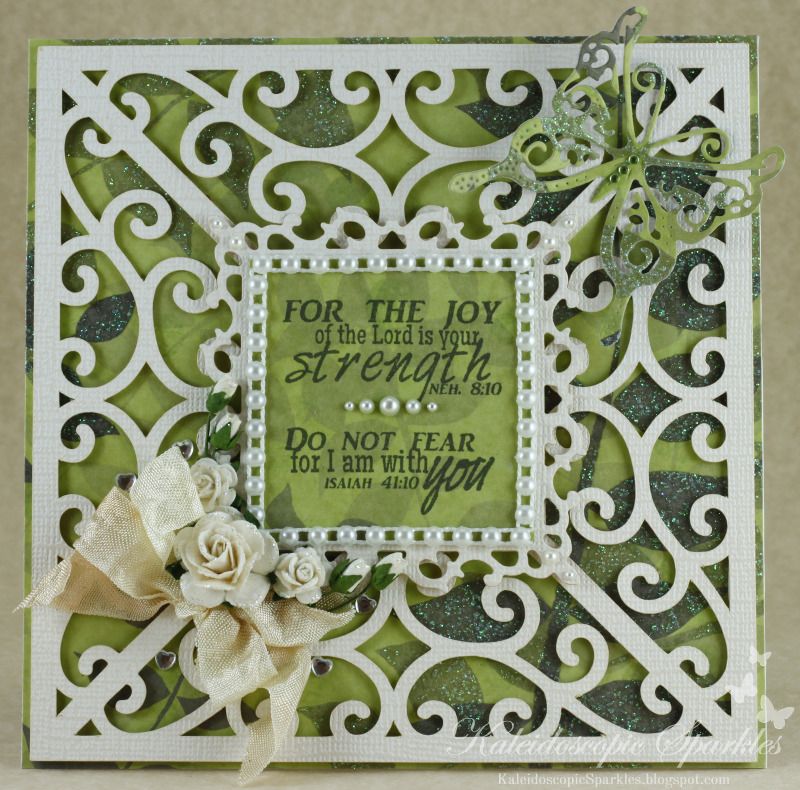
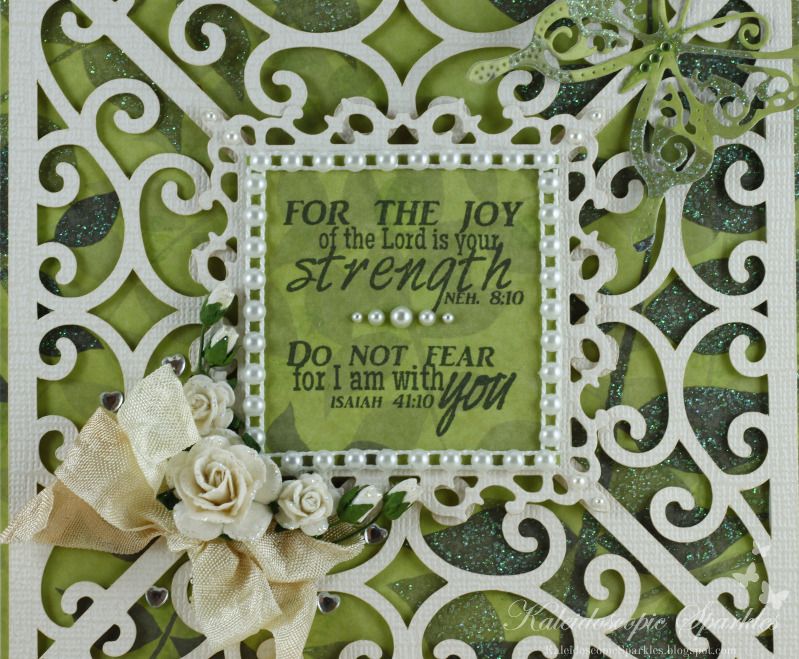
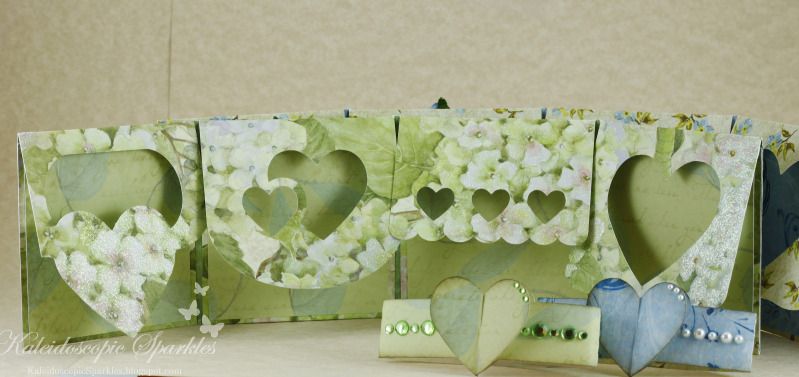
I didn't mean to cut off the blue one that much... the interior panels are lovely blue scrolls and vines. The gorgeous green and light blue glittery one is made of papers from a Susan Winget collection. So beautiful in person.

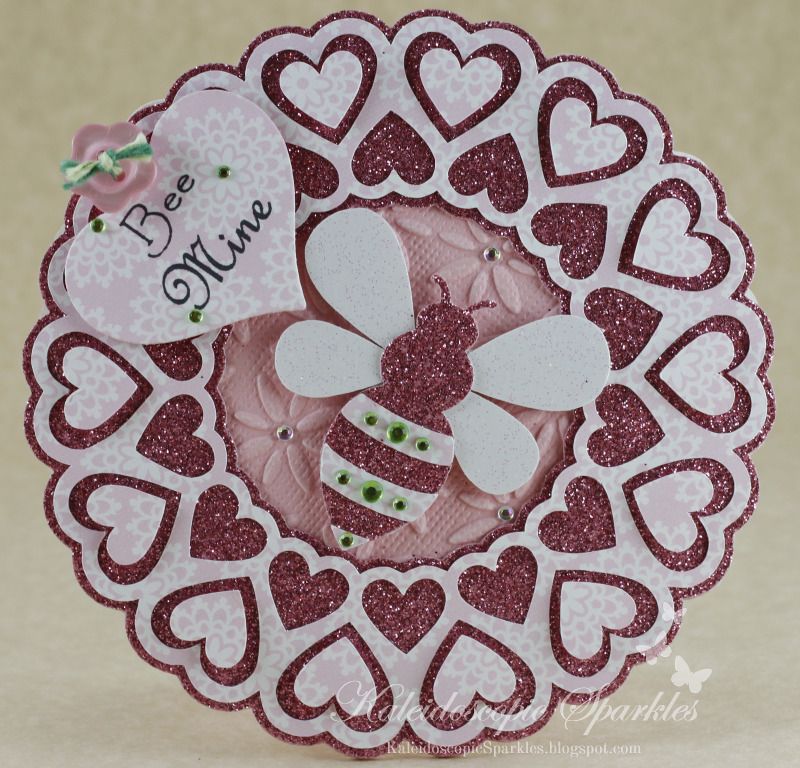
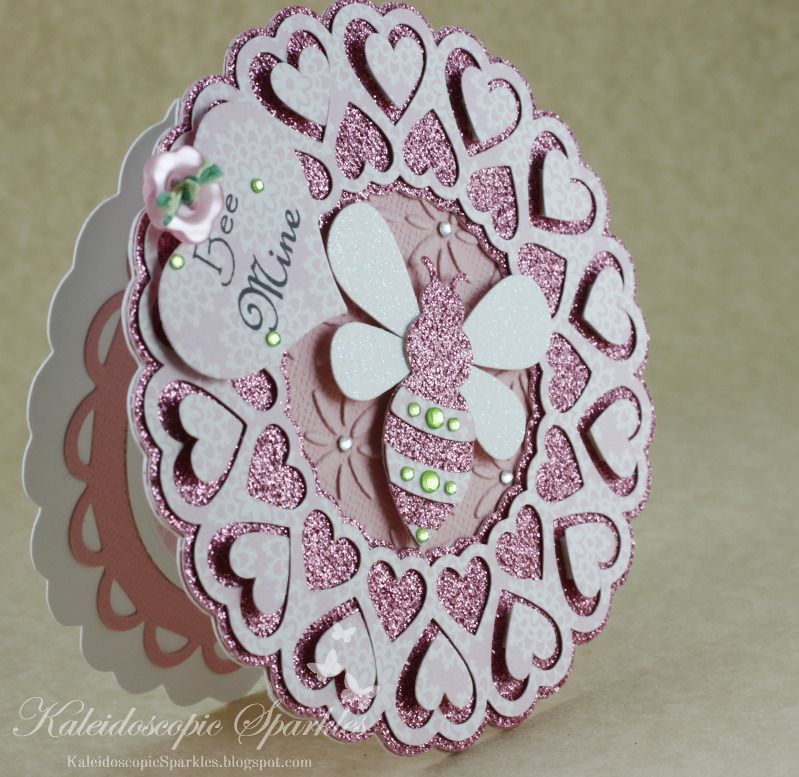
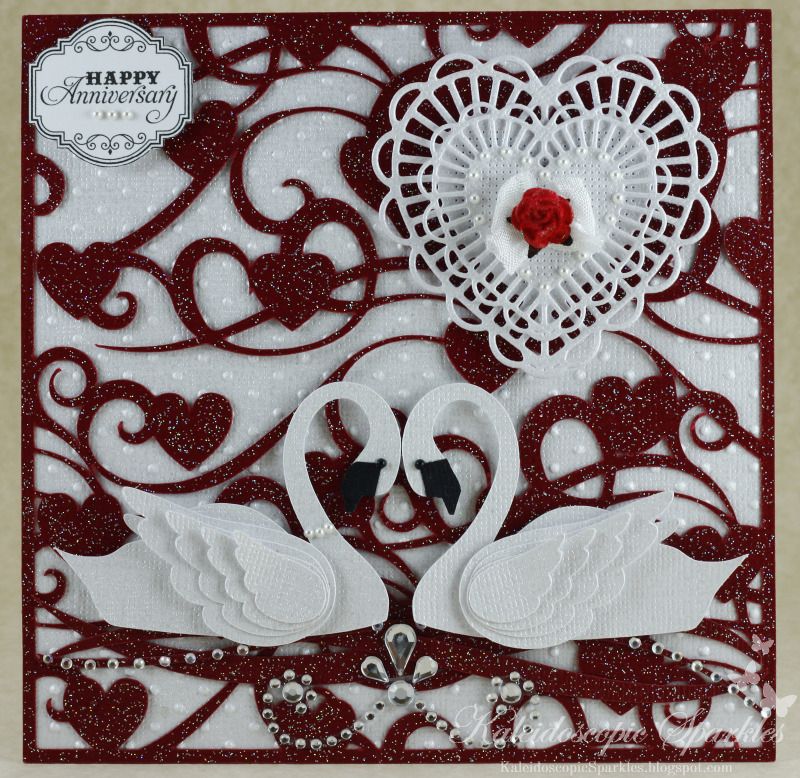
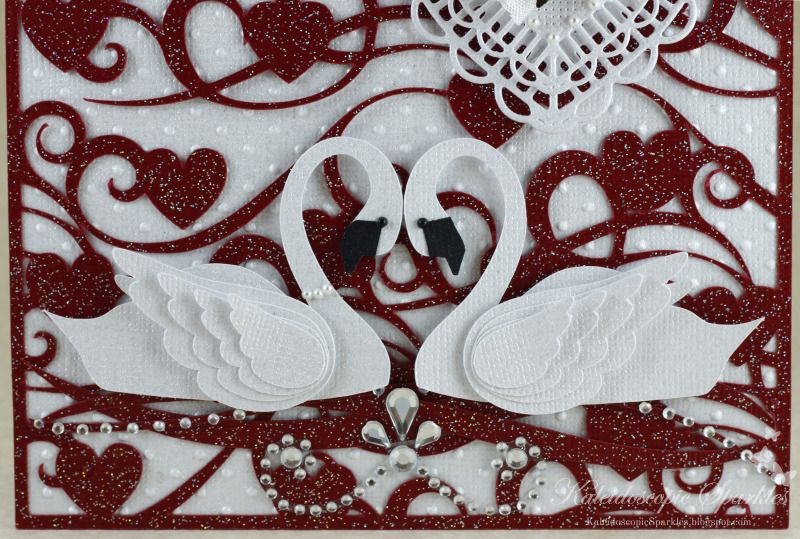
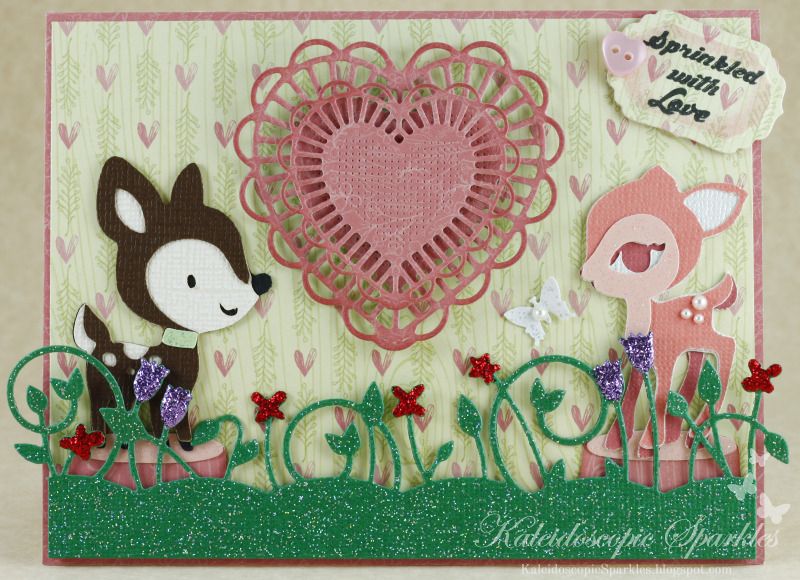
And a glimpse of the other three, ranging from fluttering hearts to bright floral to sweet elegance:
These were a joy to create, particularly knowing where they were headed. I've tucked my love inside them too, so it'll always be there as they face their new reality. It's been an honor to craft in Vicki's memory this month and I hope all my work engulfs the students and her family in an endless hug. :o)

Challenges entered:
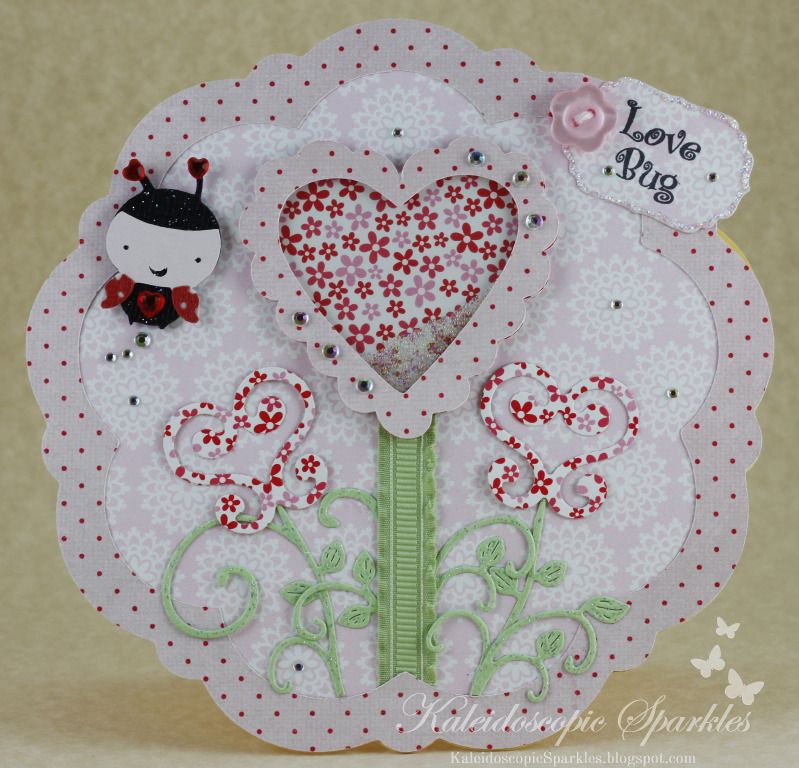
 *Cheery Lynn Designs~ Tickled Pink (the heart one)
 *Die Cuttin' Divas~ Anything Goes
 *DL.Art~ Linky Party
 *Make It Monday~ Anything Goes
 *Moving Along with the Times~ Punch it Out: Favorite punch or die (Cheery Lynn flourish)
 *Simon Says Stamp~ Anything Goes

Thank you for visiting me today! You make my blog sparkle. :o)

Wednesday, January 30, 2013

Love Bug Hello Kitty

Happy Wednesday, my dear friends! I hope your week has been all things lovely. :o) Today I have another card for January's I Feel the Love Project, where we are creating for those directly impacted by the Sandy Hook Elementary School tragedy. This little card will be going to a child who witnessed horrendous events in his/her classroom. It just breaks my heart.

Many of you know I've longed to make Hello Kitty cards, but wasn't able to buy the cartridge before Provo Craft retired it. One of the first things I did upon receiving my Silhouette Cameo this month was check for Hello Kitty files... my heart did the sparkliest happy dance ever when I discovered sweet cut files provided by the generous and talented Ruthie of September Ninth! :o)

Love Bug Hello Kitty stole my heart... and I was compelled to make a quick card to add to the owl tote box for those sweet children. :o) Isn't she precious?!
An angled view to show the red foil hearts, which appear black for the straight-on photograph:
This adorable love bug is fluttering from my heart to theirs, in hopes that she will add some sparkle to one of the first-graders who suffered such horror. She is ultra sparkly for the occasion, with red glitter Martha Stewart paper and black Core Couture. The glimmering grass provides her twinkly path. The heart paper is from a MS Valentine's Collection.. I love the whimsy. :o) The hearts will soon engulf those dear children in a whirlwind of love. Peppermint Stick trendy twine from My Craft Spot was used for the hair and flower bows, as well as the mason jar tie.

Speaking of which.. the mason jar with hearts is a Lori Whitlock cutting file, which I slightly altered to make half of the hearts larger. It's bursting with super love! :o) To those I added Peachy Keen faces from the Wide-Eyed Kids and Everyday Character Faces assortments. As you well know by now, the other hearts are green in honor of Vicki Soto's favorite color. I 'secured' the jar with twine and two jingly bells for extra Valentine fun for the kids. :o) I hope every jingle adds a sparkle to their hearts. :o)

The Whimsical Designs sentiment is from the With Love stamp set, which I stamped upon a Spellbinders Labels Four tag and outlined in Star Dust. A Recollections rhinestone heart finishes off the card because it's simply impossible to have too much sparkle. :o) Like my Bee Mine card from Monday, this is only 4x4 which is so hard for me to do. I think of them as tiny packages with big heart! :o)

Relatively short and sweet for me this time, as I'm still crafting at a furious pace to finish my final contributions for this collection. I didn't anticipate being down to the wire, but God will help me finish so I can bless Vicki's family with a little crafty gift. I hope they like it. :o) I WILL be back tomorrow because not finishing isn't an option. :o)

Challenges entered:
 *Cupcake Craft~ With Bells On
 *Make It Monday~ Anything Goes
 *Paper Pretties~ Square Cards
 *Peachy Keen Stamps~ Cards with hearts
 *{PIN}spirational Challenge~ Photo Inspiration
 *The Pink Elephant~ Hearts

Thank you for fluttering on by! Smile lots today... you are dearly loved! :o)

Tuesday, January 29, 2013

Sympathy Card

Happy Tuesday, my cherished friends! I hope you're having a beautiful day. :o)

Today I have a card to share with you for the second part of this month's I Feel the Love Project. One of the hardest aspects of tragedies from afar is the helpless feeling that can overwhelm you. That's what I was experiencing upon learning of the horrific event at Sandy Hook Elementary last month. But thanks to this incredible cause, enabling us to craft for a far higher purpose, I'm able to do a tiny bit to help some who were impacted.

This is my sympathy/encouragement card for the family of Vicki Soto, the 27-year-old first grade teacher who sacrificed her life to save some of her students that day:
This was difficult to properly photograph... the shades of green are earthy, not super bright. Because it was her favorite color, many of her family members wore green clothing to her funeral and everyone wore a green ribbon. Rather than having touches of green like the Valentines I've been making for her surviving students, I want her parents and siblings to see her in this card by immersing it in that beautiful color.

The paper is from Susan Winget's K and Company Botanical collection. When I saw the sparkling monochromatic green botanical pattern, I knew I needed it for this purpose. It peacefully rests behind a swirly frame, which is a cut file from Bird's Cards. The Scriptures are from K Andrew Designs Scripture Sayings stamp set, which I stamped atop more of the same paper and mounted it on a Spellbinders Fleur de Lis square. The square is popped up with foam tape for dimension and separation from the frame base.
I used a flat-back pearl strand and roses and rosebuds from Wild Orchid Crafts to frame the vital sentiments. A double-bow of vanilla bean crinkle ribbon from My Craft Spot adds a touch of softness. I sprinkled five heart-shaped rhinestones along the outskirts of the flower cluster to tell the Soto family how much they are loved.

Inexplicably, I forgot to take a close-up photograph of the Cheery Lynn Designs butterfly. If you click on the pictures, at least you'll see it much bigger. Originally I planned to make it cream, but at the last moment inspiration arose. I wanted to make the entire butterfly shades of green to fully represent their beloved daughter and sister. I cut it from the same paper as the base and centered it with bright green rhinestones. Her selfless heart continues to sparkle as she inspires the entire world... or at least those who take the time to see and feel it. It hurt to learn so much about her after she was gone, but I knew it would guide me to create in her honor this month. I'll carry her with me always. And this green butterfly will remind her family that she is very much still with them, too.

The coordinating interior... and a view of Vicki's protective heart in flight:
It's a tiny gesture, but one that I hope will bring comfort to her family and encourage them to receive their strength from our dear Father. I cannot image their horror that tragic day or the depth of their continued grieving... but I hope they seek heavenly peace. Their heroic daughter saved young lives that day... and at least she is safe with our Lord, where evil will never again touch her.
Challenges entered:
 *Anything Goes Challenge Blog~ Monochrome
 *Craft-Room Challenge~ Monochrome
 *Little Miss Muffet~ Hearts and Flowers (five rhinestone hearts sprinkled alongside the flowers)
 *Make It Monday~ Anything Goes
 *Stampin' for the Weekend~ Something Girlie

Monday, January 28, 2013

Bee Mine

Happy Monday, my sweet friends! I hope your week is off to a sunshiny start. :o)

I spent most of the weekend crafting, trying to meet the (seemingly impossible) goal I set for myself for this month's I Feel the Love Project. We are creating in Vicki Soto's honor, the heroic teacher whose selfless actions saved six or seven children in December's Sandy Hook Elementary tragedy. Valentine's cards for those surviving children, as well as thinking of you/sympathy cards for Vicki's family, is the mission. I am so thankful to Madison for giving us an opportunity to tangibly reach out to those impacted so deeply.

My newest contribution for those children is this sweet little card. At only 4x4-inches, it'll easily nestle inside the owl tote box I made for them a couple of weeks ago. :o)
This little bee is bursting with sparkling love! The bee and heart base are cut files from the generous and talented Bird of Bird's Cards. I used ultra-glittery pink paper for lots of sparkle and layered a lacy floral Doodlebug Lovebirds patterned paper atop it. The smaller hearts are pop-dotted for dimension (one of my favorite things to always do on my cards, though I often forget to mention it).

The sentiment is a combination of My Pink Stamper Punnylicious and Whimsical Designs With Love stamp sets. I stamped it upon a Spellbinders Nested Heart and secured it with a Bella Blvs flower button. I debated forever what shape to put the sentiment upon, as I was so hesitant to break up the circle of hearts... thankfully the Lord reminded me that I had a perfect sized heart to continue the flow of love. :o)

The base layer showing in the middle is embossed with the Cuttlebug Baby's Breath folder, my new favorite from them. I sprinkled a few rhinestones among the flowers. I mentioned with a previous card for this month's IFTL collection that everything I make for it will include green because it was Vicki's favorite color. Pink and green is a favorite color combination, so it came easily here. Green rhinestones line the bee's body, who is buzzing Vicki's endless love straight back to the children. Although unseen in the photograph, the bee's wings are glittery DCWV paper, in shades of pink and green. Incorporating green with the sentiment was a must, as she will always Bee with those who she loved with all of her beautiful heart. Thus, a smattering of green rhinestones and Lime Twist twine from My Craft Spot.

Despite the blur, I'm sharing a peek inside to show the card's dimension and sparkle. Spellbinders Lacy Circles and Classic Circles are nested inside, with the top circle being inked in Spun Sugar for added sweetness.
If I can manage to meet (or nearly-meet) my goal, this will be an unusually busy week on my blog. Thank you for always being so encouraging of this passion of mine... using my love of crafting to serve this incredible I Feel the Love purpose all year long.

Challenges entered:
 *Charisma Cardz~ Hearts and Flowers (flower-shaped button, embossed flowers, and flower DP)
 *Crafty Catz~ Cute as a Button
 *Docerela Creations~ Heart and Button
 *Fab 'n' Funky~ Favorite Color Combo (pink and green)
 *Make It Monday~ Anything Goes
 *Moving Along with the Times~ Bling it On
 *The Sisterhood of Crafters~ Hearts
 *Whoopsi Daisy~ Card/Project for a Child

Thank you for buzzing on by! I wish you a sparkly and blessed day! :o)

Saturday, January 26, 2013

Monkey Valentine's Card: More love for I Feel the Love

Happy Saturday, my dear friends! I hope everyone is enjoying a beautiful weekend! :o) Thank you for your sweet anniversary wishes toward my parents... 50 years ago today they were married in the midst of a snow storm! Even then, no storm could stop their love. :o) I'm happy to say they adore the swan card I made them. :o)

An uncharacteristically short post from me today! I've had to switch gears back to children's goodies to add to my contribution toward this month's I Feel the Love Project. We have been creating Valentines for the six or seven children who survived the Sandy Hook Elementary tragedy last month, thanks to their heroic teacher Vicki Soto... January's collection is in her honor. It has been incredible making them surprises the past few weeks!

Kiddos love monkeys, so I made a colorful little Valentine scene.
The Create a Critter monkey is offering his sparkling heart in one hand.. and his treasured banana in the other! Surely the child will know just how much it means for a monkey to share his banana. ;) I sprinkled a trail of bananas behind the sparklified Memory Box Spring Border. The Wall Decor and More tree is embossed with the Swiss Dots folder and swirling with love via heart rhinestones. I hope it engulfs the sweet kid who receives it. The background paper is from the Doodlebug Lovebirds collection, where every adorable bird is tweeting their love for everyone impacted by that event.

Love abounds inside as well, along with an extra surprise monkey. :o)
The Whimsical Designs sentiment is from the With Love set, layered upon a Spellbinders Lattice Rectangle base. I hope this card encourages a smile to the little one who needs all the extra love possible. :o)

We are also creating cards for Vicki's grieving family, which I will spend this weekend doing. There are still a few days left to participate, so I hope you'll consider joining us. :o)

Challenges entered:
 *Cupcake Craft Challenge~ Make a Scene
 *DL.Art~ Thankful Thursday: Use Red or Pink
 *Paper Playtime~ Use Brown

Thank you for swinging on by! I wish a beautiful day of love and light. :o)

Monday, January 21, 2013

50th Anniversary Card for my Parents!

Hello, my dear friends! I hope your week is off to a beautiful start. :o)

There is an incredible event this weekend within my family: my parents' 50th wedding anniversary! It gives me warm fuzzies. They've been together since high school and have been through so much over the years... when the storms come, they persevere. I have no doubt there will be some happy tears from me on Saturday! Being the youngest of five kids, they still refer to me as their little girl. :o)

The inspiration for this card stems around the sweet swans... my dad has swan decor throughout his backyard and he *always* pairs them up just like this! (He's beyond precious.) I thought they would make a wonderful anniversary card. I aimed for sweet and (relatively) streamlined, with touches of whimsy and elegance. My parents make my heart sparkle. :o)
My first card using my Cameo. :o) How do I love thee? Let me count the ways... I fell in love with this flourished hearts background and so badly wanted to use it for this card. The flourishes make me think of waves and with the hearts sprinkled throughout, I just kept thinking "waves of love!" I knew this would be gorgeous for a scrapbook LO or home decor, but I felt I would be pushing it as a card base. There are so many ultra thin parts, especially when scaled down. Since I couldn't stop thinking about it, I gave it a whirl... and the amazing Cameo cut it beautifully as a 5.5-inch square! I was elated! I used Core Couture burgundy paper to replicate sunbeam reflections dancing atop the waves. :o)

The pretty swans:
The gorgeous Sarah Bailey swan file is actually just a silhouette, so I originally planned to hand-cut some feathery wings since I wanted them dimensional. However, I stumbled upon the talented Lisa Barrie who had also used this swan cut. She brilliantly paired it with a file that contains wings, so I happy-danced and did the same. So much quicker than hand-carving! To make these Trumpeter swans, I made them black beaks and used teeny black pearls for their eyes. Since my mom adores pearls, I couldn't resist making a pearly necklace for one. :o) To add a few more 'waves' beneath the swans, I used three from this file since they matched my background perfectly. I lined the thinnest one with tiny sparkles for extra sunbeams. :o) Lastly, I added a Recollections flourish.
The pearlescent white background is embossed with the Swiss Dots folder. The hearts are from the Cheery Lynn Designs Two of Hearts set, which I accented with pearls and layered with pop-dots for dimension. A flower was a must for this card, so I sprayed a white Wild Orchid Crafts rose with Candy Apple Red glimmer mist for color and sparkle. It centers a little bow made with Snow White crinkle ribbon from My Craft Spot.

The pretty Pink Gem Designs digi sentiment is from their Vintage Occasion set, which I already love. It will get a lot of use. :o) I accented it with three pearls to match the heart and swan. This card was a joy to create as I thought of the extra special celebration... I pray they love it as much as I do. :o) I could wax poetic about the love that went into this card, but I think I'll save it for when I post the gift I'm making them next. :o)

Challenges entered:
 *A Gem of a Challenge~ Emboss It (dry embossing on white base)
 *Card Mania~ Oh, So Girly (hearts, sparkle, flower)
 *Cheery Lynn Designs~ Sweethearts
 *Crafty Ribbons~ Love/Romance/Anniversary
 *Cute Card Thursday~ Diamonds are Forever!
 *DL.Art~ Linky Party
 *Joanna Sheen~ New Beginnings (anniversary)
 *Little Scrap Pieces Fun Friday~ Use a Flower
 *Make It Monday~ Anything Goes
 *My Craft Spot~ Bling it Up!
 *Really Reasonable Ribbon~ Valentine's Day/Love, plus Ribbon
 *The Cutie Pie Challenge Blog~ Use Three Different Textures

Thank you for floating on by! (hehe) I wish you a lovely week of blessings and joy! :o)

Saturday, January 19, 2013

Sweet Saturday: Homemade Hostess Cupcakes

Happy Saturday, my dear friends! Thank you for the bloggie love for my little owl project. It was a favorite of mine and I'm so happy you liked it, too! Are you ready for a sweet treat? :o)

Growing up, a favorite treat of mine was Hostess Cupcakes. I was always excited when my parents bought them and my heart danced with glee with each bite. These days, I most enjoy homemade versions of my favorite confections because I know exactly what's in them and everything just tastes better freshly made. To my delight, the nostalgia was still there as my family and I shared this homemade rendition of a childhood favorite. :o)

Note: In my rush to finish these before my mom arrived, I did not let the glaze thoroughly set before piping the trademark swirls. Thus, melty swirls. (I like to consider them HUGGING swirls.)
I had such a fun time baking up these cupcakes! The chocolate cake batter is made in a way that renders it the fluffiest cake I've ever made. They're so tender and airy, you can simply insert a pastry tip in the top to fill it with the fluffy marshmallow filling. Regrettably, due to my haste I didn't get an interior photograph. They're topped with a smooth and satiny chocolate glaze, with the final touch being the swirls of marshmallow delight. You can never go wrong with the chocolate-marshmallow combination and this was a hit, sure to be made time and again. I did make one change this time, which was to use semi-sweet chocolate for the glaze because that's my mom's favorite. I'm sure they're just as scrumptious with the called-for bittersweet chocolate.

There are a handful of bakers who I whole-heartedly trust and will make any of their desserts with unwavering confidence. This recipe is from one, and ironically the day after I baked these, another favorite food blogger posted her own version. I may try the other recipe the next time we're craving chocolate and marshmallow cupcakes... if I happen to love the other one even more, I'll be sure to re-post. :o) However, these were so loved and enjoyed by all that I'm in no hurry to do a recipe comparison. :o)

Make these and feel like a kid again. :o)

Thank you for visiting! I hope your weekend is filled with love, crafting, and sweet confections. :o)

Homemade Hostess Cupcakes
Yield: About 26 cupcakes

Ingredients:
For the cake:
1¾ cups plus 2 tablespoons cake flour
1 cup Dutch-processed cocoa powder
1½ teaspoons baking powder
¾ teaspoon baking soda
½ teaspoon salt
6 large eggs at room temperature, separated
1 cup canola oil
1¾ cups plus 2 tablespoons sugar, divided
6 tablespoons water

For the filling and frosting swirl:
2 cups marshmallow cream/fluff
½ cup (1 stick) unsalted butter, at room temperature
¾ cup confectioners' sugar, sifted
Pinch of salt
½ teaspoon cream or milk

For the chocolate glaze:
5 ounces bittersweet chocolate, finely chopped
½ cup plus 2 tablespoons heavy cream

Directions:
To make the cupcakes, preheat the oven to 350ºF. Line cupcake pans with paper liners. Set aside.

In a medium bowl, whisk together the flour, cocoa powder, baking powder, baking soda, and salt. In a large bowl, combine the egg yolks, canola oil, 1½ cups of the sugar, and the water. Whisk to blend well. Stir the dry ingredients into the wet ingredients, mixing just until incorporated.

In the bowl of an electric mixer fitted with the whisk attachment, whip the egg whites on medium-high speed until foamy. Continue beating, gradually adding in the remaining 6 tablespoons of sugar, until stiff, glossy peaks form. Add a quarter of the egg white mixture to the bowl with the batter to lighten. Gently fold in the remaining egg whites until the batter is smooth and no streaks remain.

Divide the batter between the prepared cupcake liners, filling each about three-quarters full. Bake until the cupcakes spring back when lightly pressed, about 16-18 minutes, rotating the pans halfway through baking. Allow to cool in the pan about 5 minutes, then transfer to a wire rack to cool completely.

To make the filling, combine the marshmallow cream and butter in a mixing bowl and beat on medium-high speed until smooth. Blend in the confectioners' sugar and salt and whip until the mixture is light and fluffy, about 1-2 minutes more. Transfer the majority of the filling mixture to a pastry bag fitted with a medium round tip, reserving ½ cup in the mixing bowl. (The opening of the recommended tip is just under ½-inch in diameter.) Blend in the cream to the reserved filling mixture to make it smooth for piping the swirl on top of the cupcake. Transfer this to another pastry bag fitted with a small round tip (Wilton #3 is recommended). Chill until ready to use.

Fill the cupcakes by inserting the pastry tip directly into the center of each cupcake and squeezing in a dollop of the marshmallow mixture. (See this post for a visual-- an injector tip will not work for this recipe because the filling is too thick.) If excess filling comes out of the top, scrape it off with a knife so the top of the cupcake is essentially smooth.

Make the chocolate glaze by placing the chopped chocolate in a small bowl. Bring the cream to a simmer in a small saucepan or the microwave. Pour the hot cream over the chocolate and let stand 1-2 minutes. Whisk together until a smooth ganache forms. Let cool briefly, about 5 minutes.

Take the cupcakes one at a time and invert them, dipping the tops into the chocolate glaze. Transfer them to a wire rack or baking sheet to let the glaze set. (You can speed up this process by chilling in the refrigerator.) Once the glaze is set, use the reserved portion of marshmallow frosting to pipe a uniform swirl across the top of each cupcake. Store in an airtight container until ready to serve.

Source: Annie's Eats

Thursday, January 17, 2013

Owl Tote Box: My First CAMEO Project!

Hello, my sweet friends! I hope everyone is having a sparkly day. :o)

I received a belated Christmas blessing that set my heart aflutter. My incredible sweetheart blessed me with a Silhouette Cameo and I remain a bit stunned. :o) I (of all people) don't have the words to express how much I love this machine! The possibilities are endless and it cuts to perfection. I certainly have a ton to learn and am excited to discover all that it entails and the creativity it sparks within me. :o)

My first Cameo project needed to be sappy, sweet, and bursting with love... and I wanted it to be for this month's I Feel the Love two-part collection. It is in loving memory of Vicki Soto, the heroic first grade teacher at Sandy Hook Elementary School who gave her life to save some of her students. On part is to create Valentine's/Hearts goodies for those precious children her selfless actions saved.

I happened upon a Lori Whitlock file for a precious 3D Owl Tote Box and had to make it for those kids to hold some sweet creations. But I couldn't make it a regular owl... I wanted to celebrate all things LOVE by transforming her into a Valentine's Owl! :o)

Isn't she sweet?
I used a combination of papers from Doodlebug, Imaginisce, and Martha Stewart to bring her heart to life. All of the edges are lightly inked in Victorian Velvet for some depth.. and I think she's blushing from wearing her heart on her sleeve. Or feathers. :o) Tiny rhinestones accent her eyes, reminiscent of their beloved teacher. How beautiful is a soul that sparkles so brilliantly it is seen through the eyes... just like Vicki's. With as much love as I want to deliver the children who endured that nightmare, I needed to make something extra special. Sure, it's merely a box... but it is made with a love so strong that I'm hopeful it will saturate their hearts.

A little closer view of the papers. That middle layer of feathers is not dotted, as it may appear.
If enlarged, you'll notice a couple of my favorite details. The darkest paper consists of a plethora of tiny hearts... tiny heartfelt sunbeams to bring comfort and joy. The bottom layer was sparklified, but it's hard to see in the smaller image. As I mentioned with my last card, I am incorporating green into everything I make for this collection because it was Vicki's favorite color. The flowers in this paper are centered with green, pink, and white rhinestones. The other green accent is the scallop detail around the ribbon-closure circles. I used sparkly and bubbly ribbon from Hobby Lobby, topped with a Little Yellow Bicycle stiched-heart button and Blossom twine from My Craft Spot.

Additional love graces each side...
I tweaked the heart die from the Spellbinder's Fanciful Holiday set to embrace the loving sentiment. I masked off most of a sentiment from My Craft Spot's Joy to the World stamp set, stamping only the 'Love.' A few red rhinestones were added because love is always sparkly. :o)

Challenges Entered:
 *2 Sisters~ Celebrations
 *Craft Us Crazy~ Celebrate Love or Red
 *Craft-Room Challenge~ Valentines
 *Cupcake Craft Challenge~ Anything but a Card
 *Decorate to Celebrate~ Any Theme Party
 *Divas By Design~ Make It Girlie
 *Make It Monday~ Anything Goes
 *My Craft Spot~ Anything Goes
 *Paper Playtime~ Pets/Animals
 *Scrappy Moms Stamps~ Out of the Box (Make a box!)

Thank you for fluttering on by! I wish you a sparkling day of love. :o)


Saturday, January 12, 2013

Sprinkled with Love

Happy Saturday, my treasured friends! I pray everyone is having a blessed and beautiful weekend. :o)

In lieu of a new Sweet Saturday confection, I'm sharing a new card that serves a far sweeter purpose. :o) As I mentioned in my last post, this month's I Feel the Love collection is in loving memory of first grade teacher Vicki Soto... a beautiful soul who gave her life to save six or seven of her students at Sandy Hook Elementary. The sweet and talented Madison (of Funky Cards) highlights someone in need of extra love every month and we have the absolute privilege of crafting for a cause. We are currently creating Valentine's cards for those children Vicki saved, as well as thinking of you/sympathy cards for her grieving family. I hope you'll create a card with us and say extra prayers for all involved in the tragedy.

My second card for the kiddos... Sprinkled with Love:
I made a happy little forest scene, complete with deer sweethearts. The deer are from Create a Critter and Cindy Loo, which I set upon stumps made of pink wood-patterned paper. (What can I say, even the trees are filled with extra love this time of year!) The interior of the stump is glitter paper because their endearing love has sparklified it... just like our heartfelt creations will deliver healing love to those who are hurting. The boy deer is wearing a sparkly green collar because Vicki's favorite color was green. Every card I create for this collection will have green for that reason. I used pearls for the pretty doe's spots. :o)

The bottom border is my new Memory Box die that I am over-the-moon in love with, called Spring Border. It's so sprightly and I thought the little recipient would enjoy it. :o) I cut it with sparkling Core Couture paper and used red and purple Stickles for the flowers.

The gorgeous nested hearts in the center are Cheery Lynn dies (Two of Hearts), which are inked in Victorian Velvet. I nearly only used one, but a double dose of love is always better. :o) The papers have pretty little sketched-floral patterns on them, and both layers are pop-dotted for dimension. All of the patterned papers on the card are from Heidi Grace's Daydream collection. I love how foresty and naturally beautiful they are. :o)

The Whimsical Designs sentiment is from the With Love stamp set, chosen because the paper is reminiscent of a shower of love. :o) (And because my sappy love is sprinkled all over the place.) The tag is popped-up, lightly inked with Victorian Velvet, and has a sweet Recollections heart button. Lastly, a sparkly white butterfly fluttered onto the card, centered with a pearl, eager to bring hope and comfort.

And there's more love tucked inside, where the Spellbinders Lattice Rectangle will hold a message about how I love the recipient so dearly!
I hope this brings a smile to the precious child's heart. :o)

The inspiring hero whose memory we are honoring this month:
Challenges entered:
 *Cut It Up~ In With the New (Memory Box Spring Border die, heart button)
 *Cute Card Thursday~ Beat the Blues (with LOVE!)
 *Divas By Design~ Anything Goes
 *Make It Monday~ Anything Goes
 *My Paper Crafting/Crafting With Cutters~ Card Outreach
 *Paper Playtime~ Pets/Animals
 *Papertake Weekly~ Happy New... (Memory Box Spring Border die, heart button)

Thank you for fluttering on by! I wish you a sparkling weekend of love, hugs, and blessings. :o)


Tuesday, January 8, 2013

Love Bug Shaker Card: I Feel the Love

Happy Tuesday, my dear friends! I hope everyone is having a beautiful week! :o)

As I always do on the 1st of the month, I zipped to the I Feel the Love blog last week, eager to discover the new recipient of Madison's beautiful cause. Each month she highlights a particular person, family, or organization in need of extra love. In turn, we have the honor of using our crafty passion for a far higher purpose. We have the privilege of reaching out to people who are struggling mightily. This month I was stunned when I saw the recipient... a story already very well known. A story so huge that it is a two-part collection... as multiple people are in need.

In loving memory, we are paying tribute to Vicki Leigh Soto, a first grade teacher at Sandy Hook Elementary. She lost her life on December 14th, but due to her selfless actions and beautiful heart, six or seven of her students survived that tragic day. One part of the collection is for those survivors... those precious 6 and 7 year olds who went through unimaginable trauma in that classroom. They suffered tremendous loss and are not to be forgotten. We are creating Valentine's cards/ cards with hearts to shower them with the outpouring of love they need.

Even before the fresh tears subsided after reading about our mission this month, ideas mounted... there is so much I want to do for them, and I know God will help me. Will it be emotionally difficult this month? Absolutely. But I am so thankful for the opportunity to give them a piece of my heart...

.... via a Valentine's shaker card, for starters!
Before beginning my work for this collection, I spent some time reading about Vicki. It hurt, but I felt compelled to fill my heart with stories of her love... and maybe it'll help make her love sparkle through my creations for her surviving students and family, too.

I made a garden of love blossoms on an Elegant Edges base, with a sweet sparkling love bug to deliver my hugs. :o) The heart shaker (cut from Gypsy Wanderings) isn't as full of iridescent microbeads as I intended, but there's still a nice amount to dance around in there. (A mistake never to be repeated!) The heart is accented with rhinestones and I used ruffly American Crafts ribbon for the stem. Love rises and blossoms above all... especially when ruffled with a love so strong that it heals and protects.

The smaller hearts are from the Spellbinders Fanciful Holiday set. The sparkling Core Couture cardstock stems are Cheery Lynn Designs Mini Fanciful Flourishes. The little hearts are safely nestled beneath the larger one... much like Vicki sheltered her students that day.

The ladybug is from Create a Critter and since she has the vital task of sharing my and God's love with all who see this card, I used heart rhinestones for her antennae and heart. She is popped up with foam tape for dimension, reaching ever closer to the sweet child who receives this. The Whimsical Designs sentiment is from the With Love stamp set, which I stamped upon a Spellbinders Labels Four base and secured with a Bella Blvd flower button.

The Doodlebug and Imaginisce patterned papers are all new, courtesy of my sweetheart as an after-Christmas gift. I showed him Madison's post right after I read it, and after he helped me through the wave of tears, we headed to the craft store for heartfelt supplies. (Turns out Archiver's closed early on New Years Day... but we zoomed back there first thing the next morning!) The papers are so pretty in person.

The interior, engulfed in a circle of sunshine:
The second part of this month's IFTL drive is cards for Vicki's family... anything uplifting that one would send to a family member after a loss. I'll be starting that phase after a couple more blessings for the children she adored. I hope you will consider joining us for this very special collection in loving memory of Vicki.
Challenges entered:
 *Craft Us Crazy~ Inspiration Photo (The hearts and 'made with love' inspired me)
 *Crafty Catz~ Anything Goes
 *Cute Card Thursday~ Something New (Patterned papers)
 *Fantabulous Cricut~ Incorporate a Tag (Used CAC, Elegant Edges, and Gypsy Wanderings cartridges)
 *Little Miss Muffet~ Anything Goes
 *Little Scrap Pieces Fun Friday~ Anything Goes
 *Make It Monday~ Anything Goes
 *Pause, Dream, Enjoy~ Use Ribbon
 *Really Reasonable Ribbon~ Something New, plus ribbon (Patterned papers)
 *The Pink Elephant~ Celebrate (Celebrating life, love, and Vicki)
 *Word Art Wednesday~ Encouraging/Uplifting

Thank you for fluttering on by! I wish you a day of love, blessings, and sparkles. :o)

Saturday, January 5, 2013

Sweet Saturday: Sugar Cookies with Royal Icing

Happy Saturday, my sweet friends! A card yesterday and a treat today... I'm so happy to be posting! :o)

Despite the lack of sugary posts, I had a few fun baking adventures over the holiday season. The weekend before Christmas I finally faced a baking fear: royal icing! I've admired it for years, but stayed away from it partially due to rants of how impossible it can be, how it takes eons to get a good result, and how bad it can taste.  Thankfully I decided to stop listening to negative commentary and dive right in! You never know until you try, right?

So try I did... and they tasted amazing. While the designs aren't perfect, I was beyond ecstatic with my first attempt at decorating cookies!
Aren't they adorable? I used my favorite sugar cookie recipe, which I've neglected to post until now. I wanted to keep the shapes simple and colors to a minimum for my first try, so I opted for pink and pale blue snowflakes and sweet peppermint candies. :o) (I saw the peppermint candy idea at Bake at 350.) My icing is tinted in varying shades of AmeriColor Soft Gel Paste food coloring.

For the candies, some had marbled royal icing for a swirling peppermint effect while others are happy little polka dots. (Oh the joy when the colors didn't bleed together!) The snowflakes are simple designs while I practiced piping straight lines and fun little loops, and were given a touch of holiday cheer with sparkling cake sprinkles in the centers. :o) I cannot tell you how much fun I had making these. I am eager to play with royal icing again soon to improve! I need to be ready for some fun summer cookie decorating. :o)

I did a LOT of reading on tips, tricks, and tutorials on royal icing before cookie day, which I will always recommend to anyone who wants to try. Perhaps it was my commitment to that research that made my first attempt so much more successful than I expected. The recipe is below, after the sugar cookies.

The cookies themselves are a family favorite! Technically they appear to be a cross between a sugar cookie and shortbread, which we happen to love. I've used this recipe for all my cut-outs since finding it a few years ago. The almond is perfectly suited for the holidays and the lack of leavening agents permits the cookies to retain their shapes while baking. (There are tweaked flavor alterations for other seasons that I'll be trying this year, such as Vanilla Bean-Lemon for Easter!)

Thank you for visiting! I hope your weekend is filled with blessings, love, and sparkly sweet confections. :o)

Ella's White Sugar Cookies
Yield: Depends upon cookie cutter sizes... I prefer doubling for a nice big batch

Ingredients:
1 cup unsalted butter
1 cup confectioners' sugar
1 large egg
1½ teaspoons almond extract
1 teaspoon vanilla
2½ cups sifted flour
1 teaspoon salt

Directions:
Cream together the butter and confectioners' sugar on medium-high speed until smooth, 1-2 minutes. Beat in the egg, almond, and vanilla until blended. Mix in the flour and salt on low speed just until incorporated. Form the dough into a ball and wrap tightly with plastic wrap. Refrigerate until chilled and firm, at least 1-2 hours.

When ready to bake the cookies, preheat the oven to 375º F. Line baking sheets with parchment paper. Roll out the dough on a well-floured work surface to about ¼-inch thickness. Cut with cookie cutters as desired and transfer to the prepared baking sheets.

Bake 8-10 minutes, rotating the sheets halfway through baking, until fully cooked but not at all browned. Allow to cool on the baking sheet 5 minutes, then transfer to a wire rack to cool completely. Decorate as desired.

Source: Annie's Eats
***

Royal Icing
The amount needed will vary based on cookie sizes and how many colors you need. I halved this recipe since it was my first try, but will not do that again since I know this recipe is flawless and want to do a lot of cookies. (If you halve it, I'll save you some hassle by telling you half of 1 kilogram was about 4 cups plus 2 tablespoons plus 2 teaspoons of confectioners' sugar)

Ingredients:
6 ounces (¾ cup) warm water
5 tablespoons Meringue Powder
1 teaspoon cream of tartar (I eliminated this since my MP has cream of tartar in it)
1 kilogram (2.25 lbs) confectioners' sugar
1 teaspoon CLEAR vanilla if your meringue powder has no vanilla/vanillin powder

Directions:
In a mixer bowl, pour in the warm water and meringue powder. Mix it with a whisk by hand until it is frothy and thickened, about 30 seconds.

Add the cream of tartar and mix for 30 seconds more.

Pour in all of the confectioners' sugar at once and place the bowl on the stand mixer.

Using the paddle attachment on the LOWEST speed, mix slowly for a full 10 minutes. Icing will get thick and creamy.

Cover the bowl with a dampened tea-towel to prevent crusting and drying.

Tint with food colorings or thin the icing with small amounts of warm water to reach the desired consistency.

Source: Sweetopia


Friday, January 4, 2013

Warm Winter Wishes

Happy January, my dear friends! I pray your new year is filled with heavenly light and joy unspeakable. :o) I am so thankful to have met some incredible crafters last year and I look forward to sharing in our continued crafty journeys. :o)

My sparkly little blog has been quiet over the busy holidays, but I'm happy to be back! Since I fell far short of my Christmas card goal, my first card of 2013 was made for someone who didn't get a handmade festive creation... my sweetheart! I was so disappointed I ran out of time. As it turns out, surprising him with this 'just because' card was equally special. (The unexpected ones can be the most exciting!)

"Warm Winter Wishes"
For my sweetheart, a pretty winter scene. :o) He appreciates nature as much as I, with its majestic beauty from our Creator. The snowflake paper is from a K and Company Christmas collection. The church is from the Noel cartridge, to which I embossed the snowy rooftop with Swiss Dots and added Star Dust to the windows for a sparkling glow. The tree is a Recollections stamp, which I heat-embossed in silver and sprinkled with rhinestones for extra twinkles of joy.

A tiny peek inside (and a better view of the tree), which is lined with the same paper and a Spellbinders Fleur de Lis square.
The snowy ground is embossed with a folder from the Winter Wonderland set. The top border die is one of my favorite new things! It is the Memory Box Frostyville border die, which was high on my wish list for eons. I am thrilled for this new blessing and love that my first use is for his card. :o) (You will probably see a lot of this border! Hehe.) Graduating sizes of rhinestones are sprinkled throughout it for extra winter sparkle.

The Whimsical Designs sentiment is from Stephanie's Snow Much Fun set, which is stamped upon a Spellbinders Labels Four die. It is adhered by a three-layer snowflake from Gypsy Wanderings, with each layer popped up for dimension. I wanted to wish him a winter that is warmed by God's love. :o)

Challenges entered:
 *Card Mania~ Winter Wonderland
 *Craft with Cutters~ Snowflakes
 *Little Scrap Pieces Fun Friday~ Winter
 *Make It Monday~ Anything Goes
 *Papertake Weekly~ Anything Goes
 *Simon Says Stamp~ New (Memory Box Frostyville border die)
 *Word Art Wednesday~ Encouraging/Uplifting

Thank you for fluttering on by! I hope your day sparkles with blessings. You are loved! :o)

Related Posts Plugin for WordPress, Blogger...
Blogging tips