To pin my projects to Pinterest, hover over the picture and a Pin-it Button will magically appear.

Monday, October 29, 2012

Christmas Joy :)

Happy Monday, my dear friends! I know many of you are in Hurricane Sandy's path.. you have been and will continue to be in my prayers. **extra hugs**

I used my crafty time this weekend for the upcoming I Feel the Love Project collection. With a hunch that it'll be Christmas cards for kiddos in unfortunate situations, and my crafty time not what it once was, I wanted to get a bit of a head start. There's nothing more rewarding than using our passion to bless others, so I want to get my Christmas stash started for those sweet kiddos. It would break my heart to run out of time.
When creating for I Feel the Love, my heart is divided between happy-fluttery and panicky. I get myself so nervous, wanting everything to be just so! At the same time, it's when I have the most fun. :o) For my first Christmas surprise for a child in need of some extra love this season, I had it on my heart to create a festive scene.

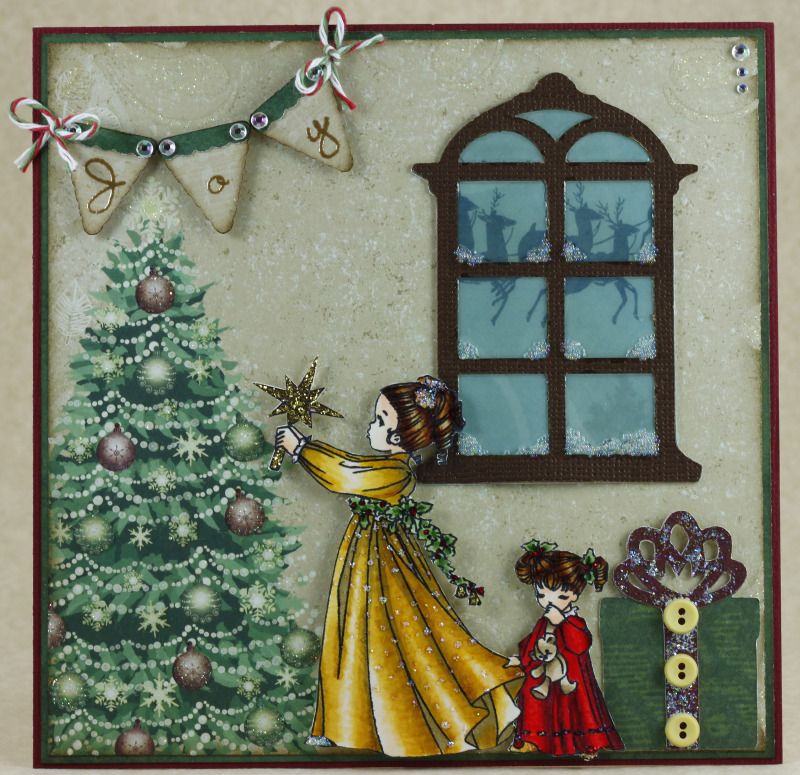
With such a special recipient, I wanted to add something extra fun. I'm thrilled to finally own the Cricut Noel cartridge, so I was eager to use it. I chose the beautiful window, backed it with a reindeer scene from a K and Company paper, filled it in with Glossy Accents for realism, and added shimmery microbeads to the corners for frostiness. I hope the sweet kiddo likes it. :o)

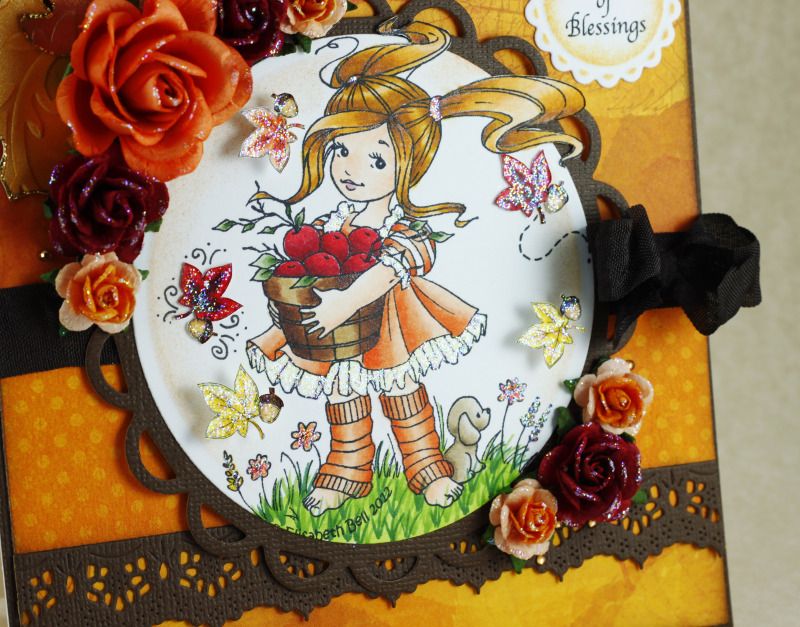
This card was built around the precious Elisabeth Bell stamp, titled Star of Bethlehem. I colored the children in Copic golds and reds, adding Star Dust, Christmas Red, and Gold Stickles at various points. I dabbed Star Dust down the gold dress, as if she's leaving a trail of sparkles wherever she goes. :o) I originally was going to have them approaching a die-cut tree, but it wasn't working out as planned. I was so thankful to have this gorgeous Best Creation Merry Christmas paper to salvage the theme. The tree is beautiful and very sparkly in person. There are also sparkling flourishes throughout the entire sheet. :o)

The gift may seem disproportionate in size, but this is for I Feel the Love... I totally want to give them a life-size Christmas present! :o) I added buttons to the Art Philosophy gift for textural detail and sparklified the ribbon. I like to think it's ready to explode with sparkling love. Or maybe it's dusted with shimmery snow because Santa just delivered it. :o)

Lastly, I made a banner to help deliver the message of Christmas joy. :o) The cut is from Art Philosophy and I used golden paper with musical scores.. the heavenly angels are singing! The "joy" stamp is from CTMH Art Philosophy collection, which I heat-embossed in gold for shininess and a bit of dimension. The banner is 'secured' with rhinestones and Christmas twine. :o) I hope this little card delivers tangible hugs and love to its future recipient. I squeezed in as much sappy, sparkly, festive love as possible. :o)

Challenges entered:
 *Christmas Crafting~ Buttons and Twine
 *Crafty Ann's~ Christmas in October
 *Crafty Ribbons~ Christmas
 *Elphine House Australia~ Buttons and Bows
 *Inspire Me Fridays~ Anything Goes
 *Make It Monday~ Anything Goes
 *Paper Playtime~ Anything Goes
 *Sparkles Christmas Challenge~ Traditional
 *Stampin' for the Weekend~ Anything Goes
 *Word Art Wednesday~ Encouraging/Uplifting

Thank you for twirling on by! I wish you a sparkling day of blessings. :o)

Saturday, October 27, 2012

Sweet Saturday: Pumpkin Gingersnap Cookies

Happy Saturday, my sweet friends! I hope you're having a sunshiny weekend. :o)

This week I made a recipe I bookmarked last year. I was determined not to let the time slip away again! I am so excited to share an Autumn-inspired version of classic gingersnaps: Pumpkin Gingersnap Cookies:
Not only are they bursting with seasonal delight, but they sparkle. Yes, my heart fluttered when I saw they would be rolled in sugar prior to baking. :o) While it does add a kiss of sweetness, I'm more than happy to do it for its mere appearance. ;) The pumpkin blends harmoniously with the molasses spiced cookies, creating a soft cookie that is vintage Fall. Since my sweetheart and I love nutmeg with pumpkin desserts, I added some to the recipe. Like all of my favorite cookies, texturally these are ever-so-slightly crisp on the outskirts before giving way to the perfectly chewy center.

Needless to say, these cookies are a new seasonal staple! My family loved them and I will be making them again soon. A batch of these is an ideal candidate as contents for homemade treat packaging! :o)

Thank you for visiting me today! I wish you a sweet and sparkly weekend! :o)
*****

Pumpkin Gingersnap Cookies
Yield: 3 dozen

Ingredients:
2⅓ cups all-purpose flour
2 teaspoons baking soda
2 teaspoons cinnamon
1½ teaspoons ground ginger
1 teaspoon ground cloves
1 teaspoon ground nutmeg
½ teaspoon salt
½ cup butter, at room temperature
1 cup granulated sugar, plus more for rolling the cookies
½ cup pure pumpkin (NOT pumpkin pie filling)
¼ cup molasses
1 large egg
1 teaspoon vanilla extract

Directions:
In a medium bowl, whisk together the flour, baking soda, spices, and salt. Set aside.

In the bowl of a stand mixer fitted with the paddle attachment, beat together the butter and sugar until creamy and smooth. Add the pumpkin, molasses, egg, and vanilla extract, mixing until well-combined.

Add the dry ingredients, mixing until combined. Refrigerate the cookie dough for at least 1 hour. The dough can be chilled for 2-3 days.

When you are ready to bake, preheat the oven to 350ºF. Line baking sheets with Silpats or parchment paper. Place sugar in a small bowl. Roll tablespoon-sized balls of dough in sugar until well-coated and place about 2 inches apart on prepared baking sheets.

Bake for 10-12 minutes, or until cookies look cracked and set at the edges. The cookies will still be soft. Let the cookies cool on the baking sheets for 2-3 minutes after removing them from the oven, then transfer to a wire rack to cool completely.

Source: Slightly adapted from Two Peas and Their Pod


Tuesday, October 23, 2012

Sweet Christmas Wishes

Happy Tuesday, my sweet friends! I hope you're having a sparkly week! :o)

After far too many days away from crafting, I finally was able to make a card! Woo! I opted for a Christmas card with a feminine flair, which is new to me. But it stayed on my heart... so I made a lovey-dovey card for someone with a heart as sappy as mine.

"Sweet Christmas Wishes"
This was designed to remind her of all the beautiful moments shared with the love of her life. :o) A flurry of love, if you will! Admittedly, this was challenging to photograph well. You have to look closely to really see the varying snowflakes and such, but in person it's a sparkling pink and white winter wonderland. :o)

The sweet Lili of the Valley image is Ice Skating, which I've colored with my Copics. Oh how I love this stamp! The adorable girl's hat and skates are sprinkled with Star Dust and her trims are fluffed up with Polar White Flower Soft. The boy's hat is paper pieced.. a first for me! He looks so dapper! Hehe. :o) The skate blades are filled with silver Stickles and the ice is covered in Star Dust. The image is mounted on a Spellbinders Picot Edge Circle, which always makes me think of a big snowflake.

The whimsical and sweet Christmas paper is from the Memory Box Yuletide collection. The mix of candy canes and flowers was irresistible for this theme. The background is dark brown with tiny little snowflakes. Together they felt like a sweet Christmas indeed. :o)

The beautiful snowflakes are from Art Philosophy, which I've cut with white and pink Core Couture cardstock for silvery sparkle. I nestled a couple of Cheery Lynn Designs Mini Fanciful Flourishes in one corner, to which I adhered the small negatives from the big snowflakes.. tiny snowflakes dancing along the snow-covered vines. :o) They're centered with pink rhinestones. The bottom corner arrangement includes medium-sized snowflakes with pink gems at each point. I wanted a variety of snowflakes. :o)

Since this is a lovey-dovey Christmas card to celebrate sweet holiday memories, I centered most of the bigger snowflakes with Star-Dusted Wild Orchid Crafts roses. (Which works with the base paper anyway... that's my excuse.) The pretty white Guipure lace is also from WOC. I typed up the sentiment on my computer, cut it with a Spellbinders Labels Four, and inked it with Spun Sugar for a final dollop of sweetness. This was out of my Christmas norm, so I hope my heart was right and the recipient enjoys this tiny blessing. :o)

Challenges entered:
 * ABC Christmas~ Up to You
 * Cheery Lynn Designs~ Texture
 * Cupcake Craft Challenge~ Paper-Piecing (little boy's hat)
 * Fashionista~ Anything Goes
 * Frosted Designs~ Sports/Dance
 * Jingle Belles~ Creature Feature
 * Lili's Little Fairies~ Anything Goes
 * Make It Monday~ Anything Goes
 * Papertake Weekly~ Glitter and Sparkle
 * Stamp and Create~ Winter Wonderland

Thank you for skating on by today! I wish you a week of all things sparkly. :o)

Saturday, October 20, 2012

Sweet Saturday: Chocolate Fudge Brownies

Happy Saturday, my dear friends! I hope you're enjoying a wonderful weekend! :o) I didn't have any crafty time this week, but am ecstatic to have some planned for today! This one-card-per-week pace is quite unsparkly.

Sometimes, despite the Autumn abundance of pumpkin and apple delights, you just need chocolate. Straight-up chocolate. Such was the case on Thursday when I whipped up a batch of my favorite brownies for me and my loved ones to enjoy. I've made them a few times since finding the recipe, but was never able to snap a happy picture to share here. Finally, this family favorite graces my sparkly blog: Chocolate Fudge Brownies.
Do you see how THICK they are? That's my kind of brownie! No wimpy stuff here. This recipe delivers when you want a rich, fudgy brownie. Some people prefer cakey brownies, but none of my loved ones fall into that category... thankfully. When we want chocolate cake, we make cake. These brownies are decadent and perfectly fudgy, with the bonus of being incredibly easy. You don't even need a mixer! The first time I made these, I topped them with the most incredible frosting I'd ever tasted... I think angels were singing. ;) Unadorned, these are equally fantastic.

There are oodles of brownie recipes floating around, but this one has become my new favorite. :o) If you decide to try them sometime, I hope you love them as much as we do! Thank you for visiting my happy little blog. I wish you a sparkly day! :o)
*****

Chocolate Fudge Brownies
Yield: 12-16 brownies

Ingredients:
¾ cup all-purpose flour
1 teaspoon baking powder
½ teaspoon salt
½ cup unsalted butter
3 ounces unsweetened chocolate
½ cup granulated sugar
½ cup light brown sugar
2 eggs
1 egg yolk
1 teaspoon vanilla extract
½ cup semisweet chocolate chips

Directions:
Preheat the oven to 350º F. Line an 8-inch-square baking dish with parchment paper, letting the excess hang over the edges. Butter the parchment paper or spray with cooking spray. Set aside.

In a small bowl, whisk together the flour, baking powder, and salt. Set aside.

Bring about an inch of water to a simmer in a medium saucepan. Place a medium, heatproof bowl on top of the saucepan (do not let it touch the water) and add the butter and unsweetened chocolate. Stir occasionally, until the chocolate and butter are completely melted and smooth.

Remove the bowl from the saucepan and whisk in the granulated and brown sugars. Whisk in the eggs, the yolk, and the vanilla extract. Add the flour mixture all at once and fold it into the chocolate mixture with a rubber spatula until combined. Fold in the chocolate chips.

Pour the batter into the prepared pan and bake for 25 to 30 minutes, or until a thin knife inserted in the center comes out clean. Allow to cool completely. Cut into squares.

Store brownies at room temperature in an airtight container, or tightly wrapped, for up to 5 days.

Source: Brown Eyed Baker


Tuesday, October 16, 2012

Bushels of Blessings: I Feel the Love

Happy Tuesday, my sweet friends! I hope you're having a sparkly week. :o)

I finally had some crafty time, so I used it to make another card for the current I Feel the Love collection. :o) This month, the amazing Madison of Funky Cards is collecting Thanksgiving cards for the elderly residents of Surrey Place Care Center. You all know my passion for the IFTL Project, as it is an honor to use my crafty passion for a higher purpose each month... delivering a heap of love to those who could use some extra sunshine.

"Bushels of Blessings"
Angled to (somewhat) better show the sparkle when light catches it. I was photography challenged big time. ;)
To deliver bushels of Thanksgiving blessings (with a touch of sweetness) to the wonderful elderly residents, I used a few of my favorite things. The Bo Bunny papers are remnants from last Autumn.. I adore the warmth they exude. This sweetheart named Apple Blossom is from Elisabeth Bell's Little Cottage Cuties collection, which I colored with Copics. The ruffles of her dress are colored pale yellow because I wanted to send them ruffles of sunshiny love. :o) To intensify the Autumn flair, I printed out a few Leaf and Acorn images from Meljen's Designs, colored them with fall hues, and sprinkled them around Apple Blossom. Three are pop-dotted for dimension and all are sparklified. She is cut out with a Spellbinders Classic Circle using the out of box technique. It's mostly washed out in the picture, but it is edged with Dried Marigold for a festive glow. I layered it atop a Lacey Circle. 

Surrounding the image are orange and deep red Wild Orchid Crafts roses, which are trimmed in Star Dust. I am certain the residents will love a touch of sparkle, so I sprinkled a few amber rhinestones within both flower arrangements. Shimmery Gypsy Wanderings leaves are nestled in the upper corner, which are embossed with the Victoria folder and outlined in gold.

The middle panel is a path of sunbeams, each one representing a heavenly blessing. How I would love to take a walk in the sunshine with this card's recipient. The Harvest Dot paper is edged with a Cheery Lynn Designs Anastasia border and dark brown crinkle ribbon (from My Craft Spot). The sentiment is computer generated, which I cut out with the smallest Lacey Circle and inked up with a combination of Mustard Seed and Dried Marigold. Although it was unintentional, I love how it ended up looking like a harvest sun! I topped it with a Chocolate Truffle twine bow, also from My Craft Spot.

The cards collected may very well be the only Thanksgiving cards these lovely nursing home residents receive, so I'm packing as much love as possible into the ones I send. I hope my and God's love shine forth so strongly that it reaches beyond the hands that will hold them. There's still some time to participate if you would like to deliver a Thanksgiving blessing. :o)

Some of the sweet residents:

Challenges entered:
 * Cooking With Cricut~ Card Outreach
 * Cupcake Craft~ Two's Company (Apple Blossom and her puppy)
 * Docerela Creations~ Photo Inspiration
 * Little Scrap Pieces~ Thanksgiving or Fall Colors
 * Make It Monday~ Anything Goes
 * My Craft Spot~ Emboss It (The three big leaves are embossed)
 * PaperPlay~ Simply Cute
 * Whimsy Inspirations Challenge~ All Things Sparkly
 * Word Art Wednesday~ Encouraging/Inspiring

Thank you for twirling on by! I wish you a day of love and sweet confections! :o)

Saturday, October 13, 2012

Sweet Saturday: Baked Pumpkin Doughnuts

Happy Saturday, my sweet friends! I hope everyone had a blessed week! :o)

I haven't had any quality crafty time since my last post, but I did have a fun baking adventure! My sweetheart bought me doughnut pans and I was tickled pink! I had been wanting to make doughnuts for quite some time, so within hours of receiving the gift I was in the kitchen putting them to work. :o) I love the plethora of flavor options, but never made them because I don't like them fried. Now with these fabulous pans, I can have all sorts of fun with the baked variety. :o) Up first needed to be a seasonal cake doughnut, which my family flipped over: Baked Pumpkin Doughnuts! :o)
Color me sparkly! I had a blast making this speedy, delightful treat. I coated half of them in a pumpkin spice and sugar mixture (as opposed to cinnamon-sugar) and dunked half in a spiced glaze. Messy, but not too bad for a first dunking try... next time I'll let the excess drip off before flipping it over. ;) I was just too excited! Hehe. These doughnuts are bursting with spiced pumpkin, perfectly fluffy, and are such a fun snack to usher in Autumn's splendor.

The toppings amped up the seasonal flair and we loved having a couple of different options to enjoy. The pumpkin spice-sugar made a huge difference over the more typical cinnamon-sugar and the glaze is spiced to perfection. There will be extra of each, so I set aside some of the pumpkin spice-sugar to use next time. I am ecstatic over this blessing and already have a good amount of doughnut recipes saved for future use. (In the near future, I might add.) These pans are not expensive and are certainly worthwhile... and it's fun to bake with kiddos, too! My family was delighted and I've already promised a batch to my mom's coworkers. Guaranteed smiles all around. :o)

Thank you for visiting me today! I wish you all a crafty, beautiful weekend. :o)

Note: I substituted melted butter for the oil in the recipe in the same amount. While they tasted amazing, I do not know the *proper* proportions of said substitution so I am writing the recipe as is. I read for eons and there were differing opinions, so I finally had enough and just went to bake! ;)

Note 2: The original recipe states that these keep for several days, but I found there to be a pretty big difference after the first day. The sugary topping melts into the doughnut by the second day and makes it sticky. Homemade doughnuts are always best when fresh, so I'll always bake accordingly.

Baked Pumpkin Cake Doughnuts
Yield: 12 doughnuts

Ingredients:
For the doughnuts:
½ cup vegetable oil
3 large eggs
1½ cups granulated sugar
1½ cups pumpkin puree (NOT pumpkin pie filling)
1½ teaspoons pumpkin pie spice (OR ¾ teaspoon ground cinnamon plus a heaping ¼ teaspoon each ground nutmeg and ground ginger)
1½ teaspoons salt
1½ teaspoons baking powder
1¾ cups plus 2 tablespoons all-purpose flour

For the pumpkin spice-sugar coating:
½ cup sugar
2 teaspoons pumpkin spice

For the spiced glaze:
1 cup powdered sugar
¼ teaspoon ground cinnamon
Dash of ground nutmeg
Dash of ground ginger
Dash of ground cloves
2 tablespoons milk

Directions:
Preheat the oven to 350º F. Lightly grease two standard doughnut pans.

In a large bowl, whisk together the oil, eggs, sugar, pumpkin, spices, salt, and baking powder until smooth. Add the flour, whisking just until blended and smooth.

Spoon batter into a large resealable plastic bag. Cut off the corner and squeeze batter into prepared doughnut pans, filling each well about ¾ full. (Approximately a scant ¼ cup of batter in each.)

Bake the doughnuts for 15-18 minutes or until a cake tester inserted into the center of one comes out clean.

Remove the doughnuts from the oven, letting them sit in the pans for about 5 minutes. Loosen their edges and transfer to a cooling rack.

To make the pumpkin spice-sugar, combine the sugar and pumpkin spice in a shallow dish and whisk to blend. When the doughnuts are still warm (but no longer fragile), dip half of them in the pumpkin spice-sugar to coat completely, shaking off the excess.

To make the spiced glaze, combine the powdered sugar and spices in a small bowl. Add the milk and whisk to combine until a thick glaze is formed. If necessary, add a bit more milk to thin out the glaze. Dip the remaining half of the doughnuts into the glaze. Allow the glaze to set before serving.

Cool completely and store in an airtight container at room temperature. *Personal note: These truly are best the first day.

Sources: Doughnuts: King Arthur Flour; Spiced Glaze: Annie's Eats

Tuesday, October 9, 2012

Encouragement Card :)

Happy Tuesday, my cherished friends! I hope your week is going beautifully. :o)

On Sunday I posted a card I made for Michael, the Autistic son of a fellow crafter who will soon be undergoing two surgeries on his feet. His sweet mom is Naomi from Creative Bug on the Loose and I couldn't resist making a little something for her, too. :o)

"He shall give His angels charge over thee."
When I think of Naomi, I think of beauty and elegance, with a touch of whimsy. (That can be said for both her and her lovely crafts!) I wanted this small gift to encourage her and also symbolize how I view her. She has such a selfless, giving heart, effortlessly portraying the beauty of her spirit. Fittingly, we crossed paths as fellow faithful participants of the incredible I Feel the Love Project. :o) And so, my goal was to deliver her Scripture surrounded by nature's beauty... and a heap of love. :o)

I love lacy frames, but without any such dies I decided to make my own with four cuts of my favorite Cheery Lynn Designs border (Anastasia). I recently saw a Cheery Lynn DT member (Sandy, I believe) create some cards with that technique and I was so inspired. I took the long route of trying to make the four shortened lengths match perfectly, but it was worth it! Although not perfect, it still looks like a lacy purple frame so I'm happy. :o) Since I'm addicted to sparkle and shine, I added two shades of purple pearls to the corners where the diagonals were cut. The base paper is from the K and Company Watercolor Bouquet stack.

The focal point is the powerful K Andrew Designs sentiment from her Scripture Sayings stamp set. I felt compelled to remind her of God's faithful protection. I mounted the golden paper atop a Spellbinders Fleur de Lis square, which I edged with a Wild Orchid Crafts flat-back pearl strand. I cut four short lengths and lined them up the best I could. Next time I'll do the lengths *before* cutting the sentiment paper. ;) A WOC pearl heart was added for an extra touch of love.

For a splash of nature, I made an arrangement of purple and white WOC roses, which are drenched in Sparkle Shimmer Spritz. I wanted to be sure they stayed sparkly all the way to Canada. ;) A Cheery Lynn Designs mini fanciful flourish rests beneath the flowers, along with a double bow of My Craft Spot Buttercup crinkle ribbon (for a touch of sunshine). To remind Naomi how much we all love her, I stacked two Cheery Lynn Hearts (Two of Hearts) for a double dose of love. The top one is pop-dotted for dimension and I topped it with a sparkly rose... just like her love is ever-blossoming toward her sweet Michael. I hope she enjoys this tiny token of encouragement from my sappier-than-a-maple-tree heart. :o)

Challenges entered:
 * Charisma Cardz~ Bada Bing! (Bling/Shiny)
 * Craft Your Passion~ Hip to be Square
 * Cute Card Thursday~ Ribbon!
 * Divas by Design~ Use Some Texture
 * Lollipop Crafts~ Something Old, Something New (Old: Stamp; New: Border die)
 * Make It Monday~ Anything Goes
 * PaperPlay~ Shine On (Sparkle, shine, or gloss)
 * Paper Pretties~ Sentiment-Focus
 * Sentimental Sundays~ Anything Goes (plus a sentiment)
 * Word Art Wednesday~ Encouragement/Uplifting, inspired by love

Thank you for fluttering on by! I wish you a blessed day of love, hugs, and pumpkin delights! :o)


Sunday, October 7, 2012

Sending Smiles Across the Miles

Happy Sunday, my sparkly friends! I hope your weekend has been beautiful. Have you made those muffins yet from yesterday?! Hehe. :o)

A sweet member of our crafty community, and a dear friend, recently sent out a personal request. Naomi (Creative Bug on the Loose) posted about her son's upcoming surgery, along with a plea for cards for him. Michael is autistic and will soon be having surgery on both of his feet. He has had problems with his hips and feet since birth and was even told he would never walk... but walk he does! Praise the Lord. :o) I hope you'll join us in shipping out some love to encourage him during his recovery.

"Sending Smiles Across the Miles"
I was stumped with this card for quite some time, completely unsure what to make him. I decided on a fun shaped card, figuring all boys like sailboats. :o) I know there are some 'girly' touches on here, but that is for a good reason. Michael has an acute awareness (and love) for details and pours over every aspect of the gorgeous cards Naomi creates. Due to that fact, I badly wanted to incorporate texture and dimensional elements for him to enjoy.

The sailboat is from Gypsy Wanderings, which I welded together with my Gypsy. Blueberry Blue twine from My Craft Spot runs down the center for some texture, which is topped with a My Mind's Eye button. The Whimsical Designs sentiment is from the Everyday Sentiments collection, which I stamped onto a Spellbinders Lacey Pennants die. The Kaisercraft paper for the sentiment has a fun design which is reminiscent of waves and I inked it with Tumbled Glass. :o)

The paper for the sails is from DCWV, which I popped up with foam tape for dimension. The rest of the boat is cut with sparkling Core Couture paper, of which the bottom is embossed with the D'vine Swirls folder for more texture. I sprinkled rhinestones along the swirls, like sunbeams dancing along the ocean's surface. :o) For a final touch I adhered American Crafts pom-pom trim, which I hope he likes. It made me think of whitecaps. :o) The card base itself is yellow so it will be a burst of sunshine upon opening and you can see a little glimmer of it 'behind' the sailboat in the center. A peek of sunshine from the front, too. :o)

I pray that Michael smiles when he receives this. Today I'm making a little card for Naomi to encourage her beautiful heart. A little crafty love can go a long way. :o)

Challenges entered:
 * Make It Monday~ Anything Goes
 * Papertake Weekly~ Anything Goes
 * Simon Says Stamp~ Glimmer and Sparkle (glimmering blue paper and rhinestones)

Thank you for sailing on by! Have a blessed day! :o)

Saturday, October 6, 2012

Sweet Saturday: Apple Cider Doughnut Muffins with Apple Cider Glaze

Happy Saturday, my dear friends! I hope you're enjoying a beautiful weekend. :o)

This week flew by, but I'm ecstatic that I had some fun kitchen time yesterday! :o) My loved ones and I adore the tastes of the season, so I opted for another Autumn delight. This time I wanted to celebrate apples and was thrilled when I stumbled upon a fantastic recipe: Apple Cider Doughnut Muffins with Apple Cider Glaze! (And homemade Apple Pie Spice, too!)
If enlarged, you can sort of see the shiny glaze on top and slightly pooled along the paper liner. Not only is it always fun to dunk treats into glazes, but this one is delicious. Both the muffin and glaze taste like Autumn. :o) The diced apple bits combine so beautifully with the spices, delivering flavor this is quintessential to this season of harvest. The muffin is light and fluffy, and while the apple cider doesn't wallop you in the face, it is certainly there. I hadn't made muffins in an extremely long time, but this one will be made again very soon.. as in the next couple of days to bless my mom's coworkers again. They love when I bake! :o)

Another fun thing about this recipe is it followed one for homemade Apple Pie Spice. I'm not a fan of buying seasonal spices, only because it seems silly to buy a bottle of spice that contains ingredients already in my spice drawer. Another benefit to making your own spice blend is that you can tweak the amount of spices that go into its creation. If you especially love a particular component, add a little extra! Not a massive fan of one spice? Dial that one down a notch. :o)

My family loved these muffins, which makes my heart flutter. It may just be a muffin, but when it brings about smiles... it means so much more. :o) Bake these, enjoy them with your family, and celebrate Autumn! :o)

Apple Cider Doughnut Muffins with Apple Cider Glaze
Yield: Approximately 12 muffins

Ingredients:
For the muffins:
2⅔ cups all-purpose flour
1½ teaspoons baking powder
¼ teaspoon baking soda
1 teaspoon homemade apple pie spice (recipe below)
¾ teaspoon salt
¾ cup milk
¼ cup apple cider, at room temperature
¼ cup unsalted butter, softened
¼ cup vegetable oil
½ cup granulated sugar
⅓ cup lightly packed light brown sugar
2 large eggs
1 teaspoon pure vanilla extract
1 cup diced Honey Crisp apples

For the glaze:
3 tablespoons butter, melted
1 cup confectioners' sugar, sifted
¼ teaspoon homemade apple pie spice (recipe below)
3 tablespoons apple cider, at room temperature

Directions:
Preheat the oven to 425º F. Lightly grease a standard muffin tin or line with 12 paper liners.

In a medium bowl, combine the flour, baking powder, baking soda, apple pie spice, and salt. Set aside. In a glass measuring cup, combine the milk and apple cider. Set aside.

In the bowl of a stand mixer fitted with the paddle attachment, cream together the butter, vegetable oil, and sugars until smooth. Add the eggs and vanilla, beating to combine. Reduce the speed to low and add in the flour mixture alternately with the milk/cider, beginning and ending with the flour mixture, until thoroughly combined. Fold in the diced apples.

Spoon the batter evenly into the prepared pan, filling the cups nearly full.

Bake the muffins for 15-17 minutes or until they're pale golden brown and a cake tester inserted into the middle of a center muffin comes out clean. Remove pan to a cooling rack and allow muffins to cool for about 10 minutes.

Prepare the glaze: In a medium bowl, mix together the melted butter, confectioners' sugar, apple pie spice, and apple cider. Whisk until smooth.

Place a layer of wax or parchment paper under the cooling rack. Dip the muffin crowns into the glaze. Place the muffins back onto the cooling rack and allow the glaze to harden.

Muffins will keep in a sealed container at room temperature for about a day.

Source: My Baking Addiction
*****

Apple Pie Spice
Yield: Approximately ⅓ cup

Ingredients:
4 tablespoons ground cinnamon
1½ teaspoons ground nutmeg
½ teaspoon ground allspice
1 teaspoon ground ginger
1½ teaspoons ground cardamom

Directions:
In a small bowl, mix together spices until well-combined. Store in a small jar or spice container.

Notes:
 * These measurements don't need to be precise. If you prefer more of one spice or less of another, feel free to adjust to your liking.
 * If using freshly grated nutmeg, decrease the amount a bit as it tends to be quite a bit stronger than jarred ground nutmeg.

Source: My Baking Addiction


Monday, October 1, 2012

In Everything... Give Thanks

Happy October, my dear friends! I hope this gorgeous month is off to a sparkly start. :o) Are you surprised to see another card from me so soon? Me too!!! :o)

I simply needed to create this weekend, so I made an Autumn-inspired card to encourage someone to live each day with a thankful heart... ideal for the upcoming Thanksgiving season. Hearts become so much more tender the last few months of the year.

Edit: I made this card mere hours before the sweet and talented Madison of Funky Cards posted the October recipient of the beloved I Feel the Love Project. Each month she highlights a particular person, family, or organization in need of extra love and sunshine. In turn, we have the honor of creating cards to bring smiles to their hearts.

I created this card yesterday out of crafty desire, unsure yet who to bless with my and God's love. I truly believe the intended recipient is at the nursing home receiving this month's collection... Sweet elderly residents of Surrey Place Care Center who deserve an abundance of Thanksgiving cards from us. :o)
The papers for the Art Philosophy card base are Recollections (plaid, shimmery orange) and PaperTrey Ink. I nestled a colorful Autumn scene within the popped-up frame, which is accented with amber rhinestones to give it a golden sunset appearance. Indeed I view these amber stones as harvest sunbeams from above! :o) The pretty leaves are cut from Gyspy Wanderings, which I embossed with the Victoria Cuttlebug folder and trimmed in Gold Stickles. The pinecones are cut from a patterned paper from my stash. The leafy cluster is held together with bows of Vanilla Bean crinkle ribbon and Chocolate Truffle twine, both from My Craft Spot.

The flourish is a Cheery Lynn Designs die, which I continue to be in love with. The sentiment is from my beloved K Andrew Designs Scripture Sayings stamp set, which I stamped with Rich Cocoa Memento onto another PTI leafy paper. The lace is from Wild Orchid Crafts. I do wish I had taken an angled view of this card.. there is so much beautiful shimmer and dimension. Just pretend you can see it. ;) I hope this little card delivers an abundance of love and encouragement to its recipient.

Challenges entered:
 * Crafty Ribbons~ Anything but Square
 * Cupcake Inspirations~ Photo Inspiration
 * Cut It Up~ Fall Photo Inspiration
 * Frosted Designs~ Embossing (leaves are embossed)
 * Little Miss Muffet~ Anything but Square
 * Little Scrap Pieces Fun Friday~ Use Ribbon or Twine
 * Make It Monday~ Anything Goes
 * My Craft Spot~ Falling Leaves
 * Sentimental Sundays~ 3-2-1 Recipe (3 leaves-2 bows-1 flourish)
 * Word Art Wednesday~ Encouragement/Uplifting sentiment

Thank you for fluttering on by! You make my blog sparkle. :o)

Related Posts Plugin for WordPress, Blogger...
Blogging tips