To pin my projects to Pinterest, hover over the picture and a Pin-it Button will magically appear.

Saturday, June 30, 2012

Dreaming of Everything Wonderful for You

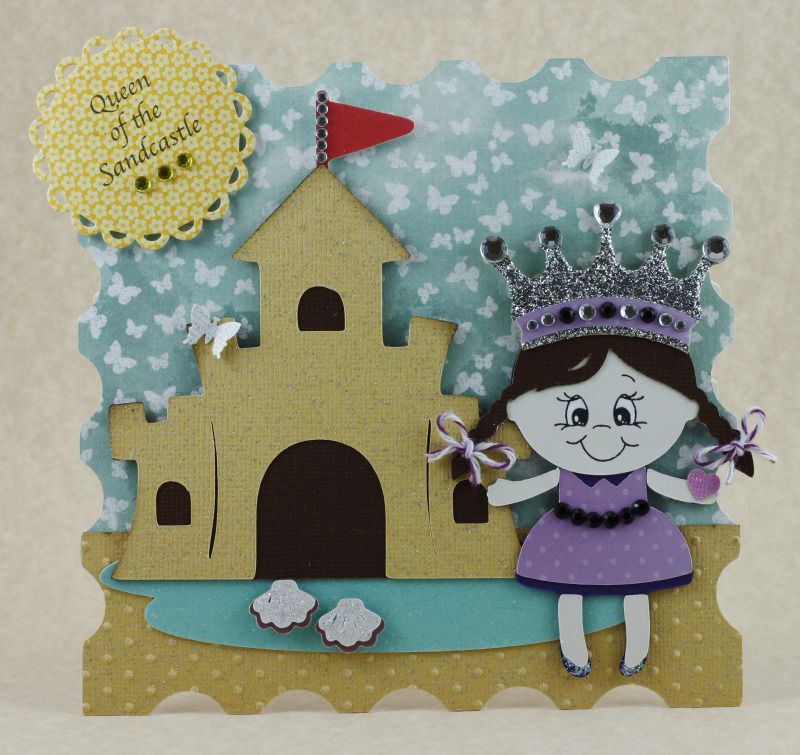
Happy Saturday, my dear friends! I hope you're having a lovely weekend. :o) (Sweet Saturday fans, do not despair! Delightful confections will return next weekend, beginning with a whimsical treat that kids and kids-at-heart will love!)

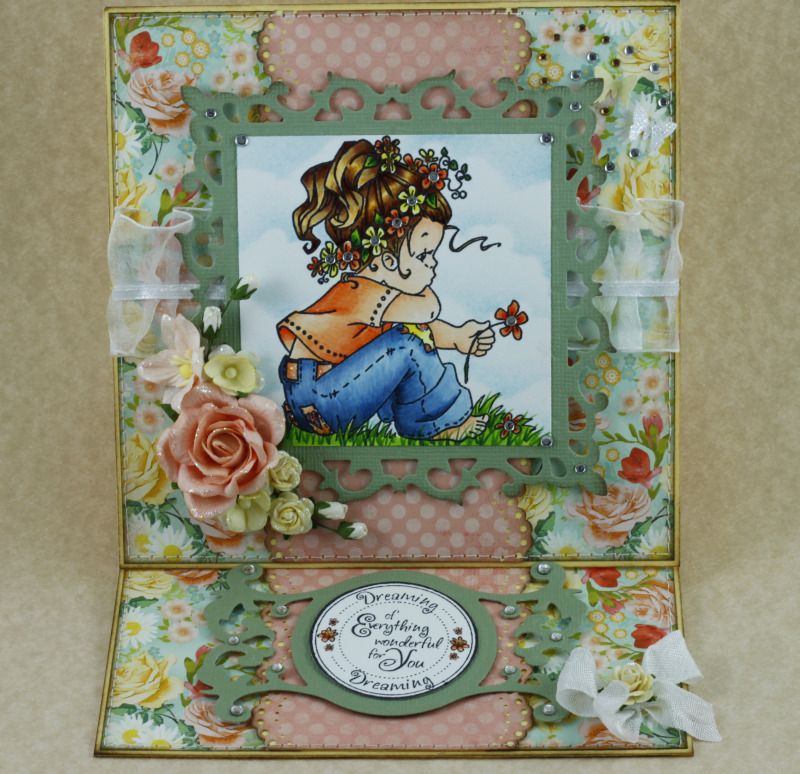
After a bumpy craftless start to the week, I am excited to finally have something to share. I made an easel card to remind a sweet person that beautiful moments are ahead. :o)

"Dreaming of Everything Wonderful for You"
A closer look at the top portion, which may need to be enlarged to see the circular paths of butterflies:
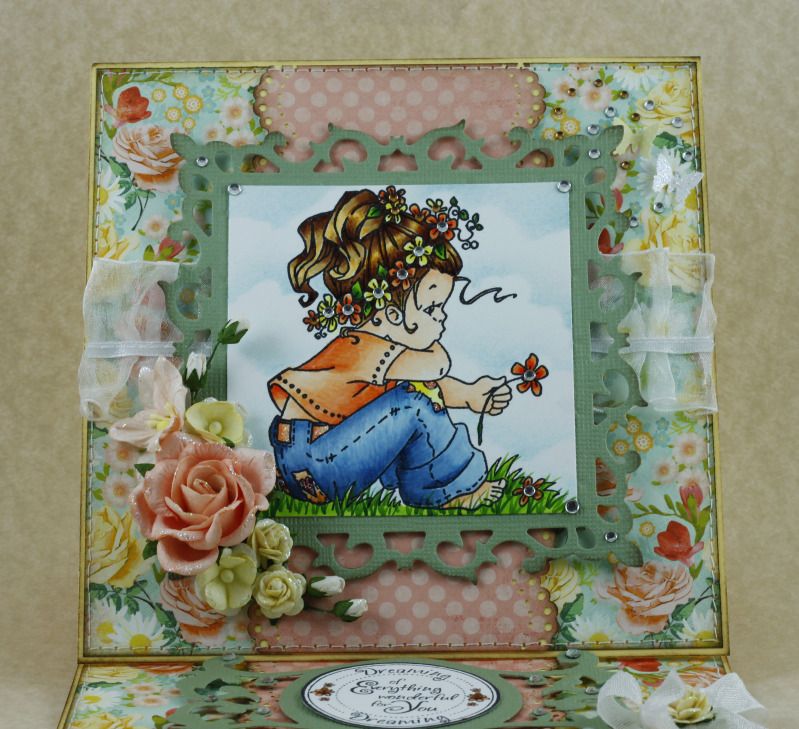
This card design is 100% inspired by the precious stamp. I was thrilled to recently win a couple of Elisabeth Bell stamps from Elphine House Australia's exclusive collection, and I knew this sweetie named Daisy would be my first choice. I've wanted her since I first saw her last summer! :o) I cannot get over how adorable she is, so deep in thoughts or dreams, and with that beautiful wreath of flowers in her hair. I hope the recipient loves her as much as I do.

Daisy is colored with Copics, crystal and amber rhinestones center every flower in her hair and in the image, and I used Broken China distress ink and a cloud template to make her a sky background. Due to returning spinal issues, I've had to alter how I sit while coloring and it is quite an adjustment. :( She is safely nestled within a Spellbinders Fleur de Lis Square, accented with more sparkle. The patterned papers are from the My Mind's Eye Howdy Doody collection, which I love to pair with my stamps. The center panel is edged with my favorite border punch, Martha Stewart Doily Lace, and I backed it with yellow to look like little sunbeams dancing along the card. The papers are inked with Walnut Stain and I used my sewing machine to stitch around the top and bottom.

I arranged some Wild Orchid Crafts flowers for Daisy's garden, selecting a peach trellis rose and lily, light yellow sweetheart blossoms and roses, and a few white rosebuds. All petals are trimmed in Star Dust. The top right corner has a special little feature, only well-visible enlarged. There are two intermingling circular paths of sparkles, one amber and one crystalline, which contain two tiny butterflies dancing a waltz in the background. :o) The front is finished off with some shimmery lightly-pleated ribbon.

The bottom:
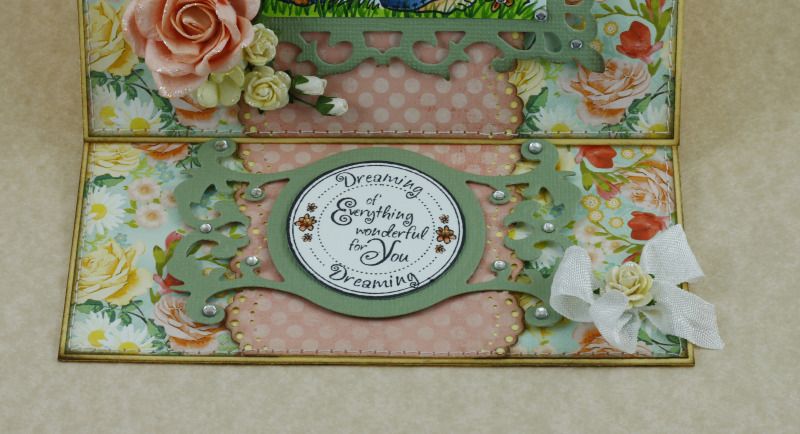
The beautiful sentiment is from Lili of the Valley's Dreamy Days set, which is adhered to a tag from the Spellbinders Fancy Tags 3 set. To match the top of the card, rhinestones are sprinkled throughout and I colored the tiny flowers in the sentiment and centered the bigger ones with amber rhinestones. Using Snow White crinkle ribbon from My Craft Spot, I made simple bow and centered it with a light yellow rose for a burst of sunshine.

Challenges entered:
Charisma Cardz~ Anything Goes
Fab 'n' Funky~ Cute and Girly
Frosted Designs~ Circles
Make It Monday~ Anything Goes
Sentimental Sundays~ Cute and Girly
The Crafty Pad~ More Than One Fold

Thank you for visiting me today! I wish you all a weekend that sparkles with sunbeams and blessings! :o)

Sunday, June 24, 2012

Queen of the Sandcastle

Happy Sunday, my treasured friends! I hope you're all doing well. What a busy bee I was last week... not a single crafty moment until this weekend. Thank you for sticking with me, despite my inability to post as often as most!

**EDIT: God had a different purpose for this card, which explains some things that transpired after I posted it at the end of June. It is now for Olivia, who certainly deserves every burst of sunshine possible. She was the one on my heart without me even knowing it. **

This card serves a very special purpose, which made the creative journey especially sweet. This goes beyond princess... she's going straight to Queen!

"Queen of the Sandcastle"
High on my wish list are the Cricut paper doll cartridges, as I adore them. I recently remembered the Playtime cartridge that came with my Cricut and I was so excited. I had forgotten there were sweet kiddos on there. I chose this one to be our sandcastle sweetheart, gave her a happy Peachy Keen face, dressed her in popsicle purple, and then turned to my sparkles for the rest. Her belt is made of deep purple rhinestones, Star Dust covers her shoes, and I altered the Gypsy Wanderings crown to make room for alternating clear and purple rhinestones. The center top point is a heart stone, which is a bit hard to see in the picture. The crown itself is covered in silver Stickles, while the band holding the sparkles matches her dress. (I would totally give the lovely recipient a crown to match every one of her outfits.) Her braids are adorned with bows of Grape Fizz trendy twine, purchased from My Craft Spot. In her hand is a shimmery heart, because this Queen has a heart of (rose) gold.

The sandcastle and sand base are made with Core Couture cardstock, so they're super sparkly. I embossed the bottom for some textural variation. Every sandcastle needs a sparkling moat and since this is for a sweet child, I topped it with an extra-twinkly seashell path. (Yes, I covered the glitter DCWV paper with Star Dust to make it twinkle more.) The castle's flag is lined with rhinestones, as I want to deliver everything sparkly to this strong child. All cuts in this paragraph are from Create a Critter.

When I think of vacation, I think of whimsical nature... so I used my cherished Magnolia butterfly paper to give her a fluttery backdrop to look at during her difficult days. (One 6x6 sheet of the turquoise butterfly paper remains. Can you feel my fear?) I added a couple of Core Couture white butterflies for dimension, placing one atop the castle.

The computer-generated sentiment is printed on My Mind's Eye paper and cut with a Spellbinders Lacey Circle to somewhat appear as a sun with pretty sunbeams dancing along it. The card base is the stamp from Elegant Edges, chosen to be like a vacation postcard postage. :o) I hope and pray this gives her beautiful heart a smile. I love her to pieces.

Challenges entered:
Celebrate the Occasion~ Welcome Summer
Charisma Cardz~ Summer
Getting Cricky~ Summertime
Krafty Girls~ Fun in the Sun

Thank you for visiting me today! I hope you have a gorgeous rest of the weekend. :o)

Sunday, June 17, 2012

Happy News and Giant Flowers Petal Box

Happy Sunday, my sparkly friends! I hope you're having a sunshiny weekend. :o)

I have exciting news and a petal box to share! I am thrilled to be featured today for the incredible Fantabulous Cricut Challenge Blog's Spotlight Sunday! Not only that, but I'll also be posting a new project tomorrow as a Guest Designer for their next challenge. I confess to happy dancing about these honors. :o) If you want to read a tiny bit about yours truly, pirouette on over to Tammy's spotlight post. :o)

Inspired by a few flowery and girly challenges, I made my mom a petal box this weekend, featuring the rose from the Giant Flowers cartridge. This cart is fantastic. I previously made the lotus (which I loved), but I think I adore this rose even more.
(Do you like this amazing angle I chose to photograph it? I know, I know... but I was mega rushed.)

Over the next few weeks I will be making a set of cards to stash inside the box for her to send friends and family. While she has varying styles, she most often gravitates to feminine flair. The Art Philosophy petal box is made with Echo Park Yours Truly paper, chosen for it's whimsical elegance and gorgeous shade of red. The rose is created with Core'dinations cardstock, as I love my paper flowers to have texture. The edges are trimmed in Star Dust, sporadic petals have dew drops via Glossy Accents, and a sparkling white butterfly was lured for a visit. When assembling the outermost rows of petals, I decided to use a pencil to gently curl the edges instead of folding/creasing them. I like it much better and will go the pencil route for all petals next time.

To make the rose stand out, I opted for the striking red and black combination. I made a narrow band of black cardstock to go around the entire box, adhered a layer of black lace on either side along the top and sides, and formed two rhinestone flourishes. I was tempted to do more in terms of decoration, but refrained since the band will be handled whenever she wants to use or look at one of the cards. I hope she likes it. :o)

Challenges entered:
 * Bitten by the Bug 2~ Rose
 * Craft Your Passion~ Anything Goes
 * Crafty Ann's~ It's a Girl Thing
 * Crafty Calendar~ Flowers in Bloom
 * Simon Says Stamp and Show~ Anything Goes

Thank you for fluttering on by! You give me warm fuzzies. I'll be back tomorrow with my Guest Designer creation, which turned out to be one of my personal favorites. :o)

Key Recipe Components:
 * Cricut cartridges: Art Philosophy, Giant Flowers
 * Paper: Core'dinations, Echo Park
 * Rhinestones: Recollections and Queen & Company
 * Butterfly punch: Fiskars
 * Miscellaneous: Lace (from stash); Stickles

Saturday, June 9, 2012

Sweet Saturday!

Happy Saturday, my sweet friends! I hope you're having a gorgeous weekend. :o)

Thank you for the sweet words on my mom's birthday card! She indeed did love it. For this week's edition of Sweet Saturday, I'm sharing her birthday dessert. :o) Rather than go the extravagant route, we settled upon a surprise cupcake. My mom is a huge chocolate-lover, so I knew it had to be ultra chocolatey. (Color me sparkly!) I made her Triple Chocolate Cupcakes with Milk Chocolate Marshmallow Frosting!
More specifically, a deep chocolate cupcake, filled with dark chocolate ganache, and topped with milk chocolate marshmallow frosting. It proved to be a celebratory-worthy combination. :o) In my rush, I forgot about the decoration on top... I was so disappointed. I'll make up for it next time. :o) I had been wanting to try this frosting recipe and was thrilled with the results! It is from my favorite baker and I have TONS of recipes of hers I am eager to try. Milk chocolate marshmallow frosting is not as overly sweet as you might think. While it is definitely sweet and chocolatey, it's not cloyingly overwhelming by any means. This is taken from a fancy cake that I will one day make, but I couldn't wait any longer to tackle this frosting. In fact, its debut landed it as my second favorite chocolate frosting I've ever made! (Number one will forever be this chocolate frosting.)

The chocolate cake is a family favorite and I was surprised that it wasn't on my blog. Clearly I missed far too many Sweet Saturdays in the last year! It is deep and rich in flavor, bursting with chocolatey goodness. The ganache filling is smooth and creamy. I entertained the idea of making it a semi-sweet ganache, but I think dark was the best option with the sweeter frosting. My family loved these cupcakes and if you decide to try them, I hope you do, too! This makes a HUGE batch, so I sent a dozen with my sweetheart to work. His co-workers demolished them and asked for more the next day. :o) You can never go wrong with a cupcake for a festive event or a mid-workday pick-me-up!

Thank you for visiting me! I'll be back tomorrow with a special card that I'm finishing up today. Yay! :o) Have a beautiful day!

Triple Chocolate Cupcakes with Milk Chocolate Marshmallow Frosting
Yield: about 32 cupcakes

Ingredients:
For the cupcakes:
¾ cup unsweetened Dutch-process cocoa powder
¾ cup hot water
3 cups all-purpose flour
1 teaspoon baking soda
1 teaspoon baking powder
1¼ teaspoons coarse salt
1½ cups (3 sticks) unsalted butter
2¼ cups sugar
4 large eggs, at room temperature
4 teaspoons vanilla extract
1 cup sour cream, at room temperature

For the ganache filling:
8 ounces bittersweet chocolate, finely chopped
1 cup plus 2 tablespoons heavy cream
4 tablespoons unsalted butter, cut into 4 pieces, at room temperature

For the frosting:
12 tablespoons (1.5 sticks) unsalted butter, softened
2⅔ cups powdered sugar
6 ounces milk chocolate, melted and slightly cooled
7 ounces marshmallow cream

Directions:
To make the cupcakes, preheat the oven to 350º F. Line standard cupcake pans with paper liners.

In a small bowl, whisk together the cocoa powder and hot water until smooth. In a medium bowl, whisk together the flour, baking soda, baking powder, and salt; set aside.

In a medium saucepan, combine the butter and the sugar over medium heat. Heat, stirring occasionally to combine, until the butter is melted. Remove the mixture from the heat and transfer to the bowl of an electric mixer fitted with the paddle attachment. Beat on medium-low speed, 4-5 minutes, until the mixture is cooled. Mix in the eggs, one at a time, scraping down the sides of the bowl as needed and beating well after each addition. Mix in the vanilla and then the cocoa mixture, beating until incorporated. With the mixer on low speed, add in the dry ingredients in two batches, alternating with the sour cream, beating just until combined.

Divide the batter between the prepared cupcake liners, filling them about ¾ of the way full. Bake 18-20 minutes or until a toothpick inserted in the center comes out clean, rotating the pans halfway through baking. Allow the cupcakes to cool in the pan 5-10 minutes, then transfer to a wire rack to cool completely.

To make the ganache, place the chopped chocolate in a medium bowl. Heat the cream in a small saucepan and bring to a boil. Once boiling, remove from the heat and pour over the chopped chocolate. Let stand about 1 minute. With a whisk, gently stir the chocolate and cream together in small circles. When the ganache has become smooth, whisk in the butter one piece at a time until incorporated. Transfer the bowl to the freezer or refrigerator to chill and thicken the ganache a bit. Whisk every 5-10 minutes to help it cool evenly. Once the mixture is slightly thickened and no longer runny, you are ready to fill the cupcakes.

To assemble the cupcakes, cut a cone out of each cupcake with a small paring knife. Cut off the pointed end of the cone and discard (or eat) so you are left with a cap of cake to cover the filling. Drop a spoonful of ganache into the center of each cupcake and recover the hole with the cap.

To make the frosting, with a mixer fitted with the whip attachment, beat butter for 3 minutes until fluffy. Reduce the speed to low and add in the powdered sugar, mixing until incorporated. Add the melted chocolate and beat until fluffy. Add the marshmallow cream and beat until frosting has lightened in color and all ingredients are well-combined.

Scrape down the bowl and mix again. Transfer to a piping bag and frost cupcakes as desired.

Sources: Cupcakes and ganache filling: Annie's Eats; Frosting: Sprinkle Bakes

Tuesday, June 5, 2012

Birthday Card :)

Happy Tuesday, my talented friends! I hope everyone is having a beautiful week! :o) Thank you for the birthday wishes for my mom. She had a wonderful celebration yesterday, filled with lots of love and laughter. :o)

The celebrating continues today as we go out to use a gift card she received and I'll finally give her this card! Though the effort was valiant, I couldn't complete it on time. It's always fun getting goodies the day after, right? Hehe.

The creative process began with this precious Elisabeth Bell image, Apple Blossom, and a sketch challenge. I knew this stamp would be used because some of my happiest memories with my mom involve apple orchards/cider mills and being outdoors. Our favorite cider mill always opens on June 1st, so it's a summertime activity as well as autumn. I colored her in deep roses and light browns, with layers of Star Dust on her ruffles, hair ties, and the flowers and butterfly in the image. I used Broken China distress ink and a cloud template to create a sky backdrop. I cut her out with a Spellbinders Labels 4 die, using the out of the box technique that I saw on Bev Rochester's tutorial page. It's so easy that I was disheartened it never occurred to me! ;) Simply use scissors to cut along the part that will go beyond the die, then place that part over the die and run it through the die cutting machine like normal. I was ecstatic because I wanted a smaller rectangular background for her instead of the huge open space on one side due to her hair that is billowing in the wind. :o)

My sweet mom loves elegant patterns like those found on teacups, so I knew I wanted to use a collection of brown and pink papers from the First Edition Isabelle stack. The bottom layer looks like flowers and leaves caught up in a whimsical breeze, while the rest are coordinating patterns that are right up her alley. The diagonal layer is the reverse side of the pink, with the colors alternated. All layers have a deep chocolate brown mat.

The heart tucked in the corner is covered in rhinestones to deliver sparkling love on her special day. :o) The roses and lily are from Wild Orchid Crafts, with each one trimmed in Star Dust. The primary arrangement is nestled atop a double bow made with Snow White crinkle ribbon from My Craft Spot. The itty bitty bouquet on the opposite side has a delicate white butterfly frolicking among the blossoms, which is centered with a rhinestone.

The sentiment is from the Whimsical Designs~ Everyday Sentiments set, which is cut out with a smaller Labels 4 die and secured with a marble pink button and chocolate truffle trendy twine. All layers are inked with Walnut Stain. I hope she loves her birthday card. :o)

Challenges entered (the most ever for me.. I was just so excited to play along!):
 * Charisma Cardz~ Bling
 * Crafty Catz~ Buttons and Bows
 * Elphine House Australia~ Let's Get Sketchy
 * Papertake Weekly Challenge~ Anything Goes
 * Really Reasonable Ribbon~ Flowers and Ribbon
 * Simon Says Stamp~ Anything Goes
 * The Crafty Pad~ Ribbon
 * The Cutie Pie Challenge Blog~ Die Cuts and Punches
 * The Ribbon Girl~ Ribbon or Lace
 * The Shabby Tea Room: Sweet Summertime and photo inspiration

Thank you for fluttering on by! I wish you all a day of sparkling love and dancing sunbeams. :o)

Key Recipe Components:
 * Spellbinders Nestablities/Shapeabilities: Labels 4, Fanciful Holiday (heart)
 * Paper: Core'dinations, First Edition~ Isabelle
 * Rubber stamp: Elisabeth Bell~ Apple Blossom
 * Copics: E0000, E000, E00 (skin); E23, E25, E31, E50 (hair and basket); R81, R83, R85 (clothing and flowers); E40, E42, E43 (clothing and puppy); YG11,  YG17, YG25 (apples); YG17, YG23, G28 (grass)
 * Sentiment stamp: Whimsical Designs~ Everyday Sentiments
 * Flowers: Wild Orchid Crafts
 * Ribbon and Twine: My Craft Spot
 * Button: My Mind's Eye Tres Jolie
 * Miscellaneous: Fiskars butterly punch, iRock, Stickles

Saturday, June 2, 2012

Sweet Saturday!

Happy Saturday, my sweet friends! I hope you're having a lovely weekend. :o) My wonderful mom's birthday is on Monday, so I am finishing up her card and finalizing her birthday dessert plan! (Just wait until you see the frosting. Oh my.)

For today's Sweet Saturday, I'm sharing an amazing recipe that is a guaranteed success for anyone who loves cookies. Many of us have a favorite chocolate chip cookie recipe, but sometimes there just isn't enough time to form all of those dough balls... bar cookies to the rescue! This has already been a repeat dessert in my home, thoroughly enjoyed by all. A new staple: Chocolate Chip Cookie Bars!

Do not let this photograph deter you. In fact, I encourage you to check out my source listed below to see accurate pictures of this. These are thick and chewy, with a plethora of chocolate chips. So many melty chocolate chips. There is essentially an entire layer of chocolate in the middle due to the humongous amount of chips! Delectable. They come together quickly, providing a perfect option for those last-minute desserts. I've made them with semi-sweet chocolate chips and also a combination of semi-sweet and milk chocolate. Both variations are amazing. These will surely be made throughout the summer, upon request and simply because we love them. :o) I highly recommend this recipe, my friends!

Thank you for swinging on by! Have a gorgeous day, filled with sunshine and smiles. :o) (And cookie bars!)

Note: If you're like me and do not have a measuring cup for 1/8th of a cup and also do not like approximating... measuring spoons save the day! 1/8 cup= 2 tablespoons. 

Chocolate Chip Cookie Bars
Yield: 24 cookie bars

Ingredients:
2 1/8 cups all-purpose flour
½ teaspoon salt
½ teaspoon baking soda
12 tablespoons butter, melted and cooled to room temperature
1 cup light brown sugar
½ cup granulated sugar
1 large egg
1 large egg yolk
2 teaspoons vanilla extract
2 cups chocolate chips
Sea salt, for sprinkling over bars (Optional; I do not do this)

Directions:
Preheat oven to 325º F. Spray a 9x13-inch baking dish with nonstick cooking spray and set aside.

In a medium bowl, whisk together flour, salt, and baking soda. Set aside.

In the bowl of a stand mixer fitted with the paddle attachment, mix the melted butter and sugars together on medium-high speed until combined. Add the egg, egg yolk, and vanilla extract and mix until smooth. Reduce the speed to low and slowly add the dry ingredients, mixing just until combined. Stir in the chocolate chips.

Pour cookie dough into the prepared dish, smoothing the top with a spatula. Sprinkle cookie bars very lightly with sea salt, if desired. Bake for 25-30 minutes or until the top of the bars are light golden brown and the edges start to pull away from the dish. Cool bars on a wire rack to room temperature. Cut bars into squares and serve.

Source: Two Peas and Their Pod


Related Posts Plugin for WordPress, Blogger...
Blogging tips