To pin my projects to Pinterest, hover over the picture and a Pin-it Button will magically appear.

Tuesday, November 1, 2011

Scraptastic News and Reminder!

Happy Tuesday, my dear friends! :o)

I am ecstatic because the lovely Cindy of Cindy's Scraptastic Designs has officially opened her store! Her images are so sweet and adorable... it is truly a pleasure every time I use them. In fact, I'm working with some right now as I prepare my project for the celebration blog hop this weekend! :o) That's right, I said 'some'... I was too excited to only use one! :o)


Cindy is generously offering a blog hop grand prize of three Scraptastic Designs digital stamps, along with a set of 12 Prisma Colored Pencils. Fabulous. :o) I hope you'll come hop with us!

Also, her weekly challenge (Scraptastic Mondays) officially begins on November 7th at 10am EST... less than a week away! So much excitement. :o)

Have a gorgeous day, my crafty friends. :o) I'll be back later today with an actual CARD! (It's been far too long!) Keep sparkling. :o)

Photobucket

Saturday, October 29, 2011

Exciting News, Beautiful Autumn, and Sweet Saturday!

Happy Saturday, my super sweet friends! :o)

Despite not having a card to post (what a crazy week!), I do have some fun things to share with you today! :o) It's a smorgasbord post!

First up, I am delighted to tell you that the very talented Melin has invited me to be a part of Paper Crafting World, her digital stamp/cutting file team! I am honored and look forward to creating with her sweet designs! :o) I am currently working on my first project for her Design Team and it will certainly showcase the versatility of her files. Look for that on Tuesday! :o) Also, we will be having a wonderful Thankful Hearts Blog Hop one week from today on Saturday, November 5th! A lovely theme. :o)


Secondly, I have even more fun news! This coming Friday, November 4th, the Design Team for Cindy's Scraptastic Designs will be having a Blog Hop! I am thrilled about this fun event to celebrate Cindy's new journey. :o) Our weekly challenges, Scraptastic Mondays, begin on November 7th! So much excitement!


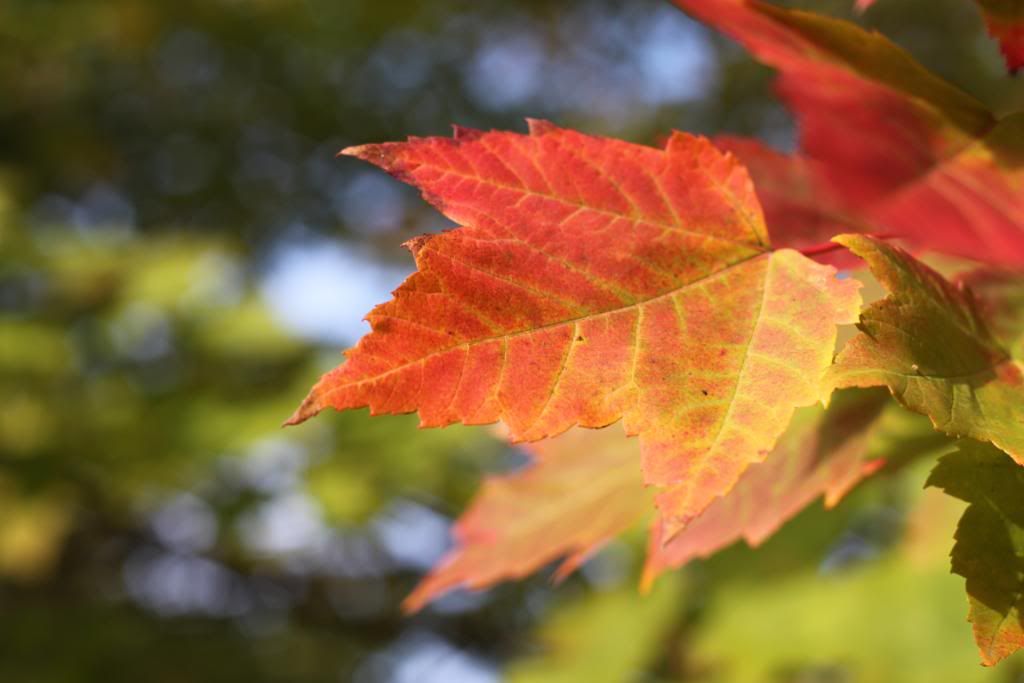
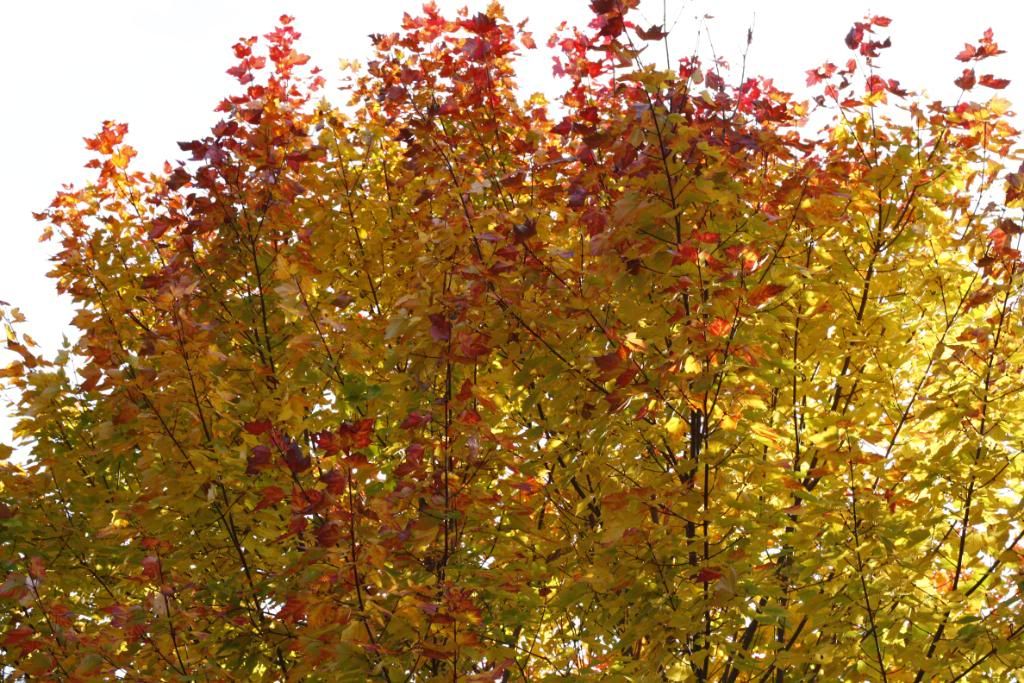
Before I post my sweet recipe, I'd like to share a few pictures. Amazingly, Autumn colors are slipping away and I've yet to get anywhere to take some beautiful landscape pictures. I did manage to get a couple pretty ones from my yard. :o)

(A gift from my boyfriend's friend, taken on Thursday to showcase beauty on an emotional day.)

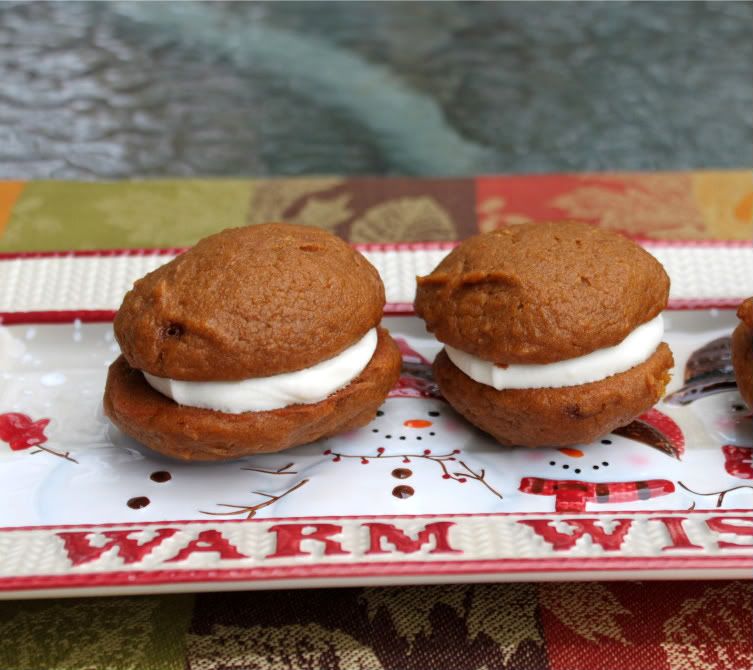
And now... Sweet Saturday! Woohoo! Before I show you the picture, let me just tell you that it *is* possible to make these uniform and structured in appearance by use of a piping bag. But sometimes it's fun to just be willy nilly and higgly piggly. Whatever the haphazard shape, these are bursting with seasonal delight. Plus, they have a fun name! Who can resist Pumpkin Whoopie Pies with Maple Cream Cheese Filling? Not this household, that's for sure.
Oh my. I've been wanting to try whoopie pies (also known as Gobs if you're native to Pittsburgh) for over a year! The combinations are endless. The classic is chocolate with marshmallow filling, but I couldn't pass up a seasonal twist to celebrate the spicy goodness of Autumn. The cookie-cakes are soft, puffy, and encompass all of the flavors you love about the season. This adaptation is paired with a maple cream cheese filling, which a couple of my loved ones questioned... but guess what? Yep, they were devoured and everyone loved it! The flavors team up beautifully. The maple isn't overly strong, so if you want a stronger maple flavor, definitely use some maple extract. Want to completely steer clear of maple? Try these with a ginger filling or even a plain cream cheese filling. Just make these fun and delightful treats! :o)

Note: The yield varies greatly, depending upon the size you make your cookie-cakes. This recipe as made by my source made 4 dozen assembled mini whoopie pies. Me? I made 19. HA! It was unintentional... but no one complained. ;)

Hopefully in the next month I'll have a new blog design... I may need to enlist some professional help, however. Otherwise, it may not get a redesign until 2015. ;) Thank you for dancing on by today! I wish you a sparkling weekend of love and creativity. :o)

Pumpkin Whoopie Pies with Maple Cream Cheese Filling
Yield: Varies upon size

Ingredients:
For the whoopie pies:
3 cups all-purpose flour
2 tablespoons cinnamon
1 teaspoon baking powder
1 teaspoon baking soda
1 teaspoon salt
1 teaspoon ground ginger
½ teaspoon ground nutmeg
1 cup granulated sugar
1 cup dark brown sugar
1 cup canola or vegetable oil
3 cups chilled pumpkin puree
2 eggs
1 teaspoon vanilla extract

For the maple cream cheese filling:
3 cups powdered sugar
8 ounces cream cheese, at room temperature
½ cup unsalted butter, at room temperature
3 tablespoons pure maple syrup
1 teaspoon vanilla extract

Directions:
Preheat oven to 350º F. Line baking sheets with parchment paper or silicone baking mats.

In a large bowl, whisk together the flour, cinnamon, baking powder, baking soda, salt, ginger, and nutmeg. Set aside.

In a separate bowl, whisk together the granulated sugar, dark brown sugar, and oil. Add the pumpkin puree and whisk to combine thoroughly. Add the eggs and vanilla, whisking until combined. Gradually add the flour mixture to the pumpkin mixture and whisk until completely combined.

Use a small cookie scoop or a large spoon to drop rounded, heaping tablespoons of the dough onto the prepared baking sheets, about 1 inch apart. 

Bake for 10 to 12 minutes, making sure that the cookies are just starting to crack on top and a toothpick inserted into the center of a cookie comes out clean. The cookies should be firm when touched. Remove from the oven and let the cookies cool completely on a cooling rack.

To make the filling, beat the butter on medium speed until smooth with no visible lumps, about 3 minutes. Add the cream cheese and beat until smooth and combined, about 2 minutes. Add the powdered sugar a little at a time. Add the maple syrup and vanilla and beat until smooth.

To assemble the whoopie pies: Turn half of the cooled cookies upside down. Pipe or spoon the filling (about a tablespoon) onto that half. Place another cookie, flat side down, on top of the filling. Press down slightly so that the filling spreads to the edges of the cookie. Repeat until all the cookies are used. Put the whoopie pies in the refrigerator for about 30 minutes to firm before serving.


Photobucket

Monday, October 24, 2011

Christmas Blessings Card

Happy Monday, my sweet friends! I hope everyone had a sparkling weekend. :o)

Today I have a Christmas card to share with you! My first one that is actually red and green, which was fun. And the blurry factor in the photograph? Just pretend it's the snow blurring your vision. ;)

"Christmas blessings" (Interior sentiment... with no picture. Grr.)

If only the picture truly captured the inspiration and depth of this card. This is one of the stamps that pushed me to try Copics... I so badly wanted to color her! Our sweet Christmas fairy/angel is battling the winter storm to deliver a very special blessing. It may look a wee bit busy... but that is intentional. Hopefully it does not detract, which I somewhat question now that I'm finished. There is a layer of sheer glitter ribbon beneath the filigree border, which replicates the sparkling path of faith. The filigree border portrays the depth of the Lord's love for us... the sparkly intricacies represent the details of His plans, which we often do not know (if ever) until our blessing has come. The tiny bell attached to the angel's wing is sparkling with silver glitter, as are the tie thingies on her arm and legs. Her wings are trimmed in Stardust and her hair is topped with a bouquet made of Flower Soft. Why so extra lovely? She is delivering a Christmas miracle, so her inner light is sparkling bright with love. The card is softly encircled with red ribbon because we are always safe, guarded, protected, and preserved in the ultimate heavenly embrace of love. :o)

A few technical aspects... for some reason, I decided to try my hand at the beautiful (yet dreaded) hard-to-blend-well Copic reds and making folds in clothing. Why I did this in the same card is beyond me. Both were hard, particularly the folds. I studied pictures and watched videos beforehand, but proper execution clearly needs oodles of practice. But I am on my way (ish)! :o) Her wings are illuminated in red because she's just bursting with love and being propelled by that exquisite faithful love. I used several snowy elements in an attempt to depict a lot of snow in a few different ways. The dots on the sheer red ribbon, the embossing of the pearlescent base, the red and green snowflake paper, the sheer glitter ribbon on the scalloped piece, and of course the Cricut'ed snowflake and tiny smattering of rhinestones. (And of course a dusting of Sparkle Shimmer Spritz.) I wanted it to be a beautiful snowstorm since the purpose is our angel fighting to help us. Plus, even the storms of life behold beauty... we just need to train ourselves to search for it. :o) Our angel is pop-dotted not only for dimension, but also to encourage us to rise above our storms. :o)

Challenges entered:
 * Cooking With Cricut~ Purple and/or Green (with optional sketches)
 * Jingle Belles~ Softly Falling Snow (incorporate a 'soft' element)
 * Love To Crop~ Encircled and Hugged (loving circles)

Thank you for fluttering on over to visit me. :o) I wish you a sparkly beautiful day!

Key Recipe Components:
 * Cricut cartridges: Elegant Edges, Gypsy Wanderings, Storybook
 * Cuttlebug embossing folder: Swiss Dots
 * Paper: Core'dinations, DCWV, SEI
 * Stamp: Wee Stamps (Silver Fairy)
 * Copics: E25, E31, E50 (hair); E0000, E000, E00 (skin); YG11, YG13, YG17 (dress); R29, R27, R24, R22, R20 (wings)
 * Ribbon: Hobby Lobby, Casa Collection Special Occasion (Jo-Anns)
 * Twine: Trendy Twine
 * Miscellaneous: Flower Soft, iRock, Shimmer Spritz, Stickles

Photobucket

Saturday, October 22, 2011

Exciting News and Sweet Saturday!

Happy Saturday, my dear friends! :o) Although I haven't had any crafty time, I do have some exciting news and a tasty (and pretty!) treat to share! :o)

I am SO honored that my friend Cindy from Cindy's Scraptastic Designs has invited me to join her new Design Team! This is truly a privilege... she is such a sweetheart and so talented, as many of you know. I am ecstatic to share in this new journey with her. She is going to be FABULOUS and I couldn't be more proud of her. The fun begins soon! :o) I've used two of her adorable images so far (HERE and HERE)... and I am bursting to use more! :o)

We should celebrate with a treat! :o) I was feeling fruity... and ice creamy. At long last, fresh cranberries arrived in my local grocery store this week. Perfect timing since I didn't have a long baking window. I've seriously waited all year for their return, just for this one recipe. It's gorgeous, delicious, and versatile... it is the BEST Cinnamon Apple Cranberry Sauce I have ever made or enjoyed.

(Over vanilla ice cream)
(Such a gorgeous color!)

And you know what else? It is easy peasy to make. I first made this last year for Thanksgiving.. and it immediately was demanded for Christmas. And several evenings in between those two holidays. The apples add another layer of seasonal flavor, plus delicious texture. The cinnamon is a perfect accent. While the cranberries are clearly the star, the cinnamon and apple additions make it a harmonious blend of sweet and tart. For the first time EVER, the cranberry sauce quickly disappeared at Thanksgiving. My mom has a passionate distaste for cranberry sauce... yet she gobbled this right up. It is magical.

The beauty in this recipe (aside from the taste I craved all year) is its versatility. For the holiday meals I enjoyed it on its own, while the meat-lovers in my family topped their (gasp) meat with it. But it goes well beyond that! This is AMAZING on top of ice cream, which is what I did last night (and this morning). It also serves as a great topping for French toast, waffles, crepes, etc. Plus, the incredible scent lingers for hours in the kitchen... don't you just love that? I love this recipe and hope you will give it a whirl, too! :o)

A couple of notes:
 * The longer this sits, the better it tastes! If possible, I recommend making this the day before serving. It is delicious as soon as it sets, but if you give the flavors time to meld, the taste deepens so beautifully. (This proves especially helpful during the busy holidays, anyway!)
 * Some reviewers of this recipe used Cranberry Juice Cocktail.. this is not the same thing! Use 100% Cranberry Juice if you can. Otherwise, alter the recipe to accommodate the added sugar in the cocktail.
 * This makes a medium-bowl portion. If you know you'll need a fairly large amount, be sure to double it.

Thank you for swinging by today! I'm happy to say I have some crafty time available this weekend, so hopefully I'll be back in a day or two with a card. I feel so rusty after so many days away. Have a beautiful weekend, my super sweet friends. :o)

Cinnamon Apple Cranberry Sauce

Ingredients:
2 cups cranberry juice
1 cup fresh or frozen cranberries
1 cinnamon stick, broken in half (OR ½ teaspoon ground cinnamon)
1 cup sugar
2 Gala apples, peeled, cored, and diced
2 teaspoons corn starch

Directions:
In a medium saucepan over medium heat, add the cranberry juice, cranberries, cinnamon, and sugar. Bring to a boil and let cook for 5 minutes. Add the apples and cook, stirring occasionally, until the cranberries have softened and apples are tender, about 5 minutes.

Remove 8 ounces of the liquid to a small bowl and whisk in the cornstarch. Slowly add the cornstarch-juice mixture (slurry) to the cranberry mixture, stirring constantly. Cook for an additional 5 minutes.

Remove from heat and pour into a serving bowl. Refrigerate until thickened, at least 30 minutes (but preferably longer). Remove the cinnamon sticks and serve.

Source: Slightly adapted from Food Network

Photobucket

Wednesday, October 19, 2011

Whimsical Wednesday Challenge: Autumn and Halloween Have Crept Into Our Homes!

Hello, my sweet friends! I hope your day is off to a wonderful start. :o)

It's another Whimsical Wednesday! The challenge this week is all about seasonal home decor, whether celebrating Autumn or Halloween. I'd love to see your projects, so I hope you'll join us! :o)

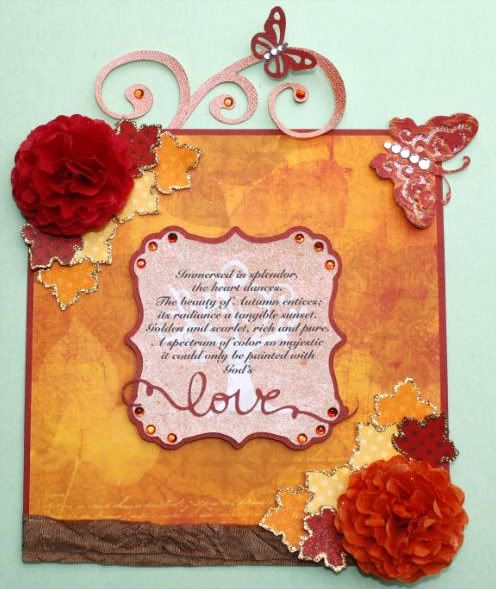
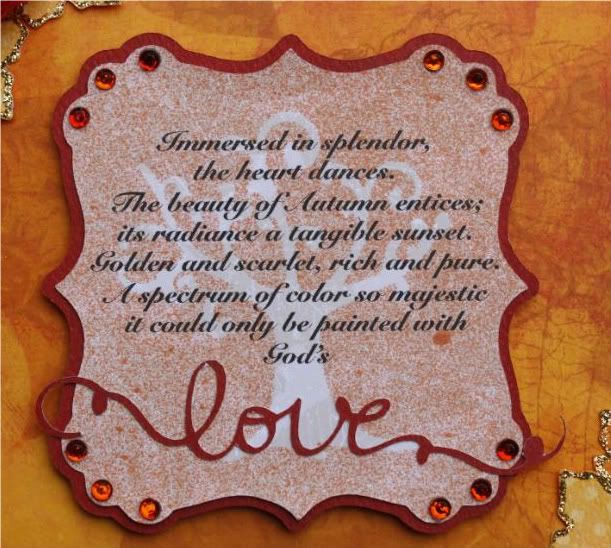
I chose to write a passage and create a wall hanging showcasing it. With the proper backing added, it can also be set upon an armoire or table, whichever the recipient desires. :o) (No need to squint... I'll type the text below the images!) If you understandably skip through my jibber-jabber, don't miss the end of this post because there's a second project! :o)
Text:
Immersed in splendor,
the heart dances.
The beauty of Autumn entices;
its radiance a tangible sunset.
Golden and scarlet, rich and pure.
A spectrum of color so majestic
it could only be painted with God's love.

I wrote the itty bitty passage after enjoying and reflecting upon beautiful fall foliage near my home. Something so exquisite can only come from a divine touch, which I tried to capture in the writing. With that as my base, I wanted to keep the surrounding design simple, yet beautiful... I wanted to enhance the showcased writing as opposed to detracting from it. (You guys know I can go a little nutty with adding stuff to my creations!) The background script in the paper makes me think of Autumn memories being written on your heart as they occur. This simple design had room for a few special elements, though.

First is the passage itself. I used my new Wall Decor and More cartridge, which I am in love with. When I saw the scrolly 'love' penned so gorgeously, I knew that would be my ending. It's such a simple touch, but I love the impact of that fabulous word standing out. :o) I still felt it needed something to really embrace Autumn and the Lord's work, so I cut out the swirly tree from the same cart to use as a mask. After carefully adhering it atop the passage using ridiculously teeny tiny pieces of double-sided tape, I went crazy with Tiger Lily Glimmer Mist. Oh the relief upon removing it without tearing the writing! :o) Pure at its core, then bursting with seasonal regal tones. It's super shimmery, too.

Secondly, I made the flowers I've been longing to try! My lovely and talented friend Sherrie at Sherrie Scraps with Passion created a tutorial last month, teaching us how to make gorgeous flowers out of coffee filters and Glimmer Mist. (Thank you, Sherrie!) They are fun, easy, and beautiful. I somehow managed to get pictures that eliminated nearly all of the pretty sparkle... rest assured, these could not possibly get any sparklier. Glimmer Mist is amazing and I am SO excited to finally have some. The colors I used for my flowers are Candy Apple Red and Tiger Lily. Sherrie's pictures accurately portray these beauties, unlike yours truly's. (I think I need to take a day to practice photographing projects. Seriously.)
Tutorial: Coffee Filter Flowers

As far as the rest of the design, I wanted the focus to remain on nature's beauty. I trimmed the polka-dot leaves in gold, reflecting the sparkling warmth of nature. I partially (but securely) adhered them, leaving them nearly pop-dotted for a dimensional element. The flourish represents an Autumn breeze, beginning from behind and swirling up and over the top.. carrying and guiding the butterfly. Now closer to the message, the larger butterfly has developed its intricate beauty, sparkling from within with the light of the Lord. :o) The flourish is also sprayed with Tiger Lily Glimmer Mist. (I couldn't put it down!) Lastly, I added some pretty crinkle ribbon in earthy brown from Prairie Bird Boutique. I hope this fun little project makes your heart all warm and fuzzy, like it does mine. I think I need to make one for myself! :o)

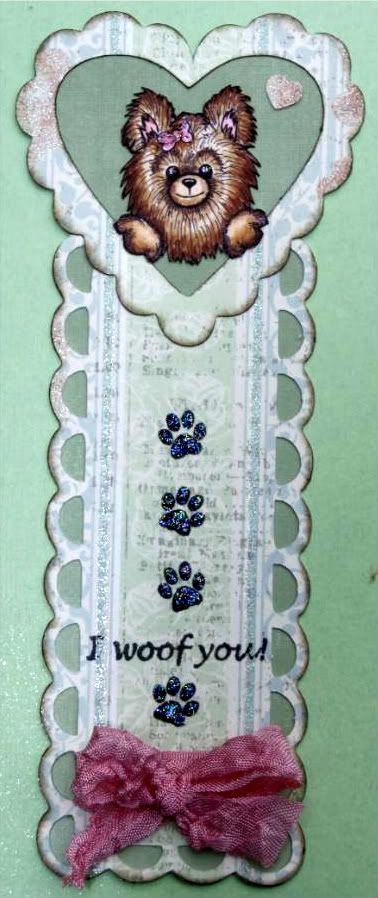
I'm super excited because we are also showcasing Mr. Cricut Crazy stamps, created by the amazing Tanner! He is one sweet and talented crafter and I am so honored to be using one of his stamps. He is a delight! I made a bookmark for my mom, using my Copics to color a fabulous digi stamp created by my friend and Design Team sister Cindy of Cindy's Little Creations.

I'm happy to say my mom loves it! I welded two borders from Elegant Edges for the bookmark and used paper that is naturally vintagey/distressed to replicate the look of a worn out, well-read book. As an added bonus, it even has areas of faint writing and sparkly elements. :o) I lined up the heart with the bookmark so the paper seamlessly flows, despite the multiple parts. She loves animals, so combining puppy elements from Tanner and Cindy was ideal! I stamped (and sparklified) paw prints because they're always traipsing across her books (and newspapers) as she's trying to read. See how the sentiment is in between two of them? It's like when you're in the middle of something, then all of a sudden you simply *need* to tell your sweetheart, parent, friend, etc. that you love them... and then you carry on with your activity. :o) The focal element is that sweet puppy Cindy designed, nestling in the ruffled heart, practically bursting out of it just like furry friends make our hearts overflow with joy. :o) She was fun to color. I added two specks of Stardust to her eyes to make them twinkly and used Cotton Candy Stickles for her sweet bow. Even though it'll be smooshed, I couldn't resist adding some crinkle ribbon. At least it's supposed to be crinkled, right?

I hope you'll play along with us this week and link up your wonderful creations to the Whimsical Wednesday Weekly Challenge post! Our two fabulous sponsors this week have provided prizes for two lucky winners who participate:

1. Prairie Bird Boutique~ One random winner will receive their choice of one beautiful bundle of shabby crinkle ribbon. Thank you, Patsy!
2. Mr. Cricut Crazy~ One random winner will receive their choice of one stamp set. Thank you, Tanner!

Be sure to flutter on over to the rest of the Design Team's blogs to see their marvelous projects. :o) I'm so happy you stopped by today. :o) Love and blessings to all!

Key Recipe Components (home decor item):
 * Cricut Cartridges: Cindy Loo, Elegant Edges, Gypsy Wanderings, Wall Decor and More
 * Sentiment: Written by me
 * Paper: Bo Bunny, Papertrey Ink
 * Ribbon: Prairie Bird Boutique
 * Small Butterfly: Martha Stewart Small Monarch punch
 * Miscellaneous: Glimmer Mist, iRock, Stickles

Key Recipe Components (bookmark):
 * Cricut Cartridge: Elegant Edges, Gypsy Wanderings
 * Paper: DCWV
 * Stamps: Puppy~ Sweet Heart Puppy from Cindy's Little Creations; Sentiment~ Mr. Cricut Crazy; Paw prints: My Pink Stamper (Even More Punny-licious)
 * Copics: E25, E31, E50 (fur); R10, RV20 (ears, bow)
 * Ribbon: Prairie Bird Boutique
 * Miscellaneous: Stickles

Photobucket

Saturday, October 15, 2011

I Feel the Love Birthday Card and Sweet Saturday!

Happy Saturday, my sweet friends! I hope your weekend is joyous and sparkly. :o)

I have a couple of special treats to share with you today! I'm excited to share some love via the incredible I Feel the Love project, created by the sweet and talented Madison at Funky Cards. Every month she shares the story of a person or family in need of some extra love and blessings... and we all have the marvelous opportunity to participate by making cards to bring them a smile. :o) I can't think of a better reason to craft. This month we're celebrating Ethan's 2nd birthday! He was diagnosed with a rare liver disease when he was 2 months old and has since had a liver transplant and gone through far more than I can even imagine. Thankfully he is on his way to the childhood he deserves... and it's truly a blessing to be able to share in his birthday celebration in this small way. :o) I hope you'll join us!

"TONS of birthday love rolling your way!"

Admittedly, I had a terrible time photographing this due to overcast skies and a fierce wind. All that aside, this is the fun birthday card I made for Ethan! His name is spelled out on peanuts, which are dancing and hopping down the twine tightrope. I used a waffle-design paper to mimic a peanut shell. Our sweet elephant is anxious to celebrate with Ethan, so he's rolling along on a sparkly ball to pick up the pace. He's ready for the festivities, with two cupcakes in honor of his second birthday and a few ultra-glittery balloons. The balloons are coated with Glossy Accents for a hard, shiny epoxy finish. I used three shades of twine to coordinate with the balloons and added some to his cute little tail. You know why the heart balloon is first, right? Because this card, like his recovery, is guided by love. I used Sunshiney font for the sentiment because it just seemed appropriate for him. :o) For added texture, I embossed the main mat, both frostings, and the dark part of the elephant's ears. I hope this brings a smile to Ethan and all of his wonderful loved ones. :o)

Challenge entered:
 * Cooking With Cricut~ Incorporate a cake, cupcake, or teddy bear!

Today isn't a regular Sweet Saturday. Rather, it is a Special Edition. You know what's hard? When bloggy friends are hurting. Such is the case right now for some very kind crafters. One of them has become so special to me and our wonderful friendship has turned into something spectacular. Knowing she is heartbroken, so far away, leaves me feeling beyond helpless. Prayers transcend boundaries, but we naturally like to DO something for our loved ones when they're going through tough times. She is a huge fan of Sweet Saturday, so I scrapped my original plan yesterday and raced to the grocery store to get ingredients to make her a special dessert. Although I can't deliver them to her in person with a hug since she is 1,858 miles away... I still made them for her as a small gesture to remind her she is in my heart. This Sweet Saturday is for her.

When a friend is hurting, sometimes you just can't decide what heart-soothing treat to bake. Cake? Cupcakes? Cookies? When everything seems right and you just can't decide which is BEST... this fantastic cupcake is the answer. For you, my sweet friend: Chocolate Chip Cookie Dough Cupcakes!

A brown sugar-chocolate chip cupcake, filled with a chunk of eggless cookie dough, and topped with cookie dough buttercream. Do I really need to tell you how amazing these taste? They are magical and are pretty much the dessert equivalent of a hug. Due to time constraints, I wasn't able to decorate the top with a teeny tiny version of my favorite chocolate chip cookies. That is such a sweet addition, so I'm disappointed I couldn't include them. They're still jam-packed with love, though. :o) Even if you make them without the filling, they are STILL beyond words. (And no, I will never try to figure out just how bad these are for you. Moderation and exercise make it okay.) ;) Every single person who I have made these for has fallen in love with them.

These are a special treat and if you're a cookie dough lover, you absolutely must try them! The frosting... oh my. The frosting. I told you a few months ago that I'm not a fan of buttercream frostings. This is the exception. It tastes exactly like cookie dough! It's so marvelous that I refrigerated the extra and will find some use for it. A mini cake? More cupcakes? Breakfast?

Note: This is a bit time consuming, but it is all easy and very enjoyable. This is a great recipe to bake over two days, if possible. Should it be a last minute decision, it's still worth the extended time in the kitchen... I do hope you'll give these a whirl. The recipe as written makes a ton, so you'll have lots to share! :o)

Note Two: This frosting is *supposed* to be a tad bit granular, so do not be alarmed. It's not grainy like the brown sugar wasn't fully incorporated... just a little granular, mimicking cookie dough.

Thank you for visiting me today! I wish you the sparkliest of weekends. :o)

Chocolate Chip Cookie Dough Cupcakes
Yield: 24-30 cupcakes

Ingredients:
For the cupcakes:
3 sticks unsalted butter, at room temperature
1½ cups light brown sugar, packed
4 large eggs
2⅔ cups all-purpose flour
1 teaspoon baking powder
1 teaspoon baking soda
¼ teaspoon salt
1 cup milk
2 teaspoons vanilla extract
1 cup chocolate chips (semisweet or bittersweet)

For the filling:
4 tablespoons unsalted butter, at room temperature
6 tablespoons light brown sugar, packed
1 cup plus 2 tablespoons all-purpose flour
7 ounces sweetened condensed milk
½ teaspoon vanilla extract
¼ cup mini semisweet chocolate chips

For the frosting:
3 sticks unsalted butter, at room temperature
¾ cup light brown sugar, packed
3½ cups confectioners' sugar
1 cup all-purpose flour
¾ teaspoon salt
3 tablespoons milk
2½ teaspoons vanilla extract

For decoration:
Tiny chocolate chip cookies
Mini chocolate chips

Directions:
To make the cupcakes, preheat the oven to 350º F. Line two cupcake pans with paper liners (24 total).

Combine the flour, baking powder, baking soda, and salt in a medium bowl. Whisk together to blend. Set aside.

In the bowl of a stand mixer fitted with the paddle attachment, combine the butter and brown sugar. Beat together on medium-high speed until light and fluffy, about 3 minutes. Mix in the eggs one at a time, beating well after each addition and scraping down the sides of the bowl as needed.

Add the dry ingredients to the mixer bowl on low speed, alternating with the milk, beginning and ending with the dry ingredients. Mix each addition just until incorporated. Blend in the vanilla. Fold in the chocolate chips with a spatula.

Divide the batter evenly between the prepared cupcake liners. Bake for 18-20 minutes, until a toothpick inserted in the center comes out clean. Allow to cool in the pan 5-10 minutes, then transfer to a wire rack to cool completely.

To make the cookie dough filling, combine the butter and sugar in a mixing bowl and cream on medium-high speed until light and fluffy, about 2 minutes. Beat in the flour, sweetened condensed milk, and vanilla until incorporated and smooth. Stir in the chocolate chips. Cover with plastic wrap and refrigerate until the mixture has firmed up a bit, approximately an hour.

To fill the cupcakes, cut a cone-shaped portion out of the center of each cupcake. Fill each hole with a chunk of the chilled cookie dough mixture. Cover with the very top of the cut-out cones, if desired.

To make the frosting, beat together the butter and brown sugar in the bowl of a stand mixer fitted with the paddle attachment until creamy. Mix in the confectioners' sugar until smooth. Beat in the flour and salt. Mix in the milk and vanilla extract until smooth and well blended.

Frost the filled cupcakes as desired, sprinkling with mini chocolate chips and topping with mini chocolate chip cookies for decoration.

Source: Annie's Eats
***

Key Recipe Components (for card):
 * Cricut cartridges: Create a Critter, Elegant, Edges, Simply Charmed
 * Cuttlebug embossing folders: D'vine Swirls, Polka Dots, Swiss Dots
 * Spellbinders Nestabilities: Labels Four
 * Paper: Core'dinations, DCWV, Papertrey Ink
 * Twine: Sew Easy (blue lagoon, limeade, lollipop)
 * Ribbon: Target dollar bin
 * Miscellaneous: Glossy Accents, Martha Stewart glitter, Stickles


Photobucket

Wednesday, October 12, 2011

Blog Hop Winner and A Berry Pink Christmas card!

Happy Wednesday, my dear friends! I hope your week has been fabulous. :o)

I have a very special card to share with you today, but before that I want to thank you all for the incredible comments on my carousel. It made me happier than a Christmas twinkle light! I'm so thankful you all played along with us over the weekend. :o) Welcome to my new fantastic friends... I can't believe I surpassed 100! Woohoo! :o)

Now for the blog candy winner! I wish I could give you all something, but the sole lucky winner is comment #36: Debeez-Designs. Congratulations! :o) Email me when you have a moment so we can set up your prize. :o) (Contact information is under the Contact Me tab!) You have two weeks to claim your prize (October 26th)!

This card was not only a heap of fun to make, but it also serves a very special purpose. The marvelous ladies at Jingle Belles are making a donation to Susan G. Komen for the Cure for each pink Christmas card submitted in their challenge this week. How fabulous is that? I am thrilled to participate. With that incredible cause and a few challenges in mind, I created a mini crystalline winter wonderland. :o) It's my first shadowbox card, which also doubles as a wall hanging thanks to a chipboard backing and the metal thingamabopperjigs that are on frames. :o)

"Wishing you a berry pink Christmas"

(I didn't get a picture of the interior, which is a gorgeous light pink brocade. A tiny piece of velcro is all that's needed to enable this to be a card *and* a wall decor item. I'm sure there are oodles of other options aside from velcro to keep it securely closed when hung, too.)

The instant I saw the Jingle Belles challenge, I knew there would be a pink strawberry so I could be all punny. Instead of making it literally fruity, I printed an online coloring book picture of Strawberry Shortcake, cut out her super cute strawberry hat, and plopped it on this adorable Copic-colored stamp. I couldn't make it a regular strawberry hat though (if there is such a thing)... I had to make it sugared. So I gave her a sugared berry festive hat via gallons of glitter glue in varying colors. Her scarf and gloves are coated in a green iridescent glitter glue, while her boots are covered in Cotton Candy Stickles. The 'berry pink' part of the sentiment is a mix of pink and black... I promise it looks spiffy in person.

The idea for her winter wonderland began with using pom poms as snow. (Yes, pom poms again already!) The benefit of a shadowbox is that instead of simply using white pom pom ribbon as a little trim as I had first planned, I was able to pile up 'snowballs' on the ledge with larger poms! So fun. Our pink sweetheart is pop-dotted against a massive snowflake and sitting in the snow. I wanted to make some outdoor Christmas trees for the scene, so I used one of my favorite jolly papers since the colored dots could serve as ornaments... but then I decided each tree needed rhinestones, anyway. The trees are pop-dotted atop snowflake-embossed pearlescent cardstock. Then my iRock nearly exploded when I decided to make the entire shadowbox sparkly. It's a special card for the Cure and deserved to be as crystalline as possible. Sparkling snowflakes in abundance! To complete the card, I spritzed it a few times with Sparkle Shimmer Spritz.

One more important aspect to this project. See those two tiny hearts? One of the challenges I made this for requires at least one heart. Originally I assumed I would have a plethora of hearts. You guys know I'm sappy. But then as I settled into making my project, I reflected and thought about the meaning of Think Pink... and subsequently scaled down their visual impact, but gave them the most important purpose. The trees are topped with hearts because love is the true sparkle of Christmas. And the hearts are small because all it takes is one tiny touch of love to transform a life. One divine touch. One heartfelt gesture to a woman engaged in battle. One faithful prayer to break strongholds and open the door for a miracle. Love never fails.

Challenges entered:
 * A Gem of a Challenge~ "With love at Christmas" (Christmas card with at least one heart)
 * Fantabulous Cricut~ Wall decor
 * Jingle Belles~ Pink!
 * Love To Crop~ Embossing
 * LUFP~ Pink!
 * My Sheri Crafts~ Think Pink!

Thank you for visiting me today! I wish you all a berry pink week. :o)

Key Recipe Components:
 * Cricut cartridges: Create a Critter, Gypsy Wanderings
 * Cuttlebug embossing folder: Winter Wonderland pack
 * Spellbinders Nestabilities: Labels Four
 * Stamp: Warm in the Winter (The Paper Shelter)
 * Copics: E25, E31, E50 (hair); E00, E000, E0000 (skin); RV10, RV13, RV14, YG11, YG13, YG17 (coat, hat, gloves); Y11, Y13 (belt); B00, B02 (pants); C3 (kitty)
 * Paper: Core'dinations, Heidi Grace, K & Company
 * Ribbon: Hobby Lobby
 * Miscellaneous: Creatology pom poms, Dew Drop Brilliance ink, iRock, Shimmer Spritz, Stickles

Photobucket
Related Posts Plugin for WordPress, Blogger...
Blogging tips